1. Introduction
This manual provides detailed instructions for the installation, operation, and maintenance of your Rockville RV6.3A Car Speaker, RXA-F1 Amplifier, and RWK42 Wiring Kit bundle. Please read this manual thoroughly before attempting installation or operation to ensure proper function and safety.

Figure 1.1: Overview of the Rockville RV6.3A Speakers, RXA-F1 Amplifier, and RWK42 Wiring Kit bundle components.
2. Safety Precautions
Always observe the following safety guidelines during installation and operation:
- Disconnect the vehicle's negative battery terminal before starting any electrical work.
- Ensure all wiring connections are secure and properly insulated to prevent short circuits.
- Mount components securely to prevent them from becoming projectiles in case of sudden stops or accidents.
- Avoid routing power cables near sharp edges or moving parts.
- Do not operate the amplifier in excessively wet or dusty environments.
- Consult a professional car audio installer if you are unsure about any part of the installation process.
3. Setup and Installation
3.1. Unpacking and Inspection
Carefully unpack all components and inspect them for any signs of damage. Ensure all items listed in the package contents are present.
3.2. Speaker Installation (RV6.3A)
The RV6.3A speakers are designed for 6.5-inch openings. Ensure the mounting depth of 2.12 inches is compatible with your vehicle's speaker locations.
- Remove existing speakers from the desired mounting location.
- Connect the speaker wires to the RV6.3A speaker terminals. Ensure correct polarity (positive to positive, negative to negative).
- Mount the speakers securely using the provided hardware. The grilles can be installed for protection.

Figure 3.1: Front and rear views of the Rockville RV6.3A 6.5-inch 3-Way Car Speakers, showing the woofer, tweeter, and terminal connections.
3.3. Amplifier Installation (RXA-F1)
Select a suitable mounting location for the RXA-F1 amplifier, ensuring adequate ventilation and protection from moisture. Common locations include under a seat or in the trunk.
- Securely mount the amplifier to a solid surface.
- Power Wiring (RWK42 Kit):
- Connect the 4-gauge power cable from the RWK42 kit to the amplifier's +12V terminal. Route this cable directly to the vehicle's positive battery terminal, installing the AGU fuse holder within 18 inches of the battery.
- Connect the 4-gauge ground cable from the RWK42 kit to the amplifier's GND terminal. Securely attach the other end to a clean, unpainted metal surface on the vehicle chassis.
- Connect the remote turn-on wire from your head unit to the amplifier's REM terminal.
- Speaker Wiring: Connect the RV6.3A speakers to the amplifier's speaker output terminals. The RXA-F1 supports 4-ohm stereo or 4-ohm bridged configurations. Refer to the amplifier's terminal block for channel assignments.
- Signal Input: Connect your head unit's RCA outputs to the amplifier's RCA input jacks (CH1/CH2 and CH3/CH4). If your head unit lacks RCA outputs, use the high-level input with the provided harness.

Figure 3.2: Top view of the Rockville RXA-F1 4-Channel Car Amplifier.
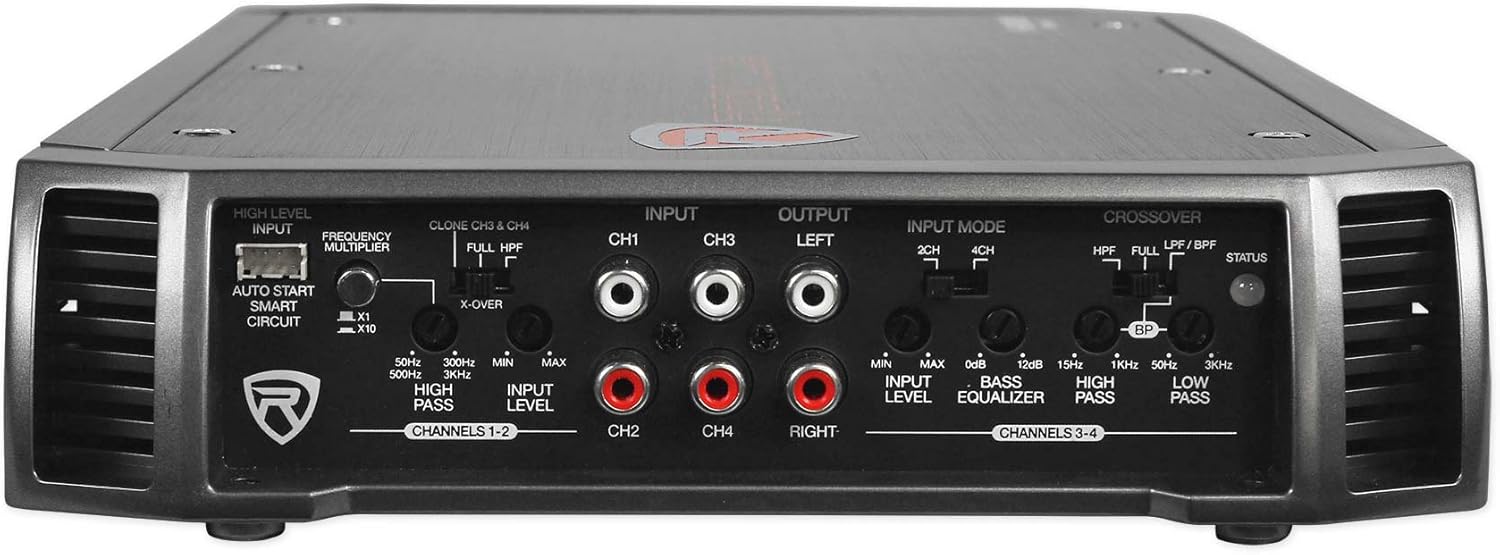
Figure 3.3: Input and control panel of the Rockville RXA-F1 Amplifier, showing RCA inputs, gain controls, and crossover settings.

Figure 3.4: Power and speaker terminal connections on the Rockville RXA-F1 Amplifier.
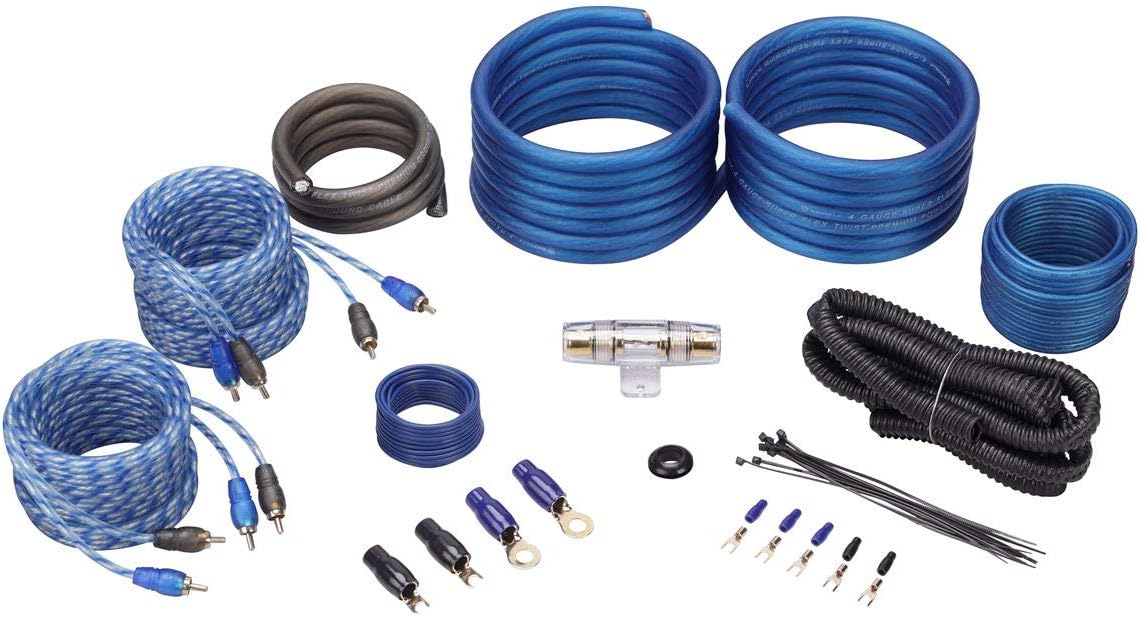
Figure 3.5: Components of the Rockville RWK42 4 Gauge Amp Wiring Installation Kit, including power/ground cables, RCA cables, and fuse holder.
4. Operating Instructions
4.1. Initial Power-Up
After completing all connections, reconnect the vehicle's negative battery terminal. Turn on your head unit. The amplifier should power on, indicated by its status LED.
4.2. Amplifier Settings (RXA-F1)
- Input Level (Gain): Adjust the input level controls (CH1/CH2 and CH3/CH4) to match the output voltage of your head unit. Start with the gain at minimum and slowly increase until the sound is clear and loud without distortion.
- Crossover Settings:
- HPF (High Pass Filter): Use for full-range speakers like the RV6.3A to filter out low bass frequencies that speakers cannot reproduce efficiently. A common setting for 6.5-inch speakers is around 80-100Hz.
- LPF (Low Pass Filter): Used for subwoofers. Not typically used for the RV6.3A speakers.
- BPF (Band Pass Filter): Allows a specific range of frequencies to pass.
- Bass EQ: The RXA-F1 features a 12 dB bass EQ. Use this sparingly to enhance bass, avoiding excessive boost that can lead to distortion or speaker damage.
- Input Mode: Select between 2-CH and 4-CH input mode depending on how many RCA pairs are connected from your head unit.
4.3. Speaker Performance (RV6.3A)
The RV6.3A speakers are designed for clear mid-range and smooth high-frequency reproduction. Proper amplifier settings will optimize their performance. Avoid overdriving the speakers with excessive volume or bass boost, which can cause distortion and damage.
5. Maintenance
Regular maintenance ensures the longevity and optimal performance of your car audio system.
- Cleaning: Use a soft, dry cloth to clean the amplifier and speaker grilles. Avoid harsh chemicals or abrasive cleaners.
- Connections: Periodically check all wiring connections for tightness and corrosion. Loose connections can lead to poor performance or damage.
- Ventilation: Ensure the amplifier's cooling fins are free from obstructions to prevent overheating.
6. Troubleshooting
If you experience issues with your system, refer to the following common problems and solutions:
| Problem | Possible Cause | Solution |
|---|---|---|
| No sound from speakers | No power to amplifier; loose speaker wires; incorrect input mode; head unit off/muted. | Check power, ground, and remote connections. Verify fuse. Check speaker wire connections. Ensure head unit is on and not muted. Adjust input mode on amplifier. |
| Distorted sound | Gain set too high; incorrect crossover settings; damaged speaker; poor ground connection. | Reduce amplifier gain. Adjust crossover settings. Inspect speakers for damage. Check ground connection for amplifier. |
| Amplifier overheats | Insufficient ventilation; impedance mismatch; gain set too high. | Ensure amplifier has clear airflow. Verify speaker impedance matches amplifier's capabilities. Reduce gain. |
| No power to amplifier | Blown fuse; loose power/ground connection; faulty remote wire. | Check and replace fuse in RWK42 kit. Verify all power and ground connections are secure. Test remote wire for 12V signal. |
7. Specifications
7.1. RV6.3A 6.5-inch 3-Way Car Speakers
- Peak Power Rating: 750 Watts per Pair / 375 Watts Each
- CEA Compliant RMS Rating: 140 Watts per Pair / 70 Watts Each
- Woofer Material: Polypropylene
- Surround: Flex Motion Butyl Rubber
- Tweeter: 1.2-inch PEI dome with ferrite magnet
- Super Tweeter: 0.6-inch
- Frequency Response: 34-20,000 Hz
- Sensitivity: 91 dB @ 1w/1m
- Mount Depth: 2.12 inches
- Impedance: 4 Ohm
- Voice Coils: Aluminum, 100% oxygen free copper windings
- Magnet: 8 Oz Y25
7.2. RXA-F1 4-Channel Car Amplifier
- Peak Power: 1600 Watts
- Dyno-Certified RMS Power:
- 4 x 65W @ 4 Ohms
- 4 x 95W @ 2 Ohms
- 2 x 200W bridged @ 4 Ohms
- Topology: Class-AB
- Capacitors: ELNA audiophile grade
- Crossovers: 12 dB/octave variable (HPF, LPF, BPF)
- Bass EQ: 12 dB
- Input Modes: 2-CH / 4-CH
- Protection: Full IC-controlled
7.3. RWK42 4 Gauge Amp Wiring Installation Kit
- Power/Ground Cable: Premium SuperFlex 4-gauge
- RCA Cables: Two 17-foot 100% copper twisted-pair
- Fuse Holder: AGU type with fuses
- Additional Components: Remote wire, speaker wire, loom, installation accessories.
8. Warranty Information
This Rockville product bundle is covered by a Limited Warranty. Please refer to the warranty card included with your purchase or contact Rockville customer support for specific terms and conditions.
9. Customer Support
For technical assistance, troubleshooting, or warranty inquiries, please contact Rockville customer support. Contact information can typically be found on the Rockville website or in your product packaging.


