1. Introduction
Thank you for choosing the WINCHMAX 17000 lb (7711 kg) 12V Electric Winch. This manual provides essential information for the safe and effective installation, operation, and maintenance of your winch. Please read this manual thoroughly before using the product to ensure proper function and to prevent injury or damage.
This winch is designed for recovery applications on vehicles over 3.5 tons, including recovery trucks and 4x4s, and is suitable for various off-road or recovery operations.
2. Safety Information
WARNING: Failure to follow these safety instructions may result in serious injury or property damage.
2.1 General Safety
- Always wear appropriate personal protective equipment, including heavy-duty gloves and eye protection, when operating the winch.
- Keep hands and body clear of the wire rope, hook, and fairlead during operation.
- Never allow children or untrained individuals to operate the winch.
- Ensure the winch is securely mounted to a structure capable of withstanding the maximum rated pull.
- Do not operate the winch if any part is damaged or malfunctioning.
2.2 Electrical Safety
- Disconnect the battery before performing any electrical work or maintenance on the winch.
- Ensure all electrical connections are clean, tight, and properly insulated.
- Use appropriate gauge wiring for the electrical connections to prevent overheating.
- Avoid short circuits.
2.3 Operational Safety
- Never exceed the rated pulling capacity of the winch.
- Always keep a minimum of five wraps of wire rope on the winch drum.
- Do not use the winch to lift people or for overhead lifting.
- Inspect the wire rope for kinks, fraying, or damage before each use. Replace damaged rope immediately.
- Maintain a safe distance from the winch and load during operation.
- Avoid sharp bends or angles in the wire rope during winching.
- Use a tree saver strap or similar anchor point protection to prevent damage to trees or other objects.
3. Package Contents
Verify that all items are present and undamaged upon unpacking:
- WINCHMAX 17000 lb (7711 kg) 12V Electric Winch
- 26m x 12mm Multi-strand Galvanized Steel Wire Rope (pre-installed)
- Twin Long-Range Wireless Remote Controls
- Wired Remote Control (Wander Lead, 4.5m cord)
- Heavy-Duty One-Piece Solenoid
- Four Roller Fairlead
- Clevis Hook (1/2 inch G70 grade forged, with safety catch and hand saver, zinc plated)
- High Tensile Fixing Bolt Kit
- WINCHMAX Branded Winch Cover
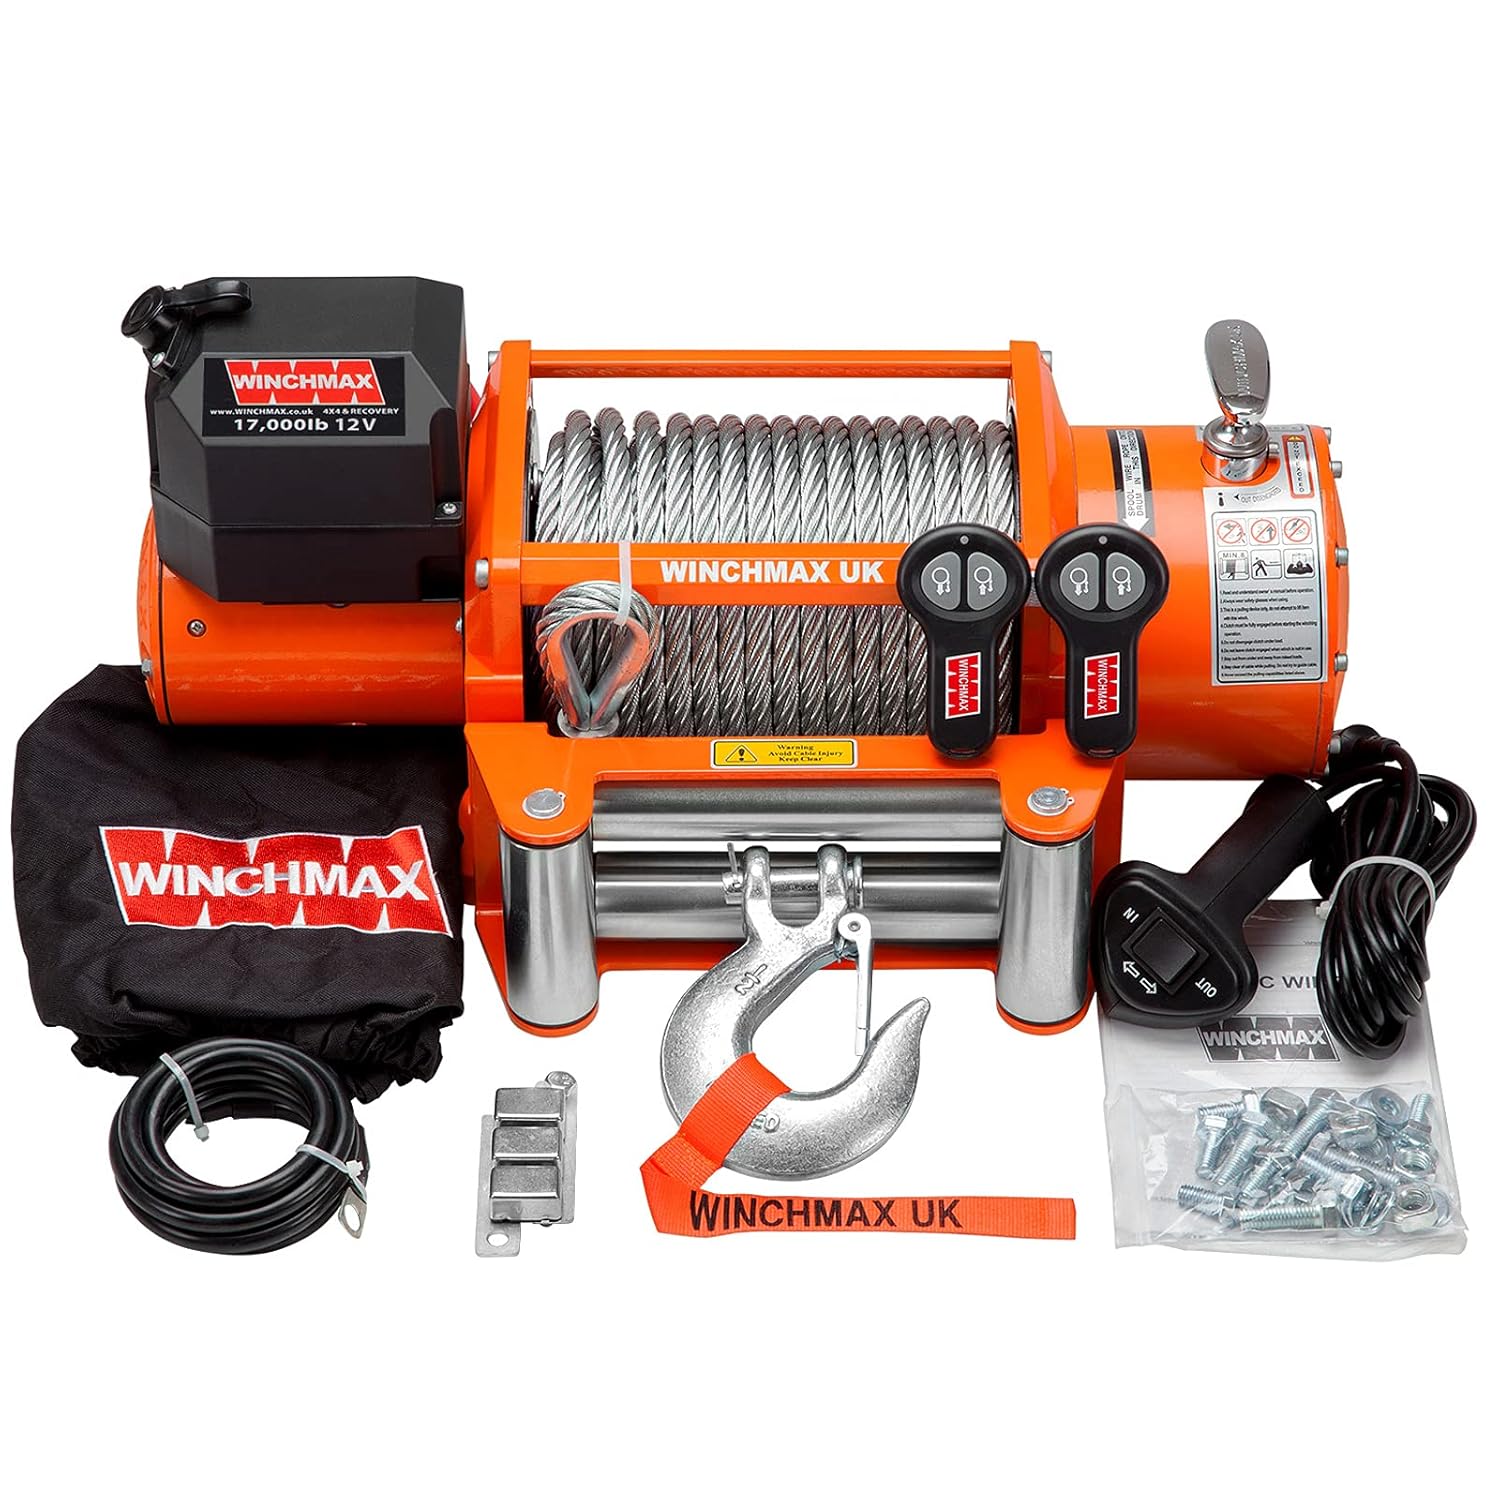
Figure 1: The WINCHMAX 17000 lb electric winch shown with all its components, including the winch unit, steel rope, hook, fairlead, wireless remotes, wired remote, and winch cover.
4. Setup and Installation
4.1 Mounting the Winch
- Select a mounting location on your vehicle or structure that is strong enough to support the winch's maximum pulling capacity.
- Use the provided high tensile fixing bolt kit to securely attach the winch. Ensure all bolts are tightened to the manufacturer's specifications.
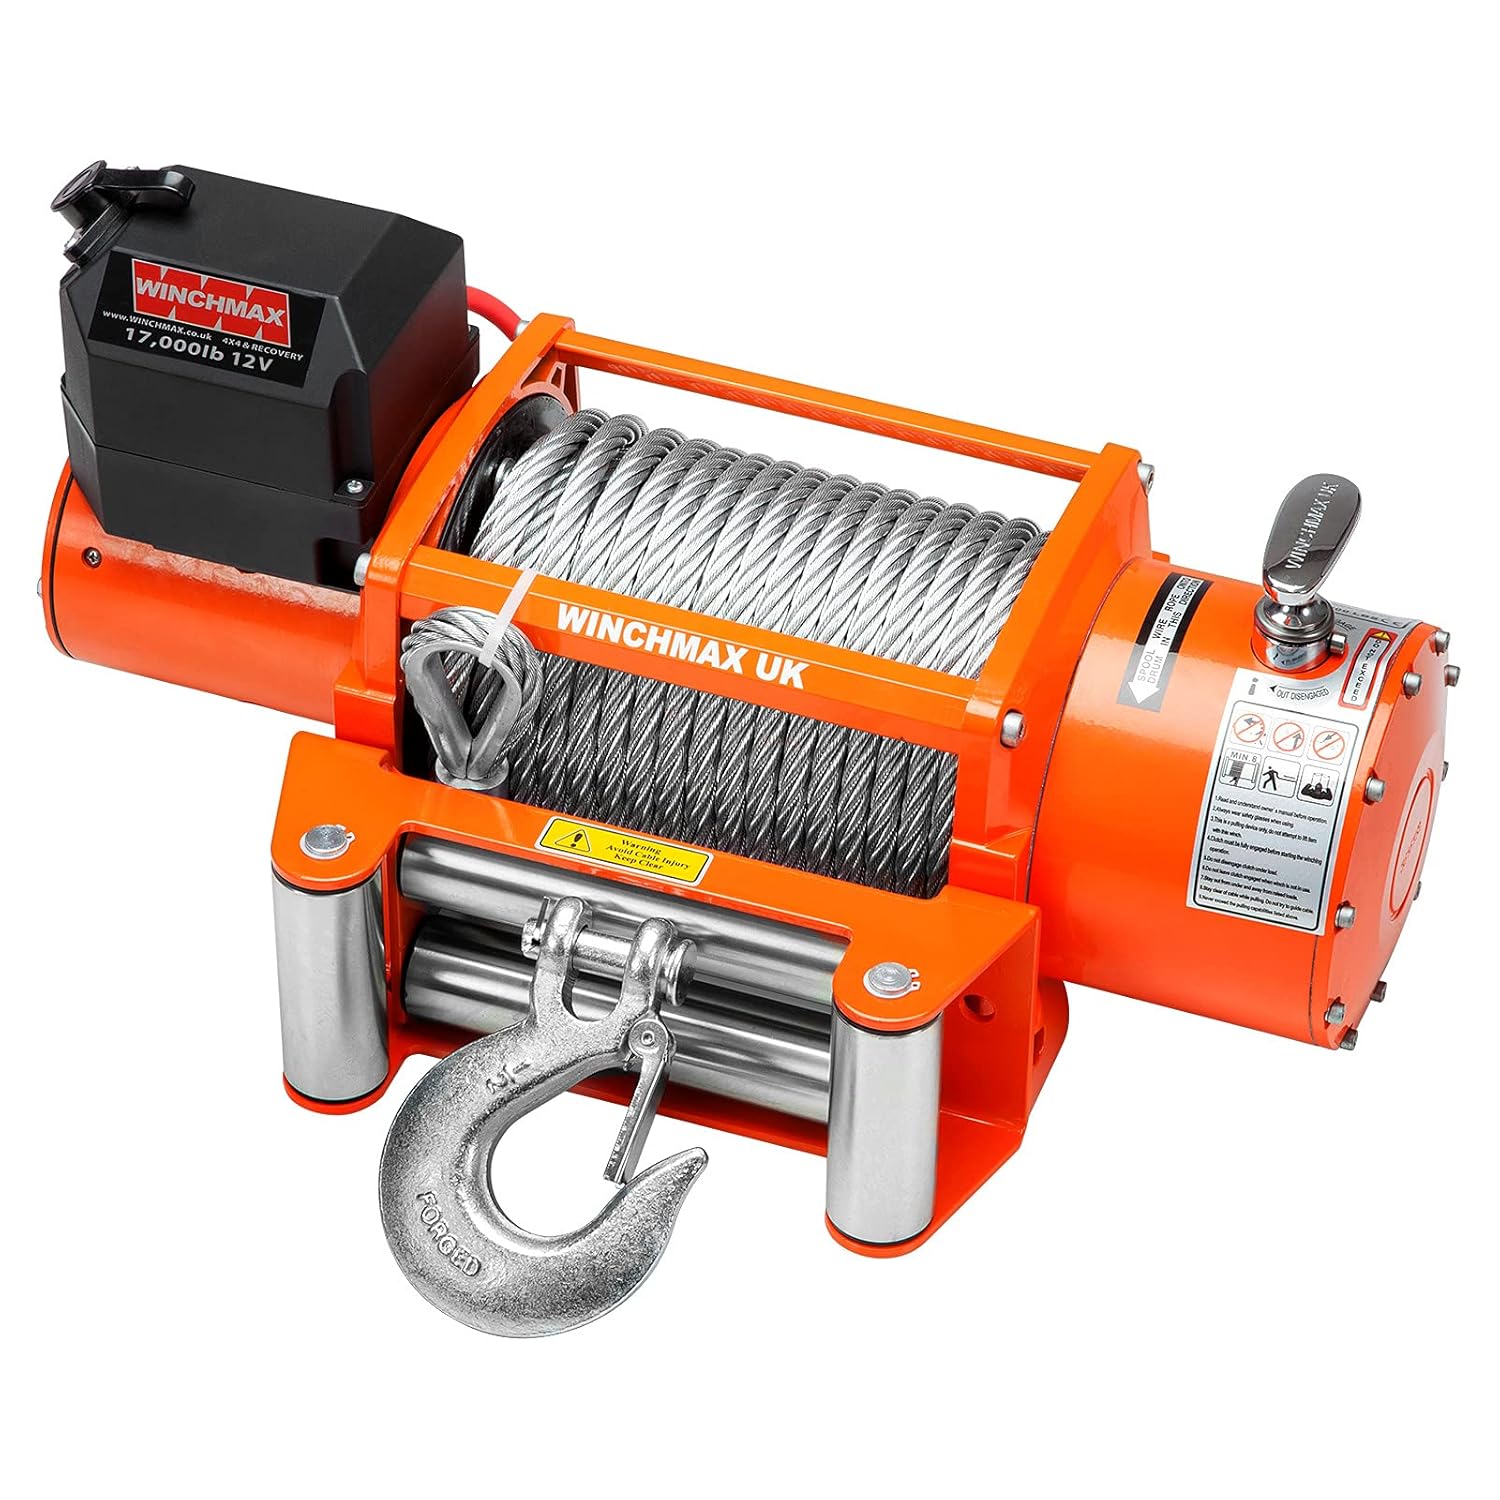
Figure 2: A side view of the WINCHMAX 17000 lb electric winch, illustrating its compact design and the robust fairlead and hook attachment point.
4.2 Electrical Connections
- Connect the heavy-duty one-piece solenoid to the winch motor and the vehicle's 12V battery.
- Ensure all connections are clean, corrosion-free, and securely fastened. Use dielectric grease on terminals to prevent corrosion.
- Connect the positive (+) cable from the solenoid to the positive (+) terminal of the battery.
- Connect the negative (-) cable from the solenoid to the negative (-) terminal of the battery or a suitable chassis ground.
- Verify that all wiring is routed away from moving parts and heat sources, and is protected from abrasion.
4.3 Wire Rope Installation (if required)
The steel wire rope is typically pre-installed. If re-spooling or replacing the rope:
- Feed the rope through the fairlead and secure the end to the winch drum using the 'through-drum' rope connection with the grub screw clamp. Ensure it is tightened securely.
- Carefully spool the rope onto the drum under light tension, ensuring it winds evenly and tightly.
5. Operating Instructions
5.1 Pre-Operation Check
- Inspect the winch, wire rope, hook, and all electrical connections for any signs of damage or wear.
- Ensure the vehicle's battery is fully charged.
5.2 Freewheel Clutch Operation
The winch features a sliding ring gear freewheel clutch for manual rope payout.
- To disengage the clutch (freewheel), rotate the clutch handle to the 'FREE' position. This allows you to pull the rope out manually.
- To engage the clutch, rotate the clutch handle to the 'ENGAGE' position. This locks the drum for powered winching. Always ensure the clutch is fully engaged before operating the winch under load.
5.3 Remote Control Operation
Your winch comes with both wired and wireless remote controls.
5.3.1 Wired Remote Control
- Plug the wired remote control (wander lead) into the designated port on the solenoid.
- Use the 'IN' button to retract the rope and the 'OUT' button to extend the rope.
- Always stand clear of the rope and load while operating.
5.3.2 Wireless Remote Control
The winch includes twin long-range wireless remote controls.

Figure 3: Front and back views of the WINCHMAX wireless remote controls, showing the 'IN' and 'OUT' buttons and activation instructions.
- To activate: Press both buttons simultaneously for 5 seconds until the LED lights up.
- To turn off: Press both buttons simultaneously for 5 seconds until the LED turns off.
- The remote will power off automatically after 2 minutes of inactivity.
- Use the 'IN' button to retract the rope and the 'OUT' button to extend the rope.
- Ensure a clear line of sight between the remote and the winch receiver for optimal performance.
5.4 Winching Procedure
- Engage the clutch.
- Connect the hook to a secure anchor point using a tree saver strap or shackle.
- Ensure the wire rope is not twisted or kinked.
- Begin winching using the remote control, maintaining constant tension on the rope.
- Monitor the rope and load throughout the operation. Stop if any unusual sounds or movements occur.
- Once the recovery is complete, disengage the clutch and carefully rewind the rope onto the drum under light tension.
6. Maintenance
Regular maintenance ensures the longevity and safe operation of your WINCHMAX winch.
6.1 Regular Inspection
- Before and after each use, inspect the wire rope for fraying, broken strands, kinks, or corrosion. Replace if damaged.
- Check all electrical connections for tightness and corrosion.
- Inspect the mounting bolts for tightness.
- Examine the hook, fairlead, and clutch mechanism for wear or damage.
6.2 Wire Rope Care
- Clean the wire rope regularly to remove dirt, mud, and debris.
- If the rope becomes severely damaged, replace it with a genuine WINCHMAX replacement rope of the same specification.
6.3 Winch Cover
Use the provided WINCHMAX branded cover to protect the winch from water, road grime, and UV exposure when not in use.
7. Troubleshooting
| Problem | Possible Cause | Solution |
|---|---|---|
| Winch does not operate | No power to winch; Loose electrical connections; Faulty remote control; Clutch disengaged. | Check battery connections and charge; Tighten all electrical connections; Replace remote batteries or use wired remote; Engage clutch fully. |
| Winch operates slowly or weakly | Low battery voltage; Undersized wiring; Overload; Motor overheating. | Recharge battery; Ensure correct wire gauge; Reduce load; Allow motor to cool down. |
| Wire rope is kinked or frayed | Improper winding; Overloading; Contact with sharp objects. | Rewind rope evenly under tension; Do not exceed rated capacity; Inspect and replace damaged rope. |
| Clutch does not engage/disengage | Debris in clutch mechanism; Damaged clutch. | Clean clutch area; Contact WINCHMAX support for repair or replacement. |
8. Specifications
| Feature | Specification |
|---|---|
| Model Number | WM1700012VR |
| Rated Line Pull | 17,000 lb (7,711 kg) |
| Motor | 12V DC, 6.8 hp / 5.1 kW Series Wound |
| Gear Train | 3-Stage Planetary |
| Gear Ratio | Not specified in input, typical for 17000lb winches is around 265:1 - 300:1 |
| Clutch | Sliding Ring Gear Freewheel |
| Wire Rope | 26m x 12mm Multi-strand Galvanized Steel |
| Fairlead | Heavy-Duty Four Roller |
| Remote Control | Twin Wireless, Wired Wander Lead (4.5m) |
| Solenoid | Heavy-duty One-Piece, IP67 Waterproof |
| Hook | 1/2 inch G70 Grade Forged Clevis Hook, Zinc Plated |
| Gross Weight | 60 kg |
| Package Dimensions | 60 x 35 x 35 cm |
| Certifications | CE certified, built to ISO9001 |
| Country of Origin | China |

Figure 4: Detailed dimensions of the 1/2 inch G70 grade forged clevis hook, showing its length, width, and pin diameter.
9. Warranty and Support
9.1 Warranty Information
WINCHMAX provides an industry-leading lifetime warranty on mechanical components and a 3-year warranty on electrical components for this product. Please retain your proof of purchase for warranty claims.
9.2 Customer Support
For technical assistance, warranty claims, or spare parts inquiries, please refer to the official WINCHMAX website or contact your authorized WINCHMAX dealer. Please have your model number (WM1700012VR) and purchase details ready when contacting support.


