
Qook 14 Set Waterproof Electrical Connector Kit
Model: JH867-001new User Manual
Introduction
This manual provides detailed instructions for the proper installation and use of your Qook 14 Set Waterproof Electrical Connector Kit. This kit is designed to provide reliable, waterproof electrical connections for various applications, including automotive, marine, and other wiring projects. Please read these instructions carefully before beginning any installation.
Product Overview
The Qook Waterproof Electrical Connector Kit includes a variety of 1 to 6-pin connectors, male and female terminals, rubber seals, and assorted fuses, all organized in a clear storage box. These connectors are constructed from durable PA66 nylon, with copper contact material and polyolefin insulation, ensuring robust and waterproof connections.
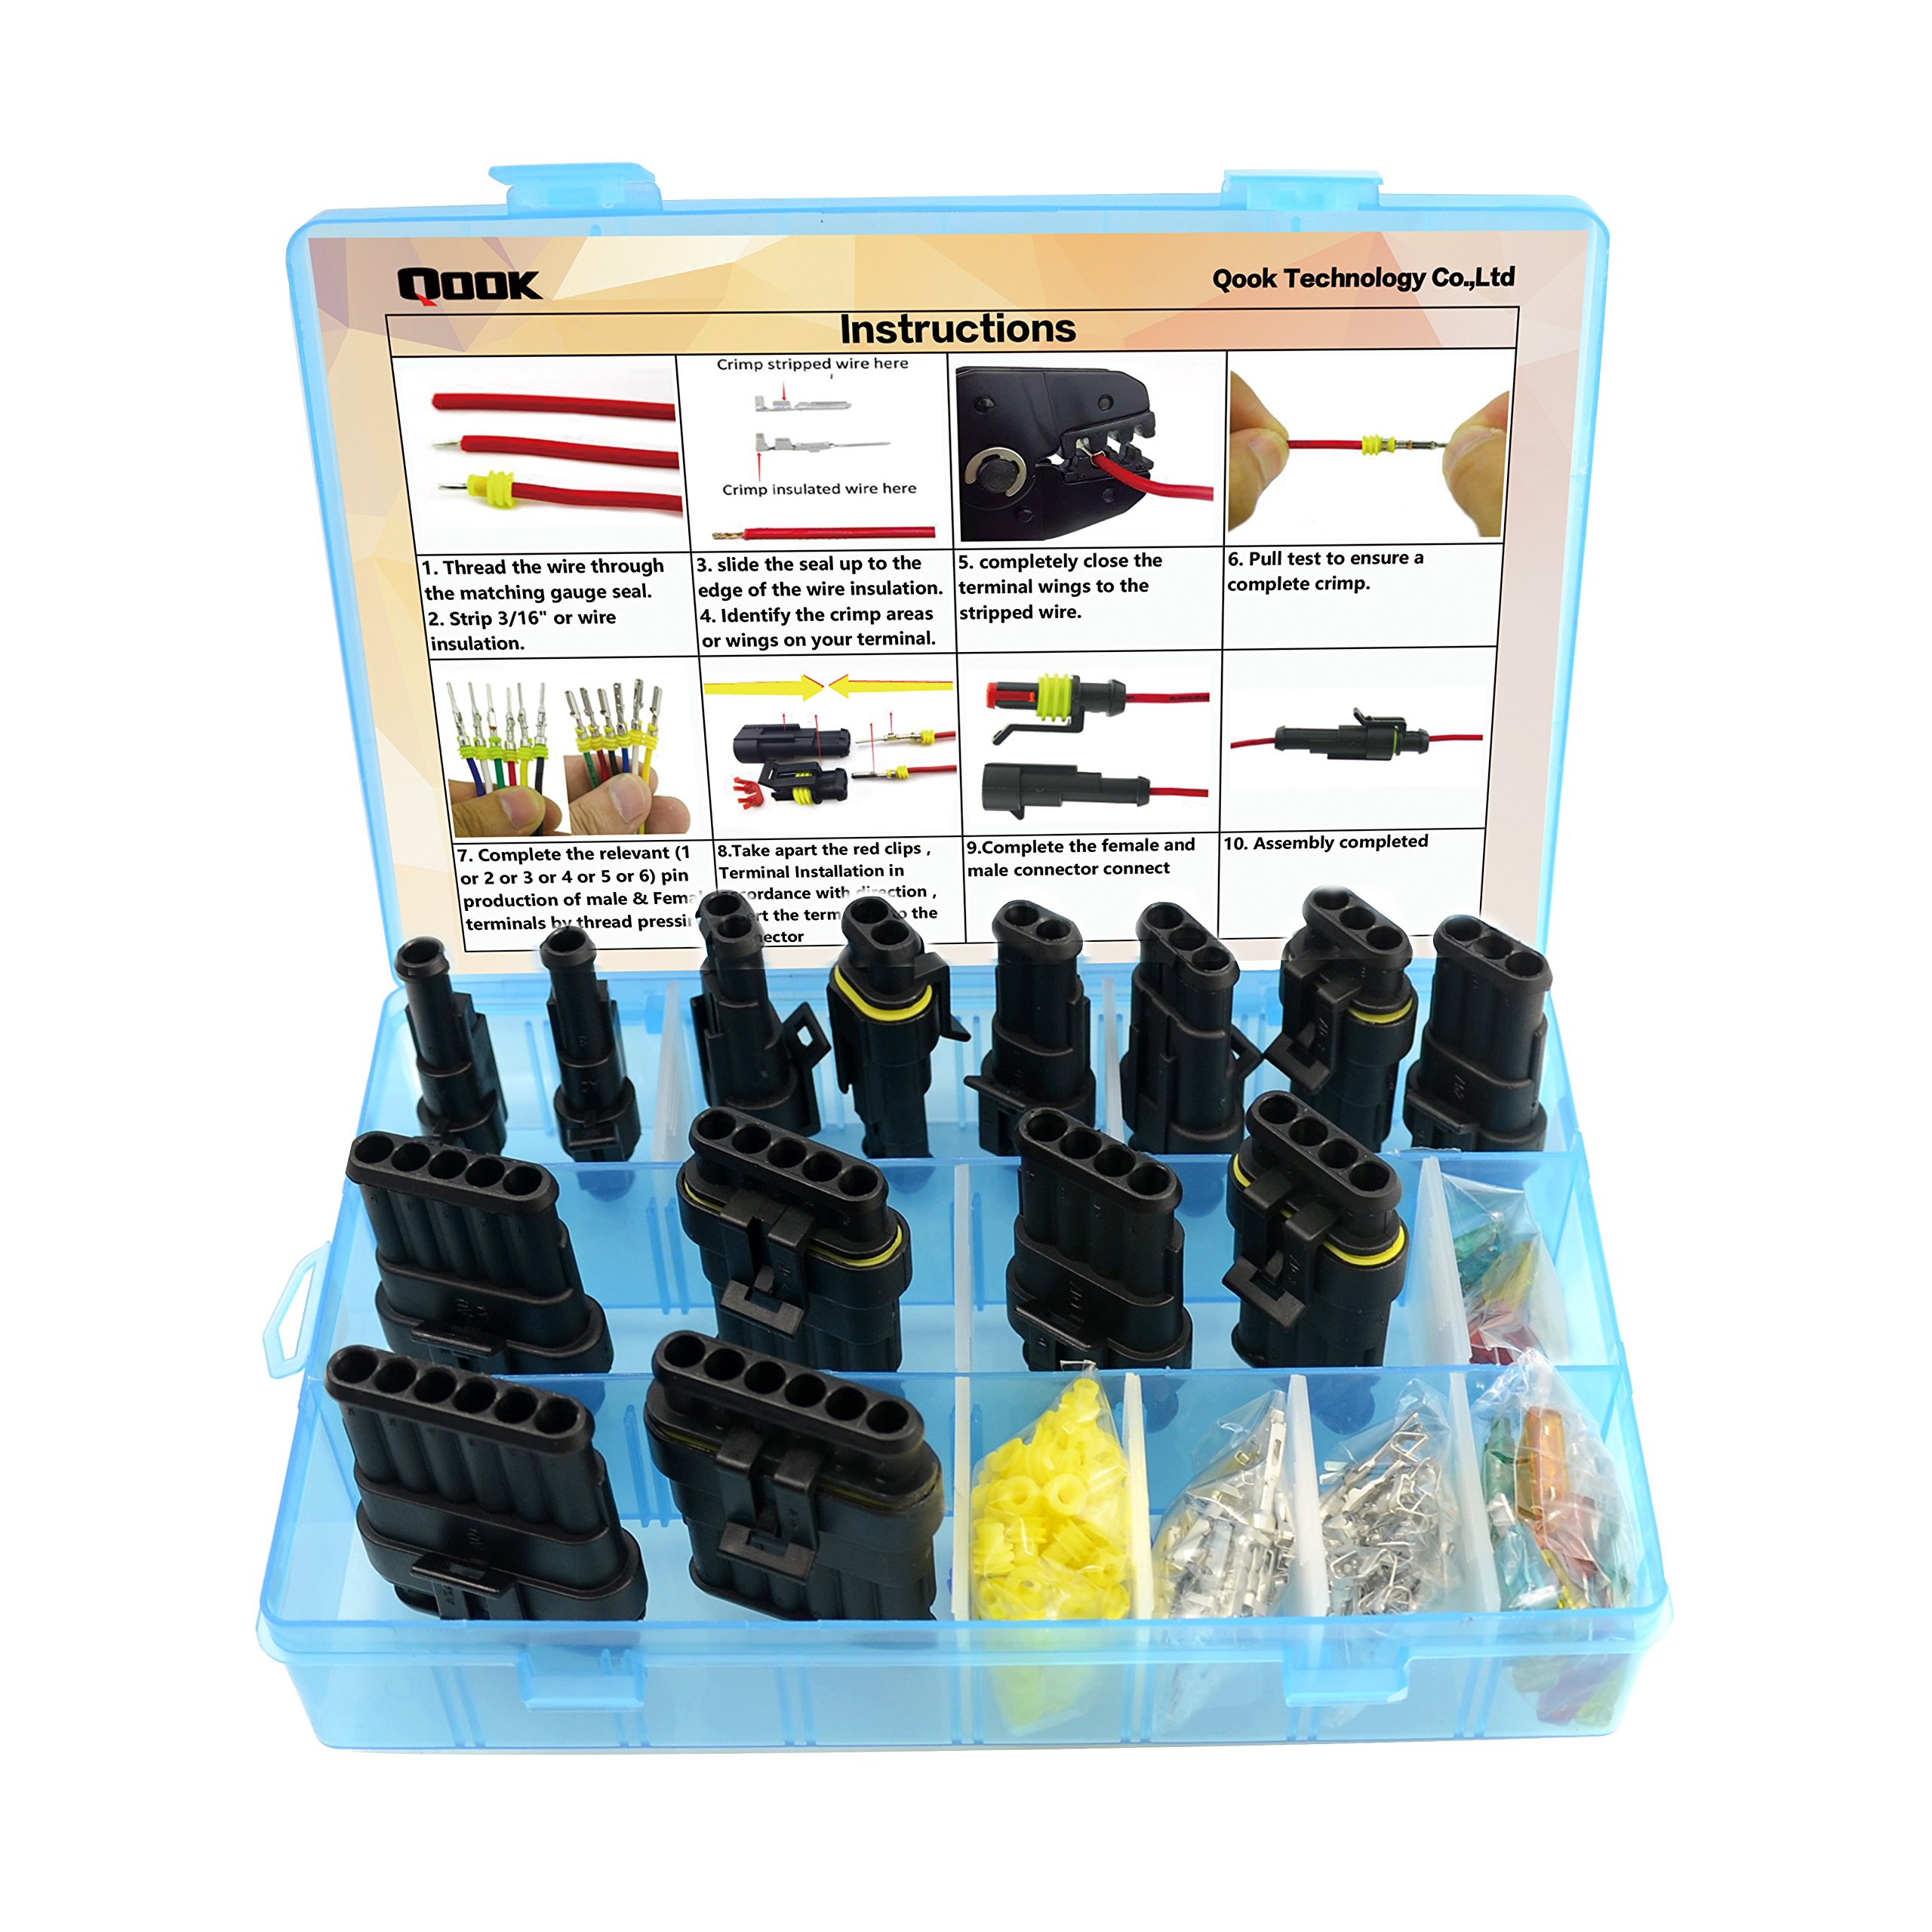
Image: The complete Qook 14 Set Waterproof Electrical Connector Kit, showing various connector sizes, terminals, seals, and fuses in a clear storage box.
Specifications
Below are the key specifications for the Qook Waterproof Electrical Connector Kit:
- Connector Type: Pin
- Contact Material: Copper
- Insulation Material: Polyolefin
- Terminal Type: Pin Terminal
- Material: PA66 Nylon (Connector Housing), Plastic (Overall)
- Temperature Rating: 80 degrees Celsius
- Item Weight: Approximately 10 ounces
- Package Dimensions: Approximately 7.83 x 5.51 x 1.42 inches
Detailed dimensions for male and female connector heads are provided in the table below:

Image: Diagram showing the dimensions (Width, Height, Length) for 1-pin to 6-pin male and female connector heads.
| Pin Count | Male Head W/mm | Male Head H/mm | Male Head L/mm | Female Head W/mm | Female Head H/mm | Female Head L/mm |
|---|---|---|---|---|---|---|
| 1-pin | 13.7 | 16.4 | 41.6 | 12.15 | 18.9 | 28.27 |
| 2-pin | 20.0 | 17.5 | 42.2 | 17.75 | 18.9 | 29.1 |
| 3-pin | 26.2 | 17.0 | 42.3 | 23.63 | 18.9 | 28.72 |
| 4-pin | 32.0 | 17.0 | 42.3 | 29.69 | 18.9 | 28.6 |
| 5-pin | 38.4 | 16.5 | 42.3 | 35.65 | 18.9 | 28.6 |
| 6-pin | 44.4 | 16.5 | 42.3 | 42.72 | 18.9 | 28.55 |
Installation Instructions
Follow these steps to properly assemble and install the waterproof electrical connectors:
- Prepare the Wire: Thread the wire through the matching gauge seal. Strip approximately 3/16" of wire insulation to expose the conductor. Ensure the stripped wire length is appropriate for the terminal crimp area.

Image: A wire with insulation stripped and a yellow rubber seal threaded onto it, ready for crimping.
- Crimp the Terminal: Slide the rubber seal up to the edge of the wire insulation. Identify the crimp areas on your terminal. Using a suitable crimping tool, completely close the terminal wings onto the stripped wire and the insulation. Ensure a secure crimp on both the conductor and the insulation for strain relief.

Image: A sequence of images demonstrating how to strip a wire, slide the seal, crimp the terminal onto the wire, and perform a pull test.
- Perform Pull Test: After crimping, gently pull on the wire to ensure a complete and secure crimp. The wire should not detach from the terminal.
- Insert Terminals into Connector Housing: For the male connector, ensure the red locking clip is removed. Insert the crimped male terminals into the male connector housing until they click into place. For the female connector, insert the crimped female terminals into the female connector housing until they click into place. Once all terminals are inserted, reinsert the red locking clip (if applicable) to secure them.

Image: Close-up view of crimped terminals with seals being inserted into a connector housing, showing the locking mechanism.
- Connect the Housings: Align the male and female connector housings and push them together firmly until they click, indicating a secure and waterproof connection. Ensure the cover is fully closed.

Image: Two connected waterproof electrical connectors with wires, demonstrating a fully closed and secured connection.
Operating Instructions
Once installed, these connectors are designed for reliable, long-term use in environments where moisture and dust are a concern. Ensure that the connectors are fully engaged and the locking mechanism is secure to maintain their waterproof and dustproof properties. Always use appropriate wire gauges for your application to prevent overheating and ensure optimal performance.
Maintenance
These connectors require minimal maintenance. Periodically inspect connections for any signs of damage, corrosion, or dislodged seals. Keep the connector surfaces clean and free from debris to ensure proper sealing and electrical contact. If a seal appears damaged or compromised, replace the connector or seal to maintain waterproof integrity.
Troubleshooting
- Issue: Terminals do not lock into the connector housing.
Solution: Ensure that the crimped portion of the terminal is not overly flattened or deformed, which can prevent it from sliding into the housing correctly. Verify that any internal locking clips (e.g., red clips) are temporarily removed before inserting the terminals and then reinserted to secure them. - Issue: Seals feel loose on smaller gauge wires.
Solution: While the seals are designed to accommodate a range of wire gauges, they may fit less snugly on the smaller end of the spectrum (e.g., 20AWG). Ensure the seal is positioned correctly against the insulation and the terminal is crimped securely to provide the best possible seal. - Issue: Connector housings do not fully engage or lock.
Solution: Check for any obstructions or misaligned pins. Ensure both male and female terminals are fully seated and locked within their respective housings before attempting to connect the two halves. Apply firm, even pressure until a click is heard or felt.
Warranty Information
For specific warranty details regarding your Qook Waterproof Electrical Connector Kit, please refer to the product packaging or contact the seller directly. Warranty terms typically cover manufacturing defects under normal use conditions.
Support
If you encounter any issues or have questions not covered in this manual, please contact Qook customer support or your retailer for assistance. When contacting support, please have your product model number (JH867-001new) and purchase information readily available.