1. Safety Instructions
Read all instructions carefully before using the appliance. Keep this manual for future reference.
- Always ensure the voltage indicated on the appliance corresponds to your mains voltage.
- Do not immerse the main unit, cord, or plug in water or any other liquid.
- Supervise children to ensure they do not play with the appliance.
- Do not operate the appliance if the plug, main cord, or the appliance itself is damaged.
- Place the appliance on a stable, heat-resistant surface, away from walls or other appliances to allow sufficient air circulation.
- Do not fill the frying basket with oil or fat, as this may cause a fire hazard.
- The appliance generates hot air and steam during operation. Keep hands and face at a safe distance from the air outlet openings.
- Always unplug the appliance after use and before cleaning. Allow it to cool down completely before handling.
- Do not use accessories not recommended by the manufacturer.
2. Product Overview
Familiarize yourself with the components of your Emerio AF-112828 Hot Air Fryer.

Figure 2.1: Main unit showing the temperature control dial (top) and timer control dial (bottom). The arrows indicate hot air circulation for even cooking.

Figure 2.2: Front view of the air fryer, highlighting the handle for the frying basket.

Figure 2.3: The removable frying basket, designed for easy food placement and removal.
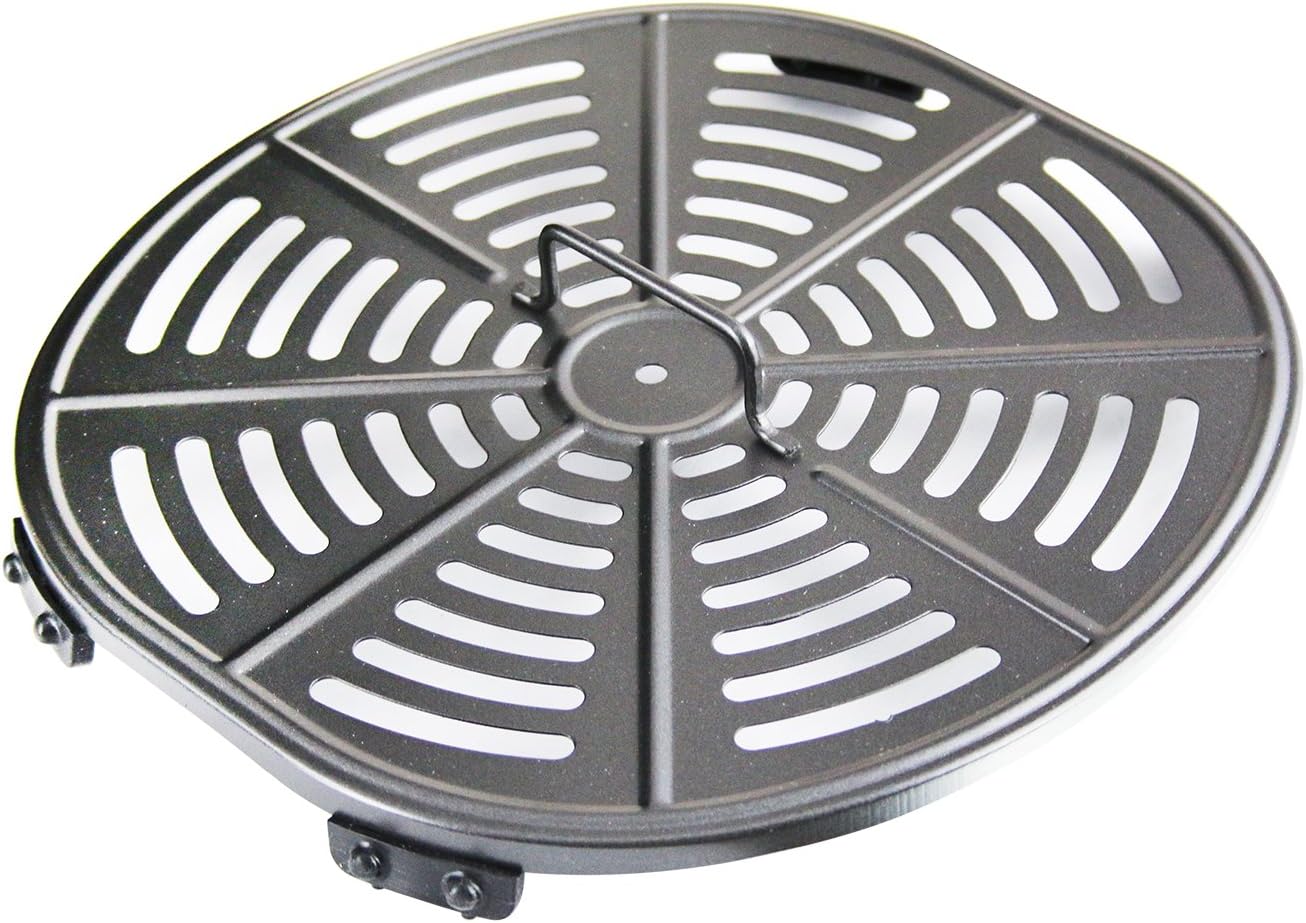
Figure 2.4: The removable cooking grid, which sits at the bottom of the frying basket to allow air circulation around food.
Main Components:
- Main Unit: Houses the heating element and fan.
- Temperature Control Dial: Adjusts cooking temperature (up to 200°C).
- Timer Control Dial: Sets cooking time (up to 30 minutes).
- Frying Basket: Removable container for food.
- Cooking Grid: Sits inside the frying basket to elevate food and allow fat to drain.
- Handle: For safely pulling out and inserting the frying basket.
3. Setup
- Unpack: Remove all packaging materials and any promotional stickers or labels from the appliance.
- Initial Cleaning: Before first use, clean the frying basket and cooking grid with hot water, dish soap, and a non-abrasive sponge. Wipe the inside and outside of the main unit with a damp cloth. Ensure all parts are completely dry before use.
- Placement: Place the air fryer on a stable, level, and heat-resistant surface. Ensure there is at least 10 cm (4 inches) of free space around the back and sides of the appliance to allow for proper ventilation. Do not place it directly under a wall cabinet.
- Power Connection: Plug the power cord into a grounded wall outlet.
4. Operating Instructions
General Operation:
- Prepare Food: Place the cooking grid into the frying basket. Place the ingredients into the frying basket. Do not overfill the basket; ensure there is enough space for air circulation.
- Insert Basket: Slide the frying basket back into the main unit until it clicks into place.
- Set Temperature: Turn the temperature control dial (top dial) to the desired temperature. Refer to the cooking guide for recommendations.
- Set Timer: Turn the timer control dial (bottom dial) to the desired cooking time. The appliance will start heating immediately.
- Cooking Process: The power indicator light will illuminate. During cooking, the heating indicator light will cycle on and off as the appliance maintains the set temperature.
- Shake/Turn Food: For some foods, it is necessary to shake or turn the ingredients halfway through the cooking time to ensure even cooking. Carefully pull out the basket, shake or turn the food, and then slide the basket back in. The appliance will resume cooking.
- Completion: When the timer reaches zero, an audible signal will sound, and the appliance will automatically switch off.
- Remove Food: Carefully pull out the frying basket. Use heat-resistant tongs to remove the cooked food. Avoid tipping the basket directly, as excess oil may have collected at the bottom.
- Cool Down: Allow the appliance to cool down completely before cleaning or storing.
5. Cooking Guide
The following table provides general guidelines for cooking various foods. Cooking times and temperatures may vary based on food quantity, size, and desired crispiness. Always check food for doneness.

Figure 5.1: Examples of different food types that can be prepared using the air fryer's roasting, frying, grilling, and baking functions.

Figure 5.2: The air fryer basket containing various foods such as pizza, chicken pieces, french fries, and seasoned potato wedges, demonstrating its versatility.
| Food Item | Quantity (approx.) | Temperature | Time (minutes) | Notes |
|---|---|---|---|---|
| Frozen Fries | 300-500g | 180°C | 15-25 | Shake halfway through. |
| Fresh Fries | 300-500g | 180°C | 20-30 | Add 1/2 tbsp oil. Shake halfway through. |
| Chicken Drumsticks | 2-4 pieces | 180°C | 18-25 | Turn halfway through. |
| Steak | 1 piece (150-200g) | 200°C | 8-15 | Flip halfway through for even cooking. |
| Frozen Spring Rolls | 4-6 pieces | 200°C | 8-12 | Shake halfway through. |
| Cupcakes | 4-6 pieces | 160°C | 15-20 | Use appropriate baking molds. |
6. Cleaning and Maintenance
Regular cleaning ensures optimal performance and extends the lifespan of your air fryer.

Figure 6.1: The frying basket and cooking grid separated for easy cleaning.
- Unplug and Cool: Always unplug the appliance from the power outlet and allow it to cool down completely before cleaning.
- Clean Frying Basket and Grid: The frying basket and cooking grid are dishwasher safe. Alternatively, they can be washed by hand with hot water, dish soap, and a non-abrasive sponge. For stubborn residue, soak them in hot water for about 10 minutes before cleaning.
- Clean Main Unit: Wipe the exterior of the air fryer with a damp cloth. Do not use abrasive cleaners or scouring pads. Never immerse the main unit in water or any other liquid.
- Clean Heating Element: Use a cleaning brush to remove any food residue from the heating element inside the appliance.
- Storage: Ensure all parts are clean and dry before storing the appliance in a cool, dry place.
7. Troubleshooting
| Problem | Possible Cause | Solution |
|---|---|---|
| Air fryer does not turn on. | Appliance not plugged in. Timer not set. | Ensure the power plug is securely inserted into a grounded wall outlet. Turn the timer dial to the desired cooking time. |
| Food is not cooked evenly. | Too much food in the basket. Food not shaken/turned. | Reduce the amount of food in the basket. Shake or turn ingredients halfway through cooking. |
| White smoke comes from the appliance. | Fat residue from previous use. Fatty ingredients being cooked. | Clean the frying basket and cooking grid thoroughly after each use. For fatty foods, absorb excess oil with a paper towel before cooking. |
| Food is not crispy. | Too much moisture in food. Not enough oil (for fresh foods). Temperature too low. | Pat food dry before cooking. Lightly coat fresh foods with oil. Increase temperature or cooking time. |
8. Specifications
- Model: AF-112828
- Brand: Emerio
- Capacity: 3.6 Liters
- Power: 1400 Watts
- Voltage: 230 Volts
- Dimensions (L x W x H): 31 x 31 x 36 cm (approx.)
- Weight: 3.8 Kilograms
- Features: Adjustable Thermostat, Timer Function, Dishwasher Safe Basket & Grid, Cool Touch Handle.
9. Warranty and Support
For warranty information, please refer to the warranty card included with your purchase or contact your retailer. If you experience any issues with your Emerio AF-112828 Hot Air Fryer that cannot be resolved using the troubleshooting guide, please contact Emerio customer support for assistance.
Contact details for customer support can typically be found on the manufacturer's official website or on your purchase documentation.


