1. Introduction and Overview
The Weston Pro Series Electric Meat Grinder, Model 10-1201-W, is a commercial-grade appliance designed for efficient meat processing. Featuring a powerful 1 HP, 750-watt air-cooled motor, this grinder can continuously process large quantities of meat, grinding up to 9 pounds per minute. Its robust stainless steel construction ensures durability and quiet operation.
Key features include:
- Powerful Motor: 1 HP, 750-watt air-cooled motor for continuous grinding.
- High Speed: Grinds 6-9 lbs. of meat per minute with a rifled-head design and offset throat.
- Durable Construction: Engineered for quiet performance and rugged durability with precision-engineered steel gears.
- Included Accessories: Patented auger-grabbing stomper, patented storage tray with cover, coarse (7 mm) and fine (4.5 mm) stainless steel plates, and a grinder knife.
- Sausage Stuffing Kit: Includes an adapter, spacer, and four-sized funnels (10 mm, 20 mm, 30 mm, 40 mm) for various sausage types.
- Built-in Knife Sharpener: For convenient knife maintenance.

Figure 1: The Weston Pro Series Electric Meat Grinder (Model 10-1201-W).
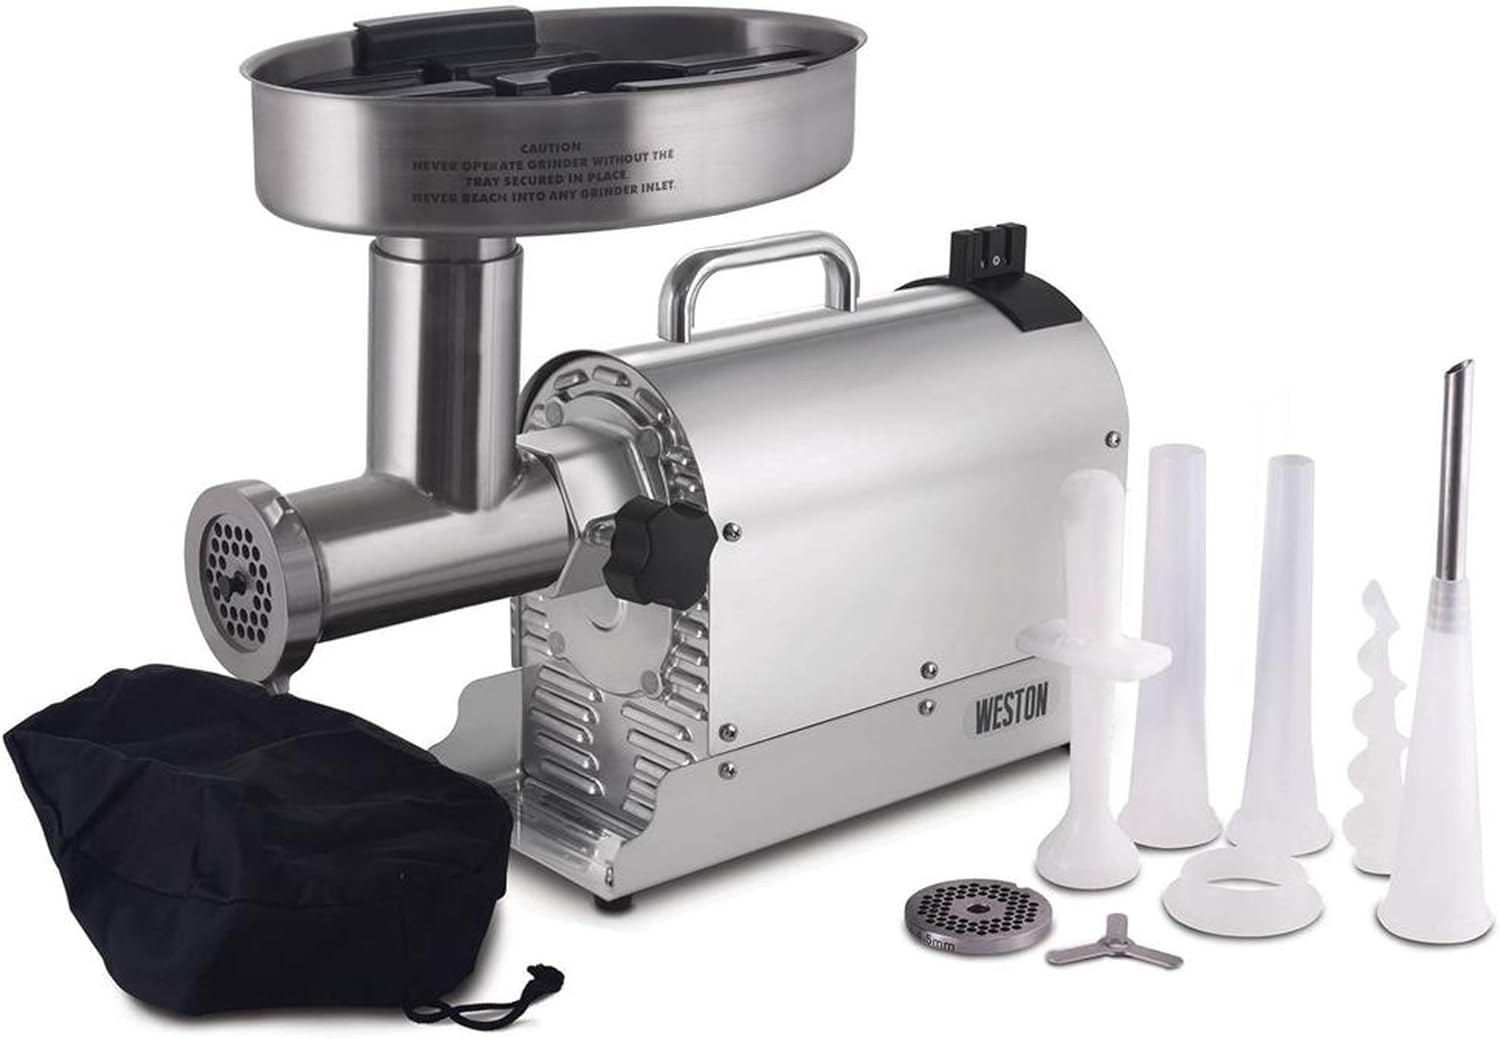
Figure 2: The meat grinder shown with its complete set of accessories, including grinding plates, knife, and sausage stuffing funnels.
2. Setup and Assembly
Before initial use, ensure all components are clean. Assemble the grinding head by inserting the auger, followed by the cutting knife, and then the desired grinding plate. Secure these components with the locking ring. Attach the assembled grinding head to the motor housing and tighten the knob to secure it in place. Place the stainless steel meat tray onto the top of the grinding head.

Figure 3: Dimensions of the Weston Pro Series Electric Meat Grinder, useful for planning counter space.
Video: Product Overview and Assembly
Video 1: An overview of the Weston Pro Series Meat Grinder, demonstrating its assembly, grinding capabilities, and sausage stuffing function.
3. Operating Instructions
3.1. Meat Grinding
- Ensure the grinder is properly assembled with the desired grinding plate (coarse or fine).
- Cut meat into pieces that fit easily into the feed tube. Remove any large bones or excessive sinew.
- Place the meat into the stainless steel tray.
- Turn the power switch to the 'Forward' position.
- Use the patented auger-grabbing stomper to gently push meat down the feed tube. Do not force the meat.
- Collect the ground meat in a suitable container placed beneath the grinding head.

Figure 4: The meat grinder actively processing meat, demonstrating its efficiency.
3.2. Sausage Stuffing
- Replace the grinding plate and knife with the sausage stuffing adapter, spacer, and chosen stuffing funnel.
- Prepare your sausage casing and slide it onto the stuffing funnel.
- Feed the seasoned ground meat into the hopper.
- Turn the power switch to the 'Forward' position.
- Guide the casing as it fills, ensuring even distribution and avoiding air pockets.
4. Maintenance and Cleaning
Proper cleaning and maintenance ensure the longevity and optimal performance of your meat grinder.
4.1. Disassembly and Cleaning
- Always unplug the grinder before cleaning or disassembling.
- Remove the meat tray, then loosen the knob to detach the grinding head.
- Unscrew the locking ring and carefully remove the grinding plate, knife, and auger.
- Wash all removable parts (grinding head, auger, knife, plates, tray, stomper, and stuffing funnels) with warm, soapy water. Rinse thoroughly and dry immediately to prevent rust.
- Wipe down the motor housing with a damp cloth. Do not immerse the motor housing in water.
4.2. Accessory Storage
The grinder features a patented storage tray with a cover, designed to keep your plates, stuffing funnels, and other accessories organized and protected.

Figure 5: The integrated storage tray with various accessories neatly organized.
4.3. Built-in Knife Sharpener
The unit includes a built-in knife sharpener to keep your knives ready for meat preparation. Follow standard knife sharpening procedures, using the sharpener located on the top of the motor housing.
5. Troubleshooting
If you encounter issues with your Weston Pro Series Electric Meat Grinder, consider the following:
- Motor Not Starting: Ensure the unit is properly plugged into a functioning electrical outlet. Check the circuit breaker on the back of the unit and press to reset if necessary.
- Meat Not Grinding/Coming Out: Verify that the grinding head is correctly assembled with the auger, knife, and plate in the proper orientation. Ensure the power switch is set to 'Forward'. If meat is backing up, briefly switch to 'Reverse' to clear the blockage.
- Motor Direction: The motor switch has 'Forward' and 'Reverse' settings. Allow the motor to come to a complete stop before changing directions. Do not operate in reverse for more than 5 seconds at a time to prevent motor damage.
- Overheating: The motor is air-cooled and designed for continuous grinding. However, if the unit feels excessively hot or stops unexpectedly, unplug it and allow it to cool down before resuming operation.
6. Specifications
| Feature | Specification |
|---|---|
| Model Number | 10-1201-W |
| Brand | Weston |
| Power | 750 Watts (1 HP) |
| Grinding Capacity | 9 lbs. per minute |
| Material | Stainless Steel |
| Product Dimensions (L x W x H) | 15" x 22.5" x 16" |
| Voltage | 120 Volts |
| Item Weight | 42 pounds |
7. Warranty and Support
The Weston Pro Series Electric Meat Grinder (Model 10-1201-W) comes with a 5-year limited warranty. For warranty claims, technical assistance, or any product-related inquiries, please contact Weston customer support. Refer to the product packaging or the official Weston website for the most current contact information.