
Introduction
This manual provides essential information for the proper installation, operation, and maintenance of your Smartwares Smoke Detector (Model 10.100.41). This pack includes four smoke detectors designed to provide early warning of fire hazards in your home. Each unit features an optical sensor with a 10-year lifespan and operates on a replaceable battery, ensuring continuous protection.
Key features include an 85 dB siren, a test/silence button, and a low battery alert. Please read these instructions carefully before installation and keep them for future reference.
Setup and Installation
Proper placement and installation are crucial for effective smoke detection. The detectors are designed for ceiling mounting.
1. Choosing Installation Locations
- Install at least one smoke detector on each floor of your home, including hallways and stairwells, as these are common evacuation routes.
- For optimal coverage, place one detector for every 20 to 40 square meters (215 to 430 sq ft).
- Avoid placing detectors in kitchens, bathrooms, or garages where cooking fumes, steam, or exhaust can cause false alarms.
- Ensure the detector is at least 30 cm (12 inches) away from walls or corners.
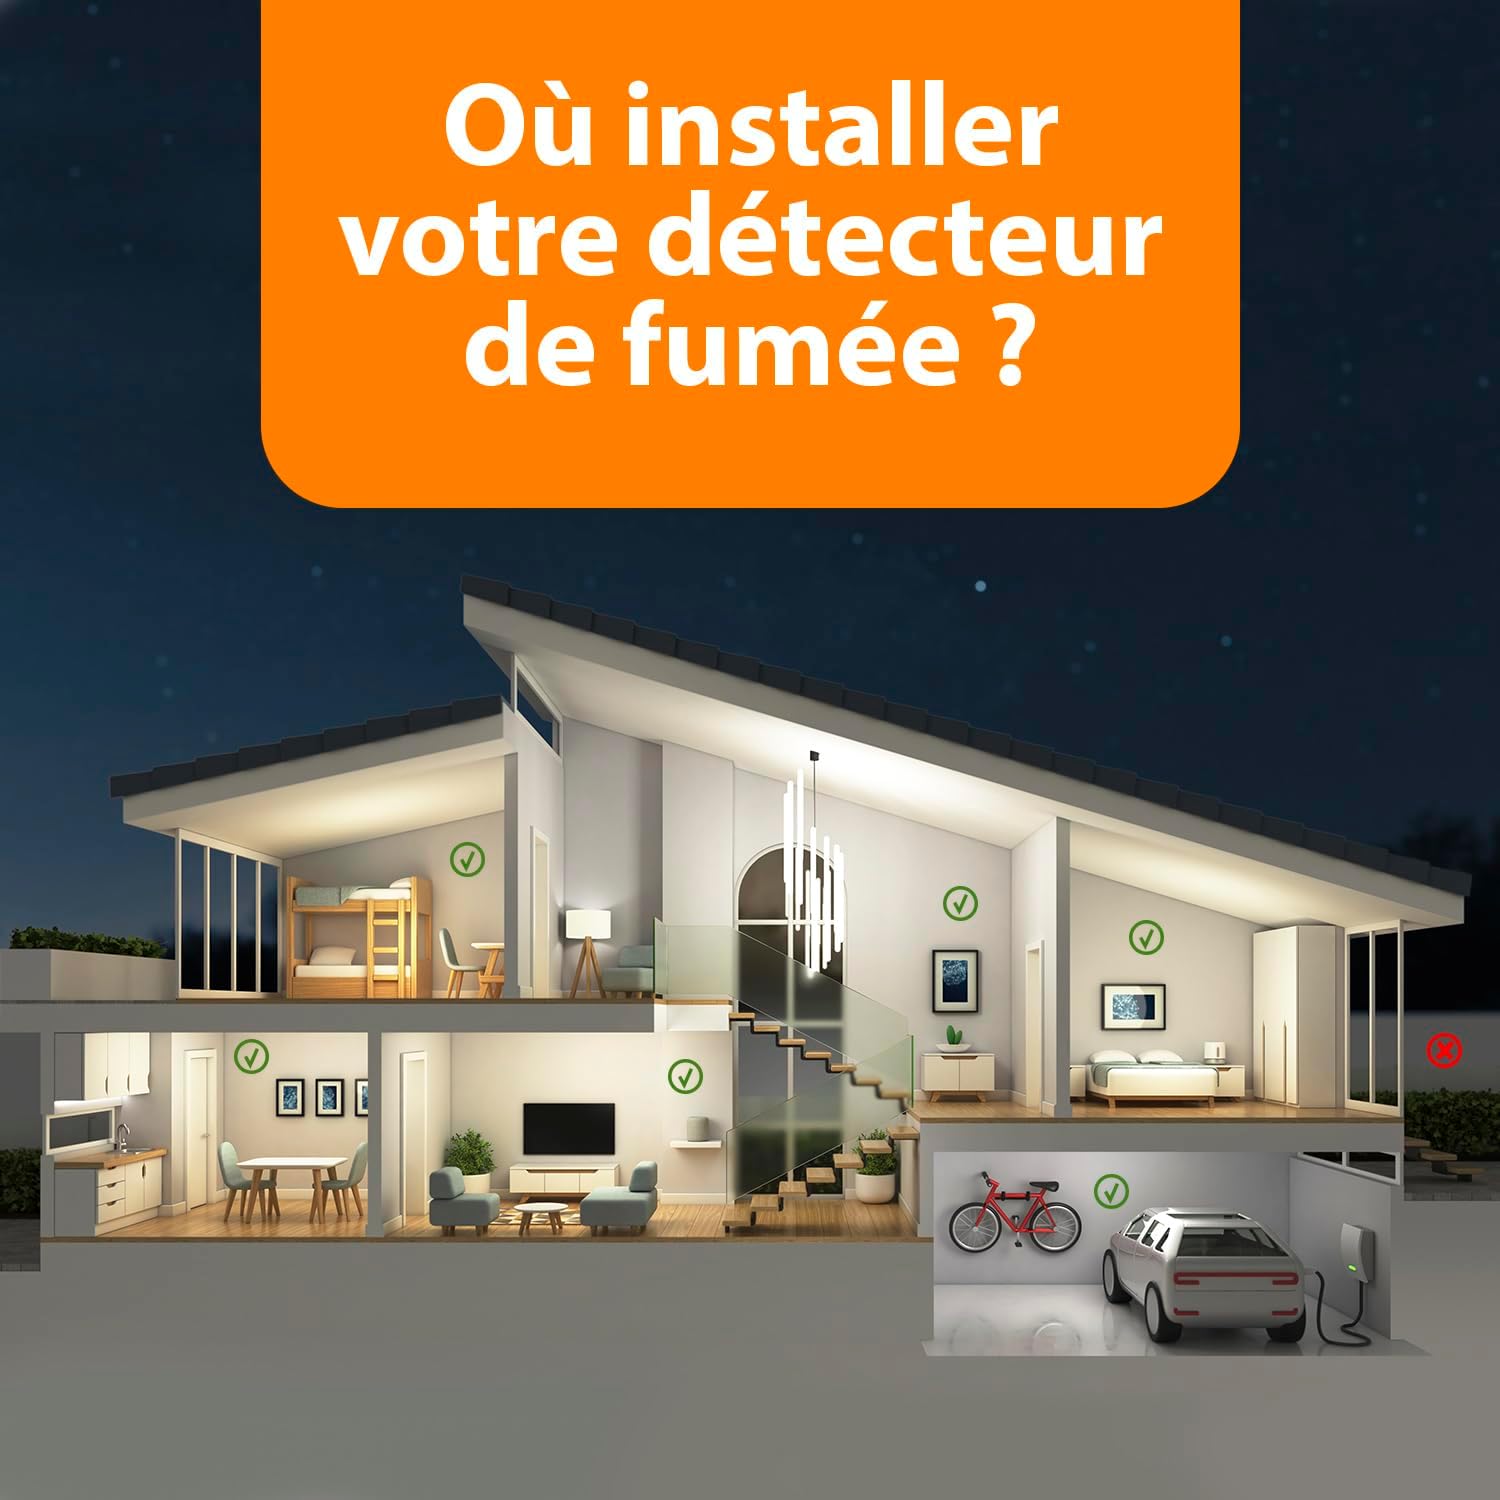
Image: Diagram illustrating recommended smoke detector placement throughout a multi-story house, indicating ideal locations in hallways, bedrooms, and living areas, and areas to avoid like kitchens and garages.

Image: A white smoke detector mounted on the ceiling of a modern hallway, emphasizing the recommendation to install one detector per floor.
2. Battery Insertion
- Each detector requires a 6F22 battery (included).
- Open the battery compartment on the back of the detector.
- Insert the battery, ensuring correct polarity (+/-).
- Safety Feature: The detector cannot be mounted onto its base plate if the battery is not correctly inserted, ensuring the device is active upon installation.
3. Mounting the Detector
- Use the provided mounting kit (screws and wall plugs).
- Mark two drill holes on the ceiling at the chosen location.
- Drill the holes and insert the wall plugs.
- Attach the mounting plate to the ceiling using the screws.
- Align the detector with the mounting plate and twist clockwise until it clicks securely into place.

Image: The underside of the smoke detector, highlighting the easy installation mechanism with an icon of a screwdriver, indicating that mounting is straightforward.
Operating Instructions
Once installed, your Smartwares smoke detector operates automatically. Familiarize yourself with its key functions:
1. Test Button
- The large central button on the detector serves as a test button.
- Press and hold this button monthly to verify the alarm's functionality. A loud 85 dB siren should sound.
- If the alarm does not sound, check the battery or replace the unit.
2. Silence Mode
- In case of an accidental alarm (e.g., from cooking fumes), press the central button to activate silence mode.
- The siren will be deactivated for approximately 10 minutes.
- After 10 minutes, the detector will automatically resume normal monitoring.

Image: A smoke detector with visual indicators for its functionalities: a hand pressing a button for the test function, a battery icon with an exclamation mark for low battery alert, and a crossed-out bell for the silence function.
3. Low Battery Alert
- When the battery is low, the detector will emit a short "chirp" sound at regular intervals.
- This indicates that the battery needs to be replaced. The included battery typically lasts for 1 year.
Maintenance
Regular maintenance ensures the longevity and reliability of your smoke detector.
1. Cleaning
- Clean the exterior of the detector monthly with a slightly damp cloth.
- Vacuum the detector twice a year to remove dust accumulation from the sensor chamber. Dust can interfere with the optical sensor's performance.
2. Battery Replacement
- Replace the 6F22 battery annually, or immediately when the low battery alert sounds.
- Refer to the "Battery Insertion" section under Setup for replacement instructions.
3. Detector Replacement
- The optical sensor has a lifespan of 10 years. After this period, the entire smoke detector unit must be replaced.
- Mark the installation date on the detector for easy tracking.
Troubleshooting
| Problem | Possible Cause | Solution |
|---|---|---|
| Alarm sounds intermittently or for no apparent reason. | Dust accumulation, steam from bathroom, cooking fumes, insect presence. | Clean the detector (see Maintenance). Use silence mode for cooking fumes. Relocate if false alarms persist due to environmental factors. |
| Alarm does not sound during test. | Dead or improperly installed battery. Faulty unit. | Check battery polarity. Replace battery. If still no sound, replace the detector. |
| Detector emits a "chirp" sound. | Low battery. | Replace the battery immediately. |
| Detector cannot be mounted to the base plate. | Battery not inserted. | Ensure the battery is correctly inserted into the compartment. |
Product Specifications
- Model Number: 10.100.41 (RM250/4)
- Sensor Type: Optical sensor
- Alarm Volume: 85 dB
- Power Source: Battery powered (6F22, 1-year autonomy)
- Sensor Lifespan: 10 years
- Product Dimensions (D x H): 10.2 cm x 3.4 cm (4.02 in x 1.34 in)
- Operating Humidity: 25% - 85%
- Operating Temperature: Up to 40 Degrees Celsius
- Material: Plastic casing
- Included in Box: 4x Smartwares 10.100.41 Smoke Alarms, Mounting Kit (screws, wall plugs), Batteries

Image: A detailed view of the Smartwares smoke detector, showing its dimensions (10.2 cm diameter, 3.4 cm height) and highlighting key features like 85 dB siren and replaceable battery.
Warranty Information
This Smartwares product comes with a manufacturer's warranty of 2 years from the date of purchase. This warranty covers defects in materials and workmanship under normal use. Please retain your proof of purchase for any warranty claims. The warranty does not cover damage caused by misuse, improper installation, or unauthorized modifications.
Support and Contact
For further assistance, technical support, or to report an issue, please contact Smartwares customer service. You can often find contact details on the Smartwares official website or through the retailer where you purchased the product.
For more information about Smartwares products, visit the official Smartwares store: Smartwares Store