
1. Introduction
Thank you for choosing the Heater Sports Deuce 95 MPH Adjustable Baseball Pitching Machine. This manual provides essential information for the safe and effective assembly, operation, and maintenance of your pitching machine. Please read this manual thoroughly before use and retain it for future reference.
The Heater Sports Deuce 95 MPH Pitching Machine is designed to deliver fastballs and curveballs at speeds up to 95 MPH, making it suitable for various skill levels. It features a dual-wheel design, variable speed controls, and an automatic ball feeder for enhanced training sessions.
2. Safety Information
WARNING: Failure to follow these safety instructions may result in serious injury or property damage.
- Always read and understand the entire manual before operating the pitching machine.
- Ensure all users, especially children, are supervised by an adult during operation.
- Keep hands, hair, loose clothing, and all body parts clear of the pitching wheels and ball chute during operation.
- Use only regulation baseballs or Heater-dimpled pitching machine balls. Do not use damaged or wet balls.
- Always wear appropriate protective gear, including a batting helmet, when using the machine.
- Position the machine on a stable, level surface in a clear area, away from spectators and obstacles.
- Ensure the machine is unplugged from the power source before performing any adjustments, maintenance, or clearing jams.
- The machine is equipped with a safety breaker. If the machine stops unexpectedly, check the safety breaker and reset it if tripped.
- Do not operate the machine in wet conditions or near water.
3. Package Contents
Carefully unpack all components and verify that all items listed below are present. If any parts are missing or damaged, contact Heater Sports customer support immediately.

Image showing all components included in the Heater Sports Deuce 95 MPH Pitching Machine package, laid out for identification.
- Pitching Machine Housing (with Pivot Arm & Ball Chute)
- Tripod
- Legs (4 sections)
- Ball Feeder Sections
- Ball Feeder Motor Section
- Hardware (nuts, bolts, washers)
- Owner's Manual
- 1 Practice Ball
4. Assembly Instructions
Follow these steps to assemble your Heater Sports Deuce 95 MPH Pitching Machine:
- Attach Legs to Tripod: Insert the four leg sections into the tripod base. Ensure they are securely locked into place.
- Attach Tripod to Housing: Mount the pitching machine housing onto the tripod. Secure it using the provided hardware (nuts and bolts). Ensure all connections are tight and stable.
- Assemble Ball Feeder: Connect the ball feeder sections together. Attach the ball feeder motor section to the assembled feeder.
- Mount Ball Feeder: Securely mount the assembled ball feeder to the designated ball feeder mount on the pitching machine housing. Ensure the ball feeder outlet aligns correctly with the ball chute.
- Final Check: Verify that all components are securely fastened and the machine is stable before connecting to power.
5. Setup and Adjustments
Proper setup and adjustment are crucial for optimal performance and safety.
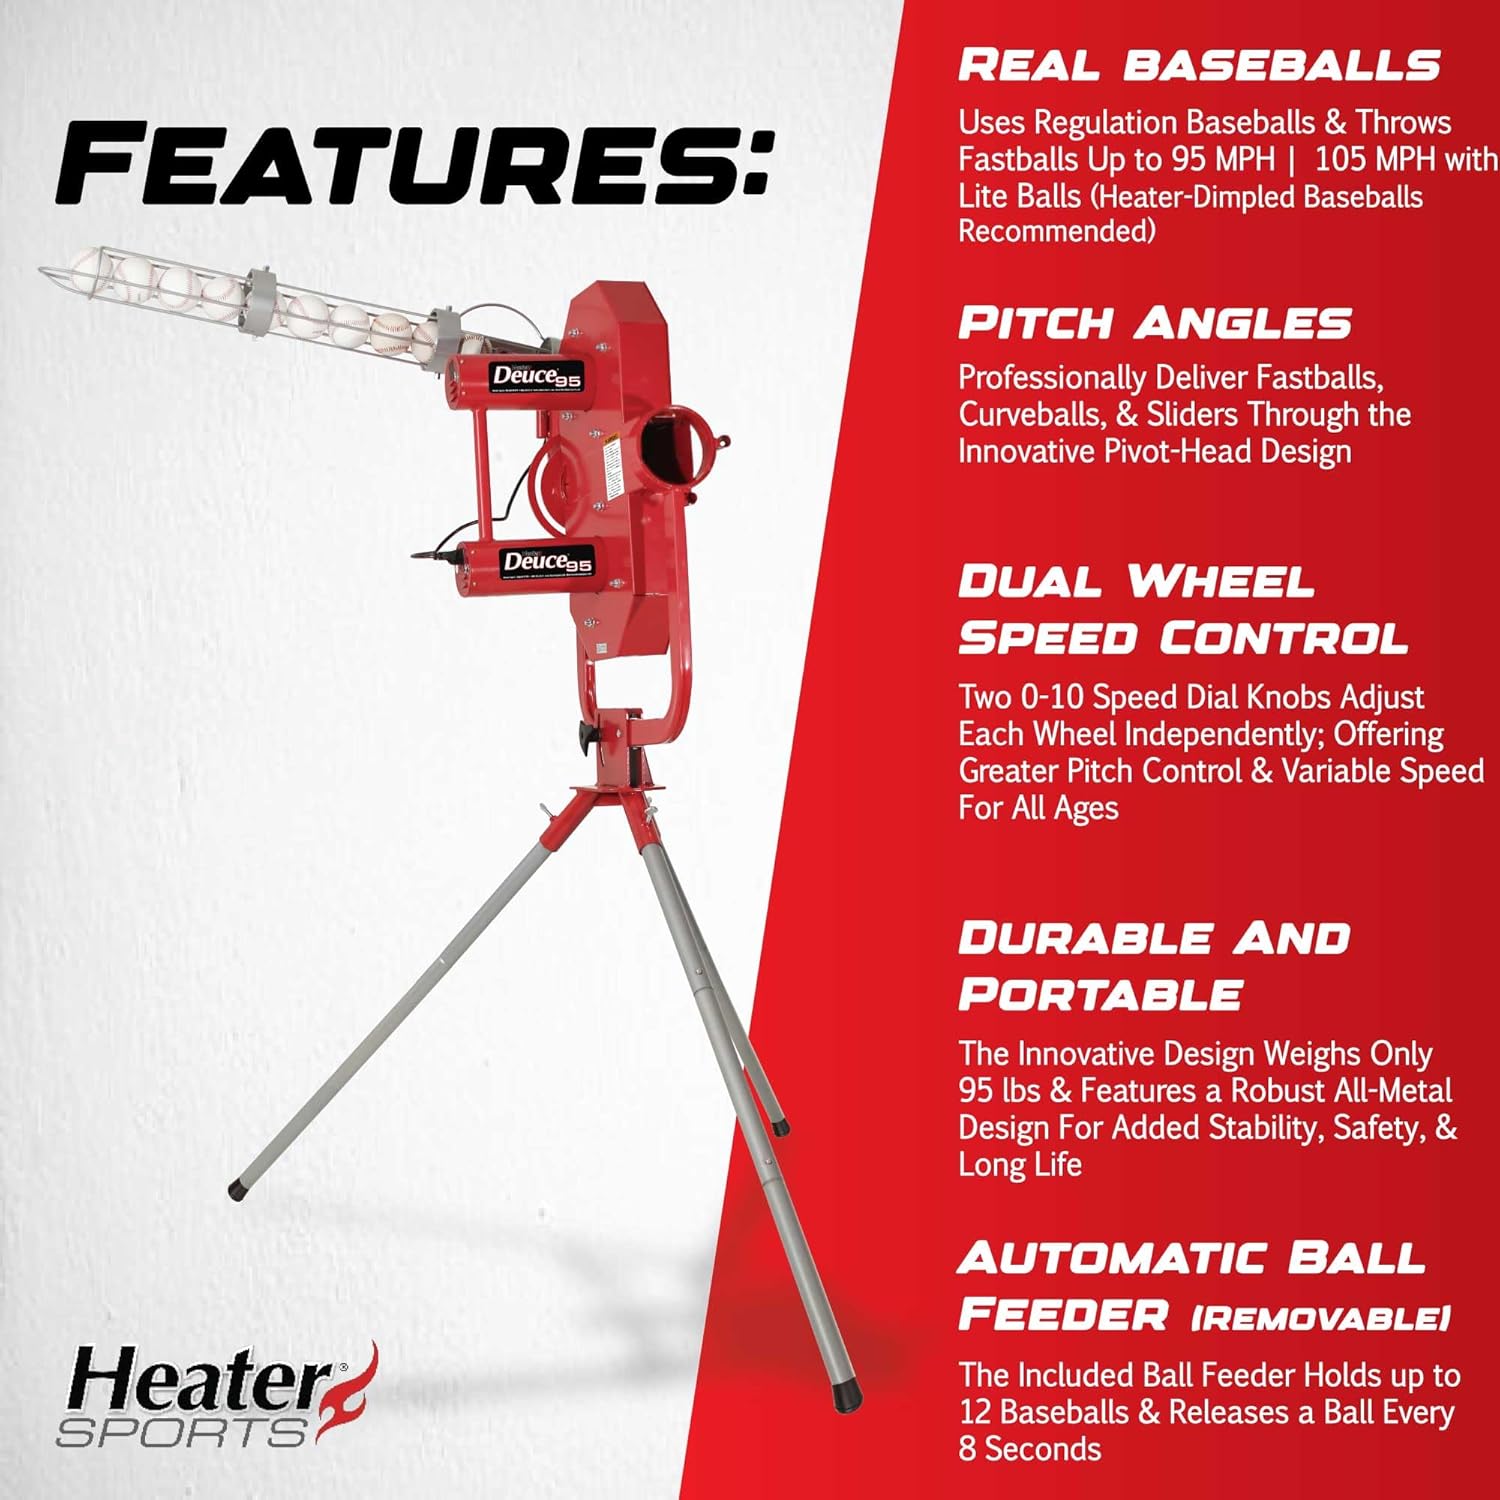
Image illustrating the assembled Heater Sports Deuce 95 MPH Pitching Machine, highlighting its features like dual wheel speed control and pivot-head design.
5.1 Machine Placement
- Place the pitching machine on a firm, level surface.
- Ensure there is ample clear space around the machine for safe operation and ball trajectory.
- Always position the machine so that the operator is safely behind it and out of the ball's path.
5.2 Pitch Angle Adjustment
The Deuce 95 features a pivot-head design allowing for easy adjustment of the pitch angle. Use the housing knob to quickly change the pitch type for grounders, strikes, or fly balls. This allows for various training scenarios, including fastballs, curveballs, and sliders.
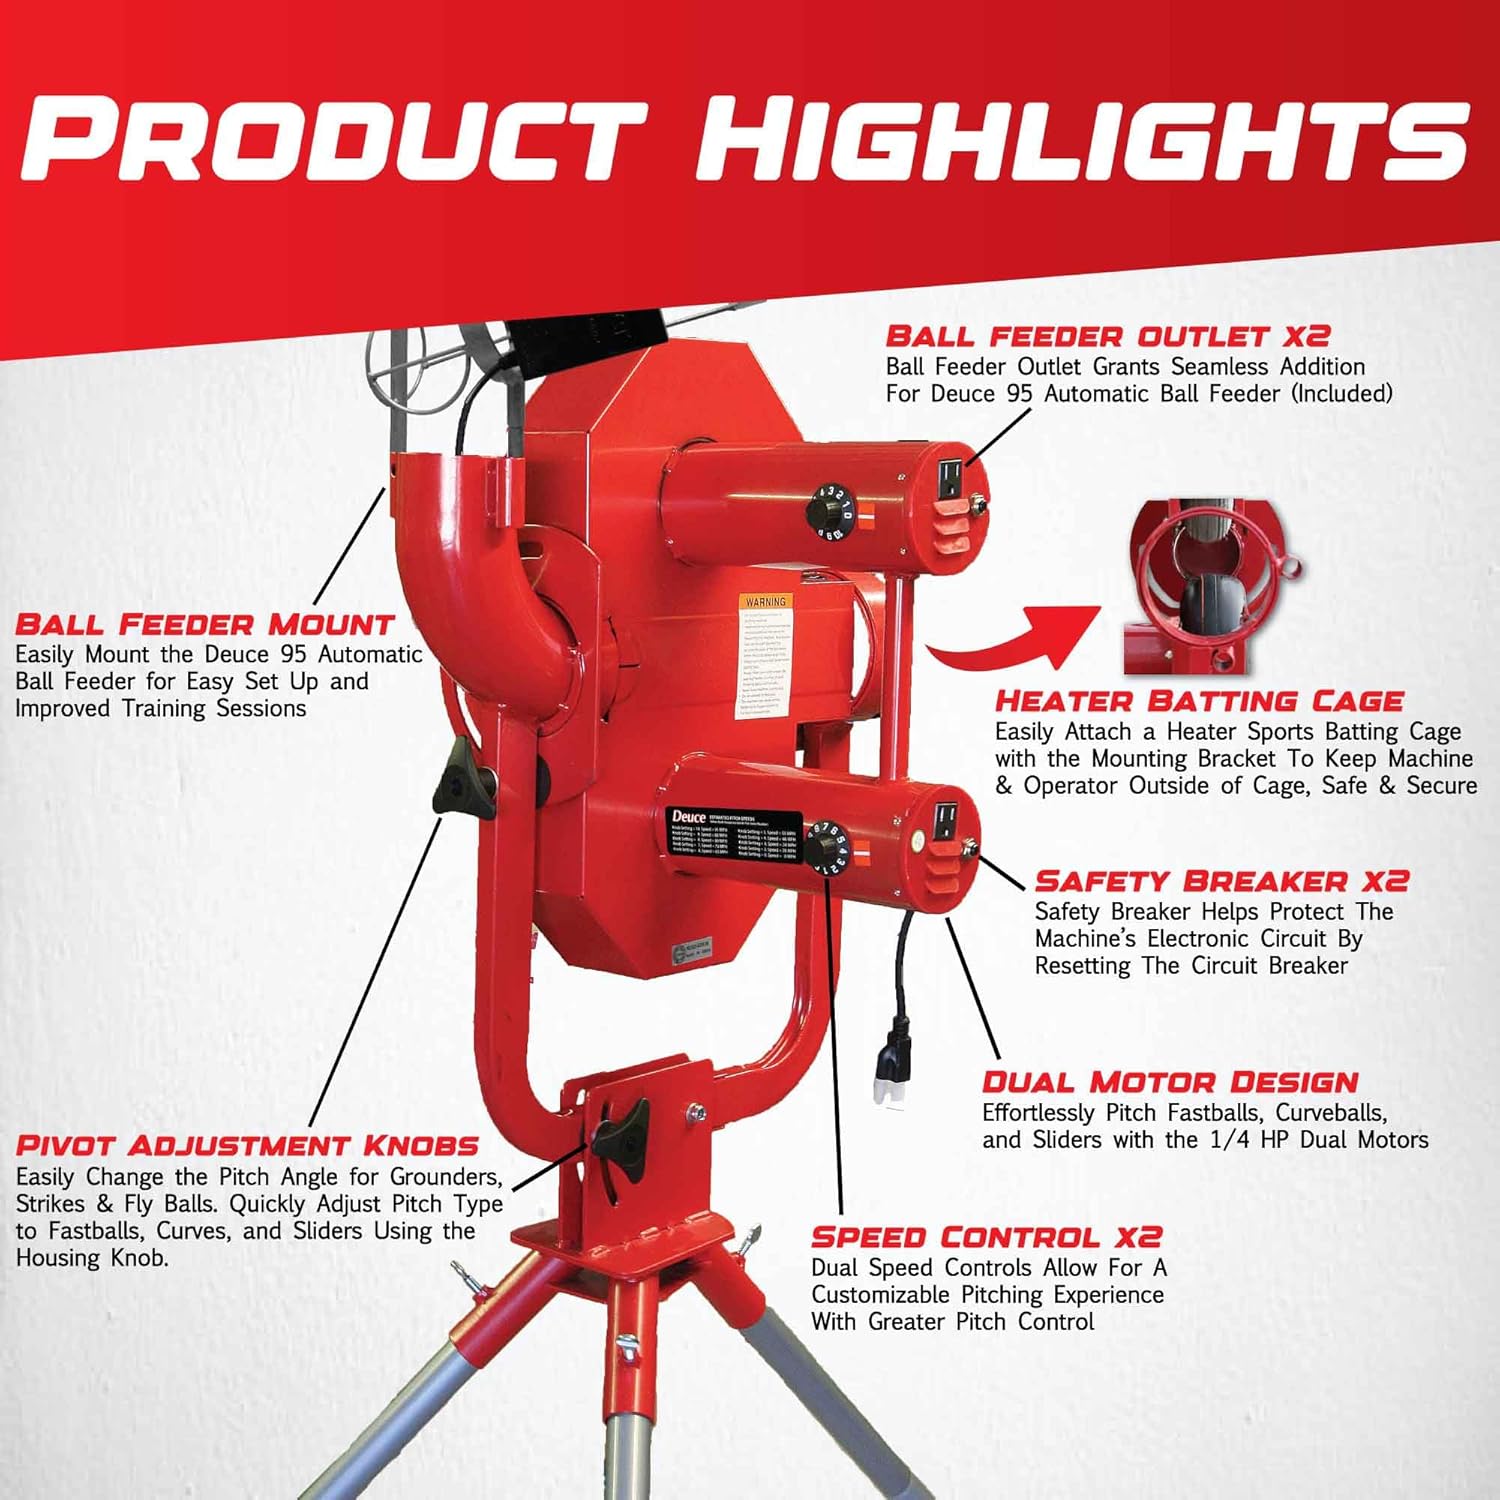
Close-up image of the Heater Sports Deuce 95 MPH Pitching Machine, detailing key components such as ball feeder outlet, pivot adjustment knobs, safety breaker, and dual motor design.
5.3 Speed Control
The machine is equipped with dual speed controls, one for each motor. These two 0-10 speed dial knobs allow for independent adjustment of each wheel, offering precise pitch control and variable speeds from 15 to 95 MPH. Adjusting the speed of each wheel differently allows for curveballs and sliders.
5.4 Automatic Ball Feeder
The included automatic ball feeder holds up to 12 baseballs and releases a ball approximately every 8 seconds. Ensure the ball feeder is securely mounted and aligned with the ball chute for consistent feeding.
6. Operating Instructions
- Power Connection: Plug the machine into a standard electrical outlet. Ensure the power cord is not frayed or damaged.
- Load Balls: Place up to 12 compatible baseballs (regulation or Heater-dimpled) into the automatic ball feeder.
- Adjust Settings: Set the desired pitch angle using the housing knob and adjust the speed controls for each motor to achieve the desired speed and pitch type (fastball, curveball, slider).
- Start Machine: Turn on the pitching machine. Allow the wheels to reach full speed before feeding balls.
- Begin Training: The automatic ball feeder will release balls at regular intervals. Ensure the batter is ready and in a safe position.
- Stop Machine: Turn off the machine after use. Unplug the power cord from the outlet.
7. Maintenance
Regular maintenance ensures the longevity and optimal performance of your pitching machine.
- Cleaning: Wipe down the machine with a damp cloth after each use. Do not use abrasive cleaners or solvents. Ensure no moisture enters the motor or electrical components.
- Storage: Store the machine in a dry, covered area when not in use. Protect it from extreme temperatures and direct sunlight.
- Inspection: Periodically inspect all nuts, bolts, and connections to ensure they are tight. Check the power cord for any signs of wear or damage. Inspect the pitching wheels for excessive wear.
- Tire Pressure: If applicable, ensure the pitching wheels maintain recommended tire pressure for consistent accuracy. Refer to any markings on the wheels or contact customer support for specific recommendations.
8. Troubleshooting
If you encounter issues with your pitching machine, refer to the following common problems and solutions:
| Problem | Possible Cause | Solution |
|---|---|---|
| Machine does not power on. | Power cord unplugged, tripped safety breaker, faulty outlet. | Ensure power cord is securely plugged in. Check and reset the safety breaker. Test the outlet with another device. |
| Inconsistent pitch accuracy. | Incorrect ball type, worn pitching wheels, uneven tire pressure, loose machine components. | Use only regulation or Heater-dimpled pitching machine balls. Inspect wheels for wear. Check and adjust tire pressure if applicable. Ensure all assembly components are tight. |
| Balls are jamming in the feeder or chute. | Incorrect ball type, misaligned feeder, foreign object, damaged balls. | Unplug the machine immediately. Carefully remove any jammed balls. Ensure the feeder is correctly aligned. Use only clean, undamaged, compatible balls. |
| Machine vibrates excessively. | Loose assembly components, uneven surface. | Check and tighten all nuts and bolts. Ensure the machine is on a stable, level surface. |
If you experience a problem not listed here or if the suggested solutions do not resolve the issue, please contact Heater Sports customer support for assistance.
9. Specifications
| Feature | Detail |
|---|---|
| Model Name | DC899 |
| Brand | Heater |
| Item Dimensions (LxWxH) | 31 x 31 x 16 inches |
| Item Weight | 92 Pounds |
| Package Dimensions (LxWxH) | 31.1 x 21.1 x 16.1 inches |
| Package Weight | 42.39 Kilograms |
| Color | Red |
| Material | Leather (Note: This material specification may refer to components like pitching wheels or ball contact surfaces.) |
| Manufacturer | World Sports Products, Inc. |
| Part Number | DC899 |
| Included Components | Pitching Machine |
| Sport Type | Baseball |
10. Warranty and Support
For warranty information, product support, or to order replacement parts, please contact Heater Sports directly. Keep your purchase receipt as proof of purchase.
For further assistance, please visit the official Heater Sports website or contact their customer service department.


