1. Important Safety Information
Before operating the Powerhorse 420cc Gas Chipper/Shredder, it is crucial to read and understand all safety instructions provided in the complete manual. Failure to do so may result in serious injury or equipment damage.
- Always wear appropriate personal protective equipment, including safety glasses or a face shield, hearing protection, and heavy-duty gloves.
- Ensure the work area is clear of bystanders, children, and pets.
- Never operate the machine without all guards and safety devices in place and functioning correctly.
- The engine is equipped with a low oil shutdown feature to prevent damage. Do not attempt to bypass this safety mechanism.
- Keep hands and feet away from all moving parts and feed openings.
2. Setup and Initial Preparation
This section outlines the basic steps for setting up your Powerhorse Chipper/Shredder for first-time use. Refer to the detailed assembly instructions in your full manual for complete guidance.
2.1 Unpacking and Assembly
Carefully remove all components from the packaging. Some assembly is required, typically involving attaching the wheels, handles, and feed hoppers. Ensure all bolts and fasteners are securely tightened.
2.2 Adding Engine Oil
The engine is shipped without oil. Before starting, add the recommended type and amount of engine oil. Locate the oil fill cap/dipstick on the engine. Use a funnel to add oil until it reaches the 'Full' mark on the dipstick. Do not overfill.
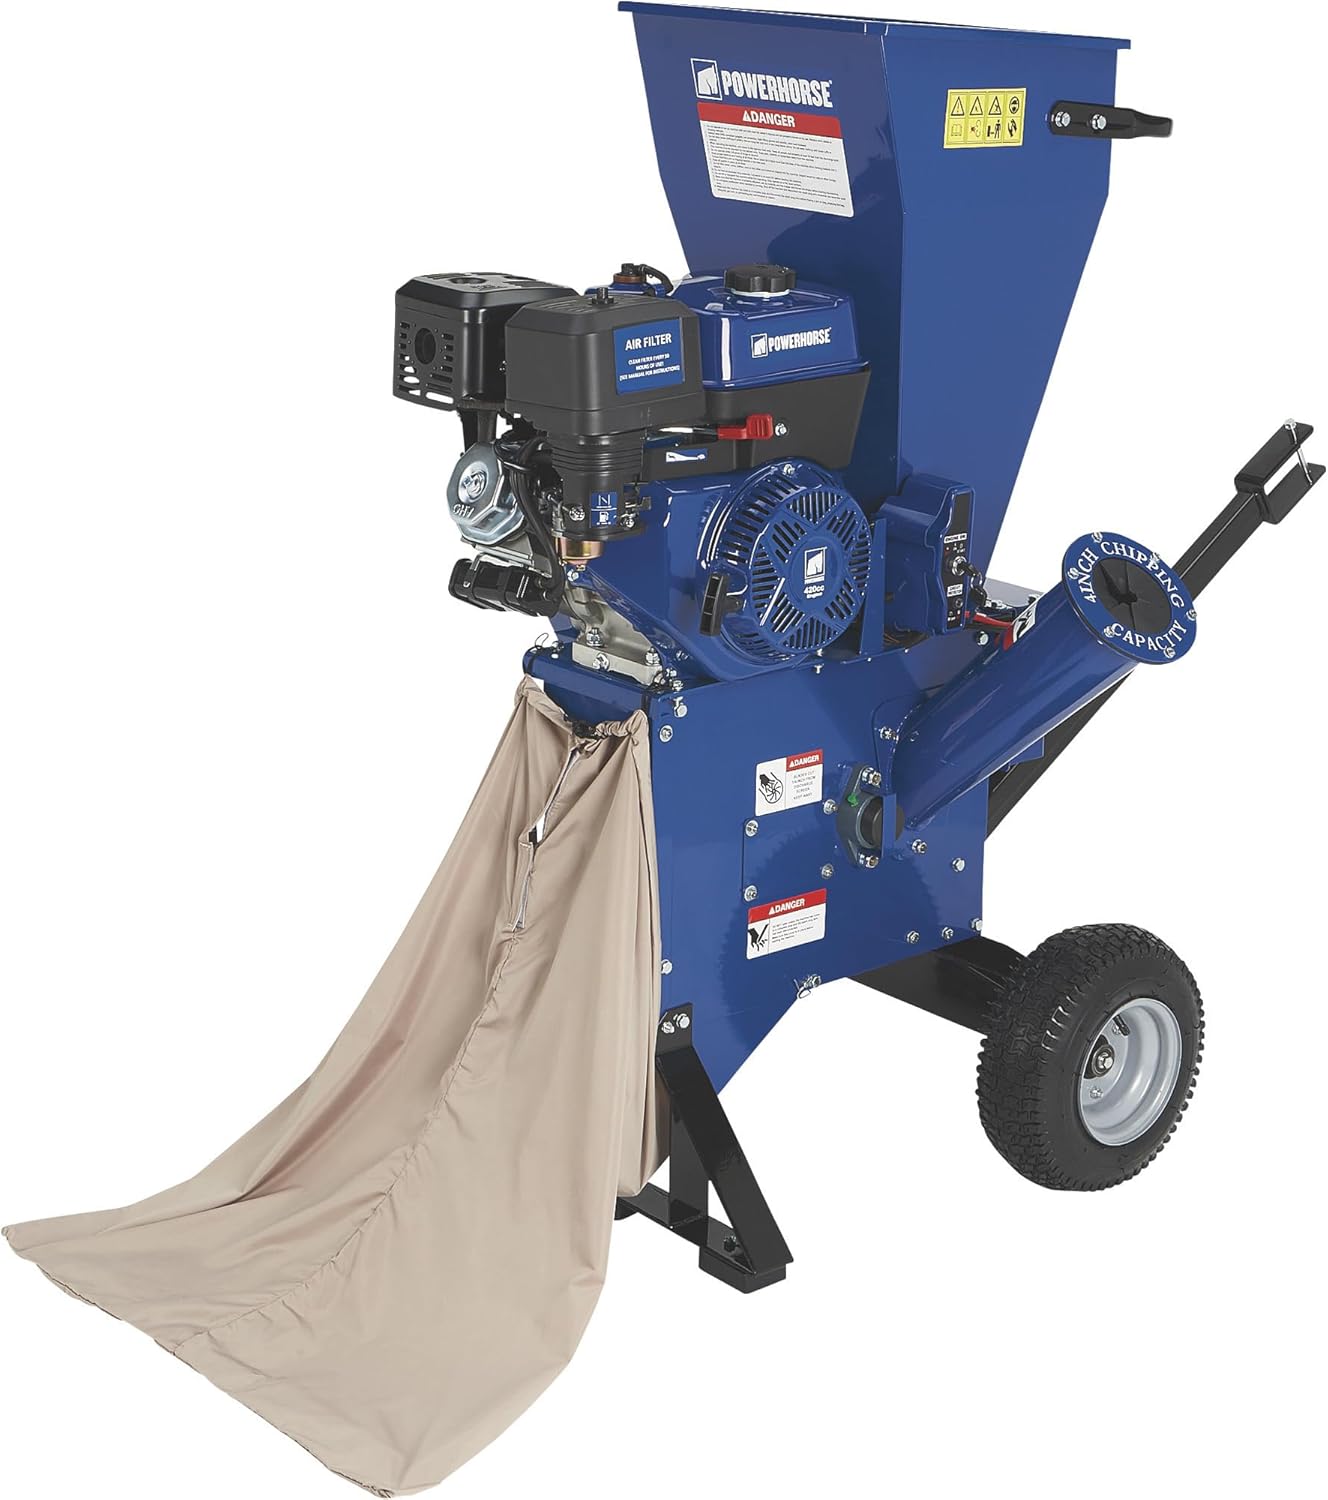
Image: Detailed view of the Powerhorse 420cc engine, highlighting the oil fill cap and dipstick. Ensure the oil level is correct before operation.
2.3 Adding Fuel
Fill the fuel tank with fresh, unleaded gasoline. Do not use E85 or other ethanol-heavy fuels. Always fill the tank in a well-ventilated area and avoid spilling fuel.

Image: Front view of the Powerhorse 420cc Gas Chipper/Shredder, showcasing its robust design and readiness for use after proper setup.
3. Operating Instructions
This section provides an overview of how to operate your Powerhorse Chipper/Shredder effectively and safely.
3.1 Starting the Engine
- Ensure the unit is on a stable, level surface.
- Turn the engine switch to the 'ON' position.
- Move the choke lever to the 'CHOKE' position (for cold starts).
- Set the throttle to the 'FAST' position.
- Pull the recoil starter handle firmly until the engine starts. Alternatively, use the electric start if equipped.
- Once the engine starts, gradually move the choke lever to the 'RUN' position as the engine warms up.
3.2 Chipping Branches
The dedicated chipper chute is designed for branches up to 4 inches in diameter. Feed branches into the chute one at a time, allowing the machine to pull them through. Do not force material into the chute.

Image: The Powerhorse Chipper/Shredder's 4-inch chipping capacity chute, ready to process larger branches.
3.3 Shredding Leaves and Brush
Use the large drop-in hopper for shredding leaves, small twigs, and other brush. Feed material gradually to prevent clogging. The dual-feed unit allows for efficient processing of various yard waste.

Image: The Powerhorse Chipper/Shredder showcasing its versatile cutting capabilities for both chipping and shredding different types of yard debris.
3.4 Maneuverability and Collection
The chipper/shredder features 13-inch pneumatic tires and a built-in handle for easy manual maneuvering. It also includes a tow bar for transport with a lawn tractor or ATV, making it portable for various work areas. A 4.7-bushel collection bag is provided for convenient mulch collection.

Image: Close-up of the 13-inch pneumatic tires on the Powerhorse Chipper/Shredder, designed for easy movement across mixed terrain.

Image: The Powerhorse Chipper/Shredder attached to a small tractor, illustrating its towable design for transport to different work sites.

Image: The 4.7-bushel collection bag attached to the Powerhorse Chipper/Shredder, designed to collect processed material for easy disposal or use as mulch.
3.5 Official Product Video
Video: Official demonstration of the Powerhorse 420cc Gas Chipper/Shredder in action, showcasing its powerful engine and efficient processing of various yard debris, including branches up to 4 inches in diameter and general brush.
4. Maintenance
Regular maintenance ensures the longevity and optimal performance of your chipper/shredder.
- Engine Oil: Check engine oil level before each use and change according to the engine manufacturer's recommendations (typically after the first 5 hours, then every 50 hours).
- Air Filter: Clean the air filter every 50 hours of use, or more frequently in dusty conditions. Refer to the engine manual for specific cleaning instructions.
- Blades and Hammers: Inspect chipping blades and shredding hammers regularly for wear or damage. Replace or sharpen as needed to maintain cutting efficiency.
- Belts: Check drive belts for tension and wear. Adjust or replace as necessary.
- General Cleaning: After each use, clean the machine thoroughly, removing any accumulated debris from the hoppers, chutes, and engine area.
5. Troubleshooting
This section addresses common issues you might encounter. For more detailed troubleshooting, consult your complete owner's manual.
- Engine Will Not Start:
- Check fuel level.
- Verify engine oil level (low oil shutdown will prevent starting).
- Ensure the engine switch is 'ON' and the choke is set correctly for starting.
- Check the spark plug.
- Poor Chipping/Shredding Performance:
- Inspect blades and hammers for dullness or damage.
- Ensure the engine is running at full throttle.
- Avoid overloading the machine; feed material gradually.
- Excessive Vibration:
- Check for loose bolts or fasteners.
- Inspect blades and hammers for imbalance or damage.
6. Specifications
| Feature | Specification |
|---|---|
| Brand | Powerhorse |
| Model Number | 1104S233 |
| Engine | 420cc Gas Engine |
| Chipping Capacity | 4 inches |
| Power Source | Gasoline Engine |
| Material | Alloy Steel, Cast Iron |
| Item Weight | 255 Pounds |
| Tires | 13-inch Pneumatic |
| Collection Bag Capacity | 4.7 Bushel |
7. Warranty and Support
For detailed warranty information, product registration, or technical support, please refer to the warranty card included with your purchase or visit the official Powerhorse website. You may also contact Northern Tool + Equipment, the seller, for assistance.
- Seller: Northern Tool + Equipment
- Return Policy: 30-day easy returns (as per seller's policy)


