
1. Introduction
This manual provides essential information for the proper setup, operation, and maintenance of your FrSky XM Plus Mini Full Range Receiver. Designed for compact applications, this receiver offers full-range capabilities with SBUS output and integrated RSSI functionality. Please read this manual thoroughly before using the product to ensure safe and optimal performance.
2. Product Overview
The FrSky XM Plus Mini is an ultra-compact and lightweight full-range receiver compatible with FrSky D16 mode transmitters. It is ideal for micro-quads and other applications where space and weight are critical. It provides up to 16 channels via SBUS and features an analog RSSI output.
Key Features:
- Ultra-miniature size: 21.5x12x3.5mm
- Lightweight: 1.6g
- Full range operation, comparable to X4R-SB and XSR receivers.
- Supports up to 16 channels via SBUS (CH1~CH15 for PWM, CH16 RSSI for FC).
- Integrated analog RSSI output (0~3.3V) on a dedicated solder pad and via channel 16.
- Firmware upgradeable.
- Direct solder option to Flight Controller (FC) with header pins (if FC supports).
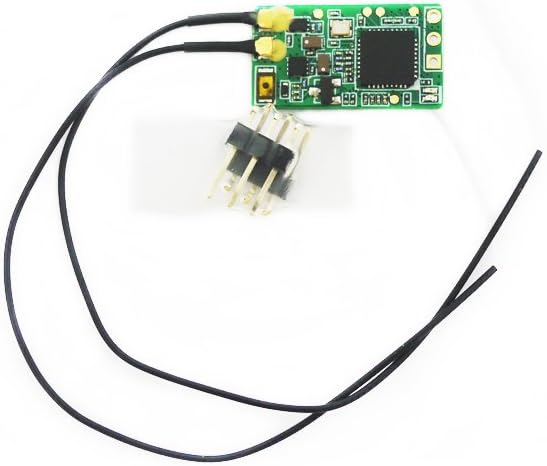
Image 2.1: Top view of the FrSky XM Plus Mini Full Range Receiver, showing the main board with two antennas and optional header pins.

Image 2.2: The FrSky XM Plus Mini Receiver positioned next to a coin, illustrating its compact size.
3. Setup
3.1 Binding Procedure
To establish communication between your FrSky XM Plus Mini receiver and your FrSky D16 mode transmitter, follow these steps:
- Turn on your FrSky transmitter and navigate to the Model Setup menu. Select the D16 mode.
- Choose the 'Bind' option on your transmitter. The transmitter will emit a series of beeps, indicating it is in bind mode.
- While holding down the F/S (Failsafe) button on the XM Plus Mini receiver, connect power to the receiver. The red and green LEDs on the receiver will illuminate, indicating it is in bind mode.
- Once the binding process is successful, the green LED on the receiver will remain solid, and the red LED will turn off. The transmitter will stop beeping.
- Disconnect power from the receiver, then turn off your transmitter.
- Reconnect power to the receiver (without holding the F/S button). Turn on your transmitter. The green LED on the receiver should now be solid, confirming a successful connection.

Image 3.1: The FrSky XM Plus Mini Receiver showing the header pins for connection, including the F/S button location.
3.2 Wiring and Connection
The XM Plus Mini receiver primarily uses SBUS for communication with a Flight Controller (FC). Ensure your FC supports SBUS input.
- Power Connection: Connect the receiver to a 3.7V to 10V power source. Typically, this is provided by the FC.
- SBUS Connection: Connect the SBUS output pin of the receiver to the SBUS input pad/pin on your Flight Controller.
- RSSI Output: The receiver provides an analog RSSI output (0-3.3V) on a dedicated solder pad. This can be connected to an analog input on your FC or OSD for signal strength monitoring. Caution: This analog RSSI signal should not be connected directly to a MinimOSD without a digital-to-analog converter (low pass filter), as it will only display 0% or 100%.
- Direct Soldering: For ultra-compact builds, the receiver can be directly soldered to the FC if the FC provides compatible pads and pin spacing.
3.3 Antenna Placement
Proper antenna placement is crucial for maintaining a reliable signal. Position the two antennas at a 90-degree angle to each other, away from carbon fiber, metal, or other conductive materials that could shield the signal. Ensure the antenna tips are free from obstruction.
3.4 Firmware Updates
Periodically, FrSky may release firmware updates for the XM Plus Mini receiver to improve performance, add features, or address issues. Refer to the official FrSky website for the latest firmware and instructions. A specific FrSky USB adapter or similar tool is typically required for firmware flashing.
4. Operating Instructions
4.1 Power On Sequence
Always power on your transmitter first, then power on your model (with the receiver). This ensures the receiver establishes a connection with the transmitter before flight.
4.2 Failsafe Configuration
Failsafe is a critical safety feature that defines the receiver's behavior in case of signal loss. It is highly recommended to configure failsafe settings on your transmitter. Common failsafe options include:
- Hold: Maintains the last received stick positions.
- No Pulses: Stops sending pulses to the servos/ESC.
- Custom: Sets specific positions for each channel (e.g., throttle to zero, control surfaces neutral).
Refer to your FrSky transmitter's manual for detailed instructions on setting up failsafe.
4.3 RSSI Monitoring
The analog RSSI output provides real-time signal strength information. Integrate this into your Flight Controller's OSD (On-Screen Display) or telemetry system to monitor signal quality during flight. This helps in identifying potential range issues or interference.
5. Maintenance
The FrSky XM Plus Mini receiver is a robust electronic component, but proper care ensures its longevity and reliability.
- Physical Inspection: Regularly inspect the receiver for any signs of physical damage, such as bent pins, cracked solder joints, or damaged antennas.
- Cleaning: If necessary, gently clean the receiver with a soft, dry brush or compressed air to remove dust and debris. Avoid using liquids or solvents.
- Storage: Store the receiver in a dry, cool environment, away from direct sunlight and extreme temperatures. Protect it from static discharge.
- Antenna Care: Ensure antennas are not kinked or cut. Damaged antennas can severely reduce range and signal quality.
6. Troubleshooting
6.1 No Bind or Loss of Signal
- Check Binding: Ensure the receiver is correctly bound to your transmitter. Repeat the binding procedure if necessary.
- Transmitter Mode: Verify your transmitter is set to D16 mode.
- Firmware Mismatch: Ensure the receiver and transmitter firmware versions are compatible. Update firmware if needed.
- Antenna Placement: Check that antennas are properly positioned and undamaged. Avoid placing them near carbon fiber or metal.
- Interference: Test in a different location to rule out local radio interference.
- Power Supply: Confirm the receiver is receiving stable power within its operating voltage range (3.7V-10V).
6.2 Incorrect RSSI Readings
- MinimOSD Connection: If using a MinimOSD, ensure a low-pass filter (digital-to-analog converter) is used for the analog RSSI signal. Direct connection will result in 0% or 100% readings only.
- Calibration: Some Flight Controllers or OSDs may require RSSI calibration. Refer to your FC/OSD manual.
6.3 Receiver Not Powering On
- Power Source: Verify the power source is active and providing the correct voltage.
- Wiring: Check all power connections for correct polarity and secure soldering/connections.
- Physical Damage: Inspect the receiver for any visible damage to components or traces.
7. Specifications
| Parameter | Value |
|---|---|
| Dimensions (LxWxH) | 21.5 x 12 x 3.5 mm (0.85 x 0.47 x 0.14 inches) |
| Weight | 1.6g (0.056 ounces) |
| Number of Channels | Up to 16CH from SBUS (CH1~CH15 for PWM, CH16 RSSI for FC) |
| Operating Voltage Range | 3.7V ~ 10V |
| Operating Current | 30mA @ 5V |
| Operating Range | Full Range |
| RSSI Output | Analog 0~3.3V |
| Compatibility | FrSky D16 mode |
| Firmware | Upgradeable |
8. Warranty Information
Specific warranty details for the FrSky XM Plus Mini Full Range Receiver are not provided within the product data. For information regarding warranty coverage, terms, and conditions, please refer to the official FrSky website or contact your authorized retailer.
9. Support Information
For technical support, troubleshooting assistance, or further inquiries regarding the FrSky XM Plus Mini Full Range Receiver, please visit the official FrSky website. You may find FAQs, forums, and contact information for their support team there. Alternatively, contact the retailer from whom you purchased the product.