1. Introduction
Welcome to your new Tediver Digital Blood Pressure Monitor. This device is designed for accurate and convenient measurement of blood pressure and pulse rate on the upper arm. It features a large LCD display, two-user memory, and an irregular heartbeat detector, providing essential health insights for home use.

Image: The Tediver Digital Blood Pressure Monitor, showing the main unit, the arm cuff, the AC adapter, and the portable carrying case.
2. Important Safety Information
Please read all instructions carefully before using this device. Incorrect use may lead to inaccurate results or device damage.
- This device is intended for adult home use only. Consult your physician for interpretation of blood pressure measurements.
- Do not use this device for diagnosis or treatment of any health problem or disease.
- Keep the device out of reach of children and pets.
- Do not use the device in a moving vehicle or on an airplane.
- Avoid taking measurements immediately after exercise, bathing, or consuming alcohol/caffeine.
- If you experience discomfort during measurement, press the power button to stop the inflation immediately.
3. Product Components
Your Tediver Digital Blood Pressure Monitor package includes the following items:
- Digital Blood Pressure Monitor Unit
- Large Upper Arm Cuff (22-42 cm / 8.7-16.5 inches)
- AC Power Adapter (DC6V)
- Portable Carrying Case
- Instruction Manual

Image: An overhead view of all items included in the Tediver blood pressure monitor kit, neatly arranged.
4. Setup Guide
4.1 Powering the Device
The Tediver Blood Pressure Monitor can be powered in two ways:
- AC Adapter: Connect the included AC adapter to the DC 6V port on the side of the monitor and plug it into a standard wall outlet. This is the recommended power source for consistent use.
- Batteries: For portable use, insert four (4) AA batteries (not included) into the battery compartment on the bottom of the monitor. Ensure correct polarity (+/-).

Image: The blood pressure monitor with its AC adapter plugged into the side port, illustrating the wired power option.
4.2 Setting Date and Time
To ensure accurate record-keeping, set the current date and time:
- With the device off, press and hold the 'SET' button (usually marked with a clock icon or 'M') for a few seconds until the year starts flashing.
- Use the 'MEM' button (usually marked with 'M') to adjust the year. Press 'SET' to confirm and move to the month.
- Repeat the process for month, day, hour, and minute.
- Once all settings are confirmed, the device will exit setting mode automatically.
5. Operating Instructions
5.1 Proper Cuff Placement
Accurate measurements depend on correct cuff placement. Follow these steps:
- Sit comfortably with your feet flat on the floor, back supported, and arm resting on a table.
- Slide the cuff onto your bare upper left arm, ensuring the air tube points towards your forearm.
- The bottom edge of the cuff should be approximately 2 cm (0.8 inches) above your elbow joint.
- Wrap the cuff snugly around your arm. You should be able to insert two fingers between your arm and the cuff.
- Ensure the artery mark on the cuff aligns with your brachial artery (inner arm).

Image: A four-panel diagram illustrating the correct steps for positioning the arm cuff for a blood pressure measurement.
5.2 Measurement Procedure
Once the cuff is correctly placed:
- Select your user ID (P1 or P2) by pressing the 'M' button if the device supports multiple users.
- Press the 'START/STOP' button (usually marked with a power icon). The cuff will begin to inflate automatically.
- Remain still and silent during the measurement. Do not talk or move your arm.
- Once the measurement is complete, the cuff will deflate, and your systolic (SYS), diastolic (DIA), and pulse (PUL) readings will be displayed on the screen.
- The device will automatically store the reading with a date and time stamp.

Image: A detailed view of the monitor's display, showing the large digits for readings, indicators for memory, time, and heart rate, and the WHO BP rating bar.
5.3 Understanding Your Readings
The display shows three main values:
- SYS (Systolic Pressure): The highest pressure in your arteries when your heart beats.
- DIA (Diastolic Pressure): The lowest pressure in your arteries when your heart rests between beats.
- PUL (Pulse Rate): Your heart rate, measured in beats per minute.
- IHB (Irregular Heartbeat): An icon will appear if an irregular heartbeat is detected during the measurement. Consult your doctor if this appears frequently.
The monitor also features a BP level bar, which visually indicates how your reading compares to normal blood pressure measurements according to WHO (World Health Organization) guidelines.
| Category | Systolic (mmHg) | Diastolic (mmHg) |
|---|---|---|
| Normal | Less than 120 | Less than 80 |
| Elevated | 120-129 | Less than 80 |
| High Blood Pressure (Hypertension) Stage 1 | 130-139 | 80-89 |
| High Blood Pressure (Hypertension) Stage 2 | 140 or higher | 90 or higher |
| Hypertensive Crisis | Higher than 180 | Higher than 120 |
Note: This table is for general reference. Always consult a healthcare professional for diagnosis and treatment.
6. Memory Functions
The Tediver Blood Pressure Monitor can store up to 120 readings for each of two users (User 1 and User 2), allowing you to track your blood pressure trends over time.
6.1 Reviewing Stored Readings
- With the device off, press the 'MEM' button (usually marked with 'M').
- The most recent reading will be displayed first.
- Press the 'MEM' button repeatedly to scroll through previous readings. Each reading will show the blood pressure values, pulse rate, and the date/time stamp.
- To switch between User 1 and User 2 memory, press the 'User Selection' button (if available, often integrated with 'M' or a dedicated user icon).
6.2 Clearing Memory
To clear all stored readings for a specific user:
- Enter memory review mode for the desired user.
- Press and hold the 'MEM' button for approximately 5 seconds until 'DEL ALL' or a similar indicator appears and the memory is cleared.
- Be aware that this action is irreversible and will delete all readings for the selected user.
7. Maintenance and Storage
7.1 Cleaning
- Wipe the monitor and cuff with a soft, dry cloth. If necessary, use a slightly damp cloth with mild soap, then wipe dry.
- Do not use abrasive cleaners, solvents, or immerse the device or cuff in water.
7.2 Storage
- Store the device and cuff in the provided carrying case when not in use.
- Keep the device in a cool, dry place, away from direct sunlight, extreme temperatures, and humidity.
- If storing for an extended period, remove the batteries to prevent leakage.
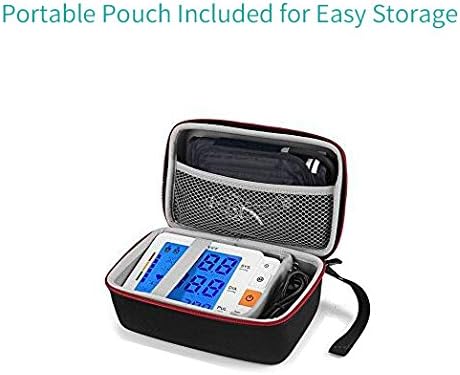
Image: The blood pressure monitor and its cuff securely placed within the custom-fit carrying case.

Image: A hand holding the compact carrying case, highlighting its portability and ease of transport.
8. Troubleshooting
If you encounter issues with your blood pressure monitor, refer to the table below for common problems and solutions.
| Problem | Possible Cause | Solution |
|---|---|---|
| Device does not power on. | No power, low batteries, or incorrect battery insertion. | Ensure AC adapter is securely plugged in, or replace batteries and check polarity. |
| Cuff does not inflate or inflates too little. | Cuff not connected properly, air leakage, or cuff damaged. | Check cuff connection to the monitor. Ensure cuff is not damaged. |
| Error message (e.g., E-1, E-2) on display. | Movement during measurement, improper cuff placement, or irregular pulse. | Remain still. Re-apply cuff correctly. If persistent, consult a doctor. |
| Readings are inconsistent or seem inaccurate. | Improper posture, talking during measurement, or recent activity. | Ensure proper measurement conditions (rested, calm, correct cuff placement). Take multiple readings. |
| Irregular Heartbeat (IHB) symbol appears frequently. | Detection of an irregular pulse rhythm. | This is an indicator, not a diagnosis. Consult your physician for evaluation. |
9. Product Specifications
Detailed technical specifications for the Tediver Digital Blood Pressure Monitor:
- Model: BP366A
- Measurement Method: Oscillometric
- Measurement Range: Pressure: 0-299 mmHg; Pulse: 40-199 beats/minute
- Accuracy: Pressure: ±3 mmHg; Pulse: ±5% of reading
- Cuff Size: Large, fits arm circumference 22-42 cm (8.7-16.5 inches)
- Memory: 2 users x 120 readings with date/time stamp
- Power Source: DC 6V (AC adapter included) or 4 x AA batteries (not included)
- Display Type: Backlight LCD
- Automatic Power Off: Approximately 1 minute after last operation
- Product Dimensions: Approximately 14.5 x 10.5 x 5.2 cm (5.7 x 4.13 x 1.96 inches)
- Item Weight: Approximately 735 grams (1.62 pounds)
- Material: Plastic

Image: A diagram illustrating the physical dimensions of the blood pressure monitor unit and the large arm cuff.
10. Warranty and Support
10.1 Warranty Information
The Tediver Digital Blood Pressure Monitor (Model BP366A) comes with a 2-year limited warranty from the date of purchase. This warranty covers defects in materials and workmanship under normal use. It does not cover damage caused by misuse, accidents, unauthorized modifications, or failure to follow the instructions in this manual. Please retain your proof of purchase for warranty claims.
10.2 Customer Support
For technical assistance, warranty claims, or any questions regarding your Tediver Blood Pressure Monitor, please contact our customer support team. Refer to the contact information provided on the product packaging or the official Tediver website.