Product Overview
The ASRock H110 Pro BTC+ is a specialized motherboard designed for cryptocurrency mining operations. It supports a high number of graphics processing units (GPUs) to maximize mining efficiency. This manual provides essential information for setting up, operating, and maintaining your motherboard.

Image: Top-down view of the ASRock H110 Pro BTC+ motherboard, showcasing its layout and multiple PCIe slots.
1. Setup Guide
1.1 Component Installation
Follow these steps to install the necessary components onto your ASRock H110 Pro BTC+ motherboard.
1.1.1 Processor (CPU) Installation
This motherboard supports 7th and 6th Generation Intel Core i7/i5/i3/Pentium/Celeron Processors with an LGA 1151 socket. Carefully align your CPU with the socket, ensuring the notches match, then gently place it into the socket. Secure the retention arm.
1.1.2 Memory (RAM) Installation
The motherboard features DDR4 DIMM slots. It supports DDR4 2400/2133 memory modules with a maximum capacity of 128GB. Ensure memory modules are compatible by checking the Qualified Vendor List (QVL) on the ASRock website. Insert the RAM modules firmly into the slots until the clips on both sides lock into place.
1.1.3 Storage Device Installation
The ASRock H110 Pro BTC+ includes 4 SATA3 ports for traditional storage drives and 1 M.2 slot (SATA3) for high-speed SSDs. Connect your SATA drives using SATA cables. For M.2 SSDs, insert the module into the M.2 slot and secure it with the provided screw.
1.1.4 Power Connections
Connect the main 24-pin ATX power connector and the 8-pin ATX 12V power connector from your power supply to the motherboard. For stable operation with multiple GPUs, ensure your power supply is adequate and properly connected. Avoid using cheap power supply units (PSUs) and ensure proper power distribution, especially when using multiple GPUs. If using more than 3 GPUs, utilize both SATA and top Molex power sources, but do not use both Molex plugs simultaneously.
1.1.5 Graphics Card (GPU) Installation
This motherboard is designed for mining with 1 PCIe 3.0 x16 slot and 12 PCIe 2.0 x1 slots. Install your primary graphics card into the PCIe 3.0 x16 slot. For additional GPUs, use the PCIe 2.0 x1 slots, typically with risers. When using PCIe risers, it is recommended to apply electrical tape around the riser chips that connect to the PCIe slots to prevent accidental shorts.

Image: Angled view of the ASRock H110 Pro BTC+ motherboard, highlighting the numerous PCIe slots for GPU installation.

Image: Rear view of the ASRock H110 Pro BTC+ motherboard, showing the solder points and general PCB layout.
1.1.6 IO Shield Installation
The IO shield is a separate component. Ensure it is installed into your PC case before mounting the motherboard to protect the rear ports and prevent dust ingress.

Image: The retail box of the ASRock H110 Pro BTC+ motherboard along with its included accessories like cables and manual.
2. Operating Instructions
2.1 Initial Boot-up
After all components are securely installed and power is connected, power on your system. The motherboard features onboard power and reset buttons for convenient operation, especially in open-air mining rigs.
2.2 BIOS Configuration
Access the BIOS/UEFI settings during boot-up (usually by pressing DEL or F2). Configure settings relevant to mining, such as PCIe lane allocation, power management, and boot options. The motherboard includes a dedicated mining BIOS for optimized performance.
2.3 Network and Audio
The motherboard is equipped with Gigabit Ethernet for wired network connectivity. For audio, it supports 7.1 CH HD Audio (Realtek ALC887 Audio Codec).
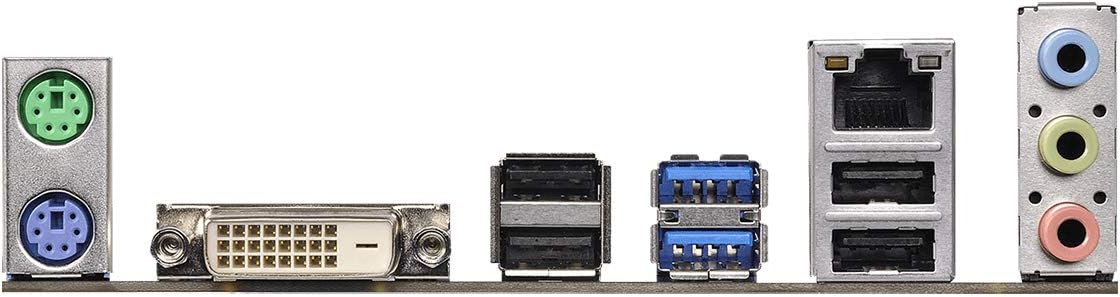
Image: Close-up view of the rear I/O panel of the ASRock H110 Pro BTC+ motherboard, showing various ports including USB, Ethernet, and audio jacks.
3. Maintenance
3.1 System Cooling
Ensure adequate airflow and cooling for all components, especially GPUs and the CPU. The motherboard has multiple fan headers (CPU_FAN, CPU_OPT, SYS_FAN1, SYS_FAN2, SYS_FAN3) to connect system fans. Regularly clean dust from fans and heatsinks to maintain optimal temperatures.
3.2 BIOS Updates
Periodically check the ASRock website for BIOS updates. Updates can improve stability, compatibility, and performance. Use the BIOS Q-Flash Plus feature for convenient BIOS updates without needing a CPU or RAM installed.
3.3 Component Checks
Regularly inspect all connections for looseness or damage. Ensure all power cables, data cables, and riser connections are secure. Check for any signs of overheating or component stress.
4. Troubleshooting
4.1 Common Issues
- System Fails to Boot: Verify all power connections, especially the 24-pin ATX and 8-pin ATX 12V connectors. Reseat RAM modules and ensure the CPU is correctly installed.
- GPU Errors: If experiencing GPU errors, ensure all GPUs are properly seated in their PCIe slots/risers and receiving adequate power. Check riser connections and consider updating GPU drivers.
- Instability: Ensure a stable and high-quality power supply is used. Check RAM compatibility against the QVL. Overclocking unstable settings can lead to system crashes.
5. Product Specifications
| Feature | Detail |
|---|---|
| Brand | ASRock |
| Model Name | H110 PRO BTC+ |
| CPU Socket | LGA 1151 |
| Compatible Processors | Intel Celeron, Intel Pentium, 7th and 6th Generation Intel Core i7/i5/i3 |
| Chipset Type | Intel H110 |
| RAM Memory Technology | DDR4 SDRAM |
| Memory Speed | 2400 MHz / 2133 MHz |
| PCIe Slots | 1 PCIe 3.0 x16, 12 PCIe 2.0 x1 |
| SATA Ports | 4 SATA3 |
| M.2 Slots | 1 M.2 (SATA3) |
| USB 2.0 Ports | 4 (rear) |
| Dimensions (LxWxH) | 13.58 x 11.22 x 2.36 inches |
| Item Weight | 1.19 pounds |
6. Warranty Information
Specific warranty details for the ASRock H110 Pro BTC+ motherboard are not provided in the available product information. Please refer to the manufacturer's official website or contact ASRock customer support for comprehensive warranty terms and conditions.
7. Support
For further assistance, technical support, or to access updated drivers and manuals, please visit the official ASRock Store or their global support website.