Introduction
This manual provides detailed instructions for the safe and efficient installation, operation, and maintenance of your Relaxdays 2X Ceiling Bike Rack Pulley System. Please read this manual thoroughly before use and retain it for future reference.
Safety Information
- Ensure the mounting surface (ceiling joists or solid concrete) can support the weight of the bike rack and the bicycle (up to 30 kg).
- Use appropriate mounting hardware for your ceiling type. The included hardware may not be suitable for all surfaces.
- Always secure the rope properly after raising the bicycle to prevent accidental lowering.
- Do not exceed the maximum weight capacity of 30 kg.
- Keep hands and fingers clear of moving parts during operation.
- Regularly inspect all components for wear, damage, or loose connections. Replace worn or damaged parts immediately.
- Keep children and pets away from the bike rack during installation and operation.
Package Contents
Please verify that all components are present before beginning installation:
- 2x Ceiling Mounting Brackets with Pulleys
- 2x Bike Hooks with Pulleys and Straps
- 1x Rope (approx. 15 meters)
- 1x Rope Cleat
- Mounting Hardware (screws, anchors)


Setup and Installation
Follow these steps carefully to install your bike rack system. It is recommended to have a second person assist during installation.
Step 1: Determine Mounting Location
Choose a location on your ceiling that provides sufficient space for your bicycle to be lifted without obstruction. Ensure the area is clear of light fixtures, pipes, or other obstacles. The two main mounting brackets should be spaced according to the length of your bicycle, typically aligning with the handlebars and the seat post.
Step 2: Mount the Ceiling Brackets
- Position the two ceiling mounting brackets on the ceiling. The bracket with the rope locking mechanism should be placed where you intend to operate the pulley system.
- Mark the drilling points for each bracket. Ensure they are aligned and parallel.
- Drill pilot holes using an appropriate drill bit for your ceiling material.
- Insert wall anchors (if necessary) and secure the brackets firmly to the ceiling using the provided screws or suitable alternatives.

Step 3: Thread the Rope
- Thread the rope through the pulleys on the ceiling brackets and the bike hooks as shown in the diagram or video.
- Ensure the rope runs smoothly through all pulleys and the locking mechanism.
- Tie a secure knot at the end of the rope that attaches to the bike hook.

Step 4: Install the Rope Cleat
Mount the rope cleat on a wall at a convenient height, allowing you to easily secure the rope after raising the bicycle.
Installation Video Demonstration
For a visual guide on the installation process, please watch the following video:
Operating Instructions
Lifting a Bicycle
- Lower the bike hooks by releasing the rope from the cleat and gently pulling the rope to allow the hooks to descend.
- Position your bicycle directly beneath the hooks.
- Carefully attach one hook to the handlebars and the other to the seat post. The hooks are padded to protect your bicycle's frame.
- Pull the rope to raise the bicycle. The pulley system will reduce the effort required.
- Once the bicycle is at the desired height, secure the rope firmly to the rope cleat. Ensure the locking mechanism on the pulley engages to prevent accidental lowering.

Lowering a Bicycle
- Carefully release the rope from the cleat.
- While holding the rope securely, gently allow the bicycle to descend.
- Once the bicycle is at a manageable height, unhook it from the rack.
- Raise the empty hooks to prevent them from being an obstruction.
Maintenance
- Regular Inspection: Periodically check all screws, bolts, and connections to ensure they are tight.
- Rope Condition: Inspect the rope for any signs of fraying, wear, or damage. Replace the rope if any deterioration is observed.
- Pulley Function: Ensure the pulleys rotate freely and are not obstructed. Lubricate if necessary with a suitable lubricant.
- Hook Padding: Check the rubber padding on the hooks for wear. This padding protects your bicycle's finish.
Troubleshooting
| Problem | Possible Cause | Solution |
|---|---|---|
| Bicycle does not lift smoothly. | Rope tangled or pulleys obstructed. | Check rope path for tangles. Ensure pulleys are clean and lubricated. |
| Rope slips from locking mechanism. | Rope not properly secured or mechanism worn. | Ensure rope is fully engaged in the locking mechanism. Inspect mechanism for wear; replace if damaged. |
| Rack feels unstable after installation. | Improper mounting or unsuitable ceiling material. | Re-check all mounting screws and anchors. Ensure installation is into solid joists or appropriate anchors for concrete. Consult a professional if unsure. |
Specifications
- Brand: Relaxdays
- Model: 10018934
- Color: Black
- Material: 10% Plastic, 90% Iron
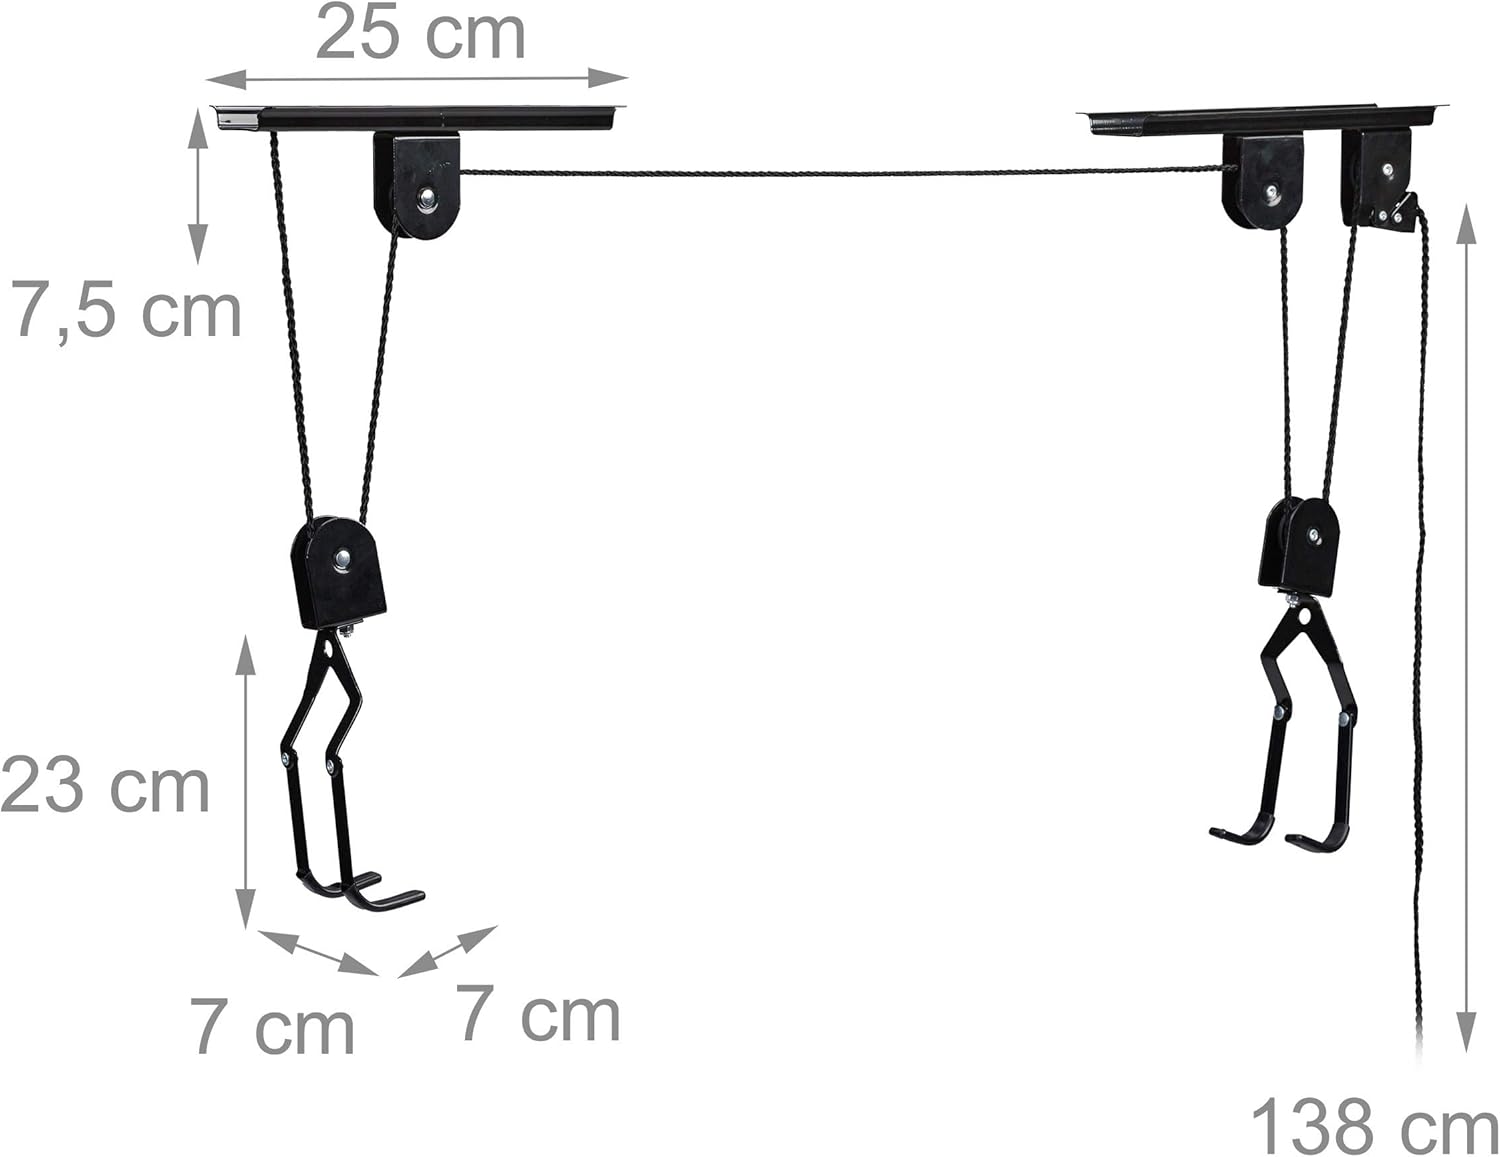
- Product Dimensions: 9 x 25 x 7.5 cm (per bracket)
- Item Weight: 1.53 kg
- Max. Load Capacity: 30 kg
- Max. Ceiling Height: Up to 4 meters
- Special Features: Frame protection (padded hooks), Pulley lifting system
Warranty and Support
For warranty information or technical support, please refer to the official Relaxdays website or contact their customer service directly. Contact details are typically found on the product packaging or the brand's official online channels.


