
Premier Water Systems RO575W
Contents
5 Stage Reverse Osmosis Home Drinking Water Filter System
Model: RO575W | Brand: Premier Water Systems
Introduction
This manual provides comprehensive instructions for the installation, operation, and maintenance of your Premier Water Systems 5 Stage Reverse Osmosis Home Drinking Water Filter System, Model RO575W. This system is designed to provide unlimited ultra-fresh, clean, great tasting water directly from your tap, offering a superior alternative to bottled water.
The 5-stage filtration process effectively removes sediment, chlorine, chloramines, and a wide range of contaminants including TDS, sodium, chromium, arsenic, copper, and lead, ensuring high-quality drinking water for your household.
Product Components
Your Premier Water Systems RO system includes the following components:
- Sediment filter (Stage 1)
- Carbon block filter (Stage 2)
- Granular Activated Carbon (GAC) filter (Stage 3)
- RO membrane (Stage 4)
- Post carbon in-line filter (Stage 5)
- 2.8 gallon water storage tank (Model: RO-122)
- Housing wrench
- Color coded tubing
- Saddle drain valve
- Tank ball valve
- Auto shut off valve
- Faucet

Figure 1: Complete 5 Stage Reverse Osmosis System with storage tank and faucet.

Figure 2: Key features and components of the RO system, including the lead-free faucet, NSF approved tank, color-coded quick-connect fittings, and double O-ring leak-resistant housing.
Setup and Installation
Pre-Installation Checklist
- Ensure you have all components listed in the "Product Components" section.
- Verify adequate space under your sink for the system and tank.
- Confirm access to a cold water supply line and a drain pipe.
- Gather necessary tools: drill, adjustable wrench, utility knife, Teflon tape.
- Read all instructions thoroughly before beginning installation.
Installation Steps
- Install the Faucet: Choose a suitable location on your sink or countertop for the RO faucet. Drill a hole (if necessary) and secure the faucet according to the manufacturer's instructions.
- Connect the Feed Water Adapter: Turn off the cold water supply. Install the feed water adapter (usually a T-valve) to your cold water line under the sink.
- Install the Drain Saddle Valve: Attach the drain saddle valve to the drain pipe under your sink, ensuring it is above the P-trap. Drill a small hole in the drain pipe for the connection.
- Mount the Filter Housing Assembly: Secure the main filter housing assembly (with the three pre-filters) to the cabinet wall under your sink using the provided mounting bracket and screws.
- Connect Tubing: Use the color-coded tubing to connect the components:
- Connect the feed water adapter to the inlet of the sediment filter (Stage 1).
- Connect the outlet of the post carbon in-line filter (Stage 5) to the RO faucet.
- Connect the RO membrane housing drain line to the drain saddle valve.
- Connect the RO membrane housing purified water line to the storage tank ball valve.
- Refer to the system diagram for precise connections.
- Install the Storage Tank: Place the storage tank in a convenient location under the sink. Connect the tank ball valve to the tank and then to the RO membrane purified water line.
- Install the RO Membrane and Post Filters: Insert the RO membrane into its housing. Connect the post carbon in-line filter (Stage 5) after the RO membrane and before the faucet.
- Check for Leaks: Slowly turn on the cold water supply. Carefully inspect all connections for any leaks. Tighten fittings as needed.

Figure 3: Flow diagram illustrating the 5 stages of filtration, from sediment pre-filter to the G.A.C. in-line post filter, and connections to the storage tank and faucet.
Operating Instructions
Initial System Flush
Before consuming water from your new RO system, it is crucial to perform an initial flush to remove any carbon fines or air from the system:
- Ensure all connections are secure and there are no leaks.
- Open the RO faucet and leave it open.
- Turn on the cold water supply to the system.
- Allow the system to fill the storage tank. This may take 2-3 hours depending on water pressure. You will hear water flowing into the tank.
- Once the tank is full (water flow from the faucet will slow to a trickle or stop), close the RO faucet.
- Allow the tank to completely fill again (another 2-3 hours).
- Open the RO faucet and drain the entire tank. This flushes out any impurities from the new filters.
- Repeat steps 5-7 at least two more times. This ensures the system is thoroughly flushed and ready for use.
Daily Use
Once flushed, your RO system is ready for daily use. Simply open the RO faucet to dispense purified water. The system will automatically refill the storage tank as water is drawn.
Maintenance
Regular maintenance is essential to ensure the optimal performance and longevity of your RO system. This primarily involves replacing the filter cartridges.
Filter Replacement Schedule
The frequency of filter replacement depends on your water quality and usage, but general guidelines are:
| Filter Stage | Filter Type | Replacement Frequency |
|---|---|---|
| Stage 1 | 5 Micron Sediment Filter | Every 6-12 months |
| Stage 2 | 5 Micron Carbon Block Filter | Every 6-12 months |
| Stage 3 | Granular Activated Carbon (GAC) Filter | Every 6-12 months |
| Stage 4 | 75 GPD RO Membrane | Every 2-3 years |
| Stage 5 | In-Line Granular Activated Carbon (GAC) Post Filter | Every 12 months |
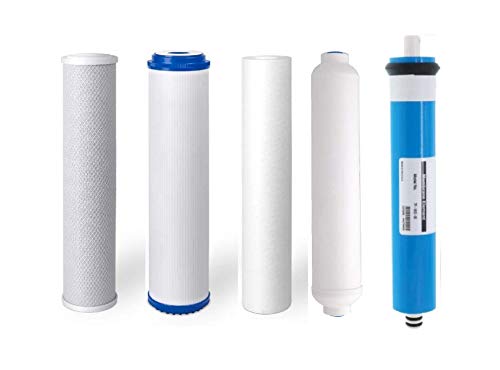
Figure 4: Individual replacement filters for the 5-stage RO system, including sediment, carbon block, GAC, RO membrane, and in-line GAC post filter.
Filter Replacement Procedure
- Turn off the cold water supply to the RO system.
- Close the tank ball valve.
- Open the RO faucet to relieve pressure and drain any remaining water. Leave the faucet open.
- Using the provided housing wrench, unscrew the filter housings for Stages 1, 2, and 3.
- Remove the old filters and discard them.
- Clean the inside of the filter housings with mild soap and water, then rinse thoroughly.
- Insert new filters into their respective housings. Ensure the O-rings are properly seated.
- Screw the filter housings back on, hand-tighten, then use the wrench for a final snug turn (do not overtighten).
- For the RO membrane (Stage 4) and in-line post filter (Stage 5), disconnect the quick-connect fittings, remove the old filters, and install new ones, ensuring secure connections.
- Slowly open the cold water supply valve and the tank ball valve.
- Check for leaks at all connections.
- Perform a system flush as described in the "Initial System Flush" section to remove air and carbon fines from the new filters.
Troubleshooting
This section addresses common issues you might encounter with your RO system.
| Problem | Possible Cause | Solution |
|---|---|---|
| No water from faucet or very slow flow |
|
|
| Water has bad taste or odor |
|
|
| Constant drain water flow |
|
|
| Leaks |
|
|
Specifications
| Attribute | Detail |
|---|---|
| Model Number | RO575W |
| Brand | Premier Water Systems |
| Filtration Stages | 5 Stages (Sediment, Carbon Block, GAC, RO Membrane, Post Carbon GAC) |
| RO Membrane Capacity | 75 Gallons Per Day (GPD) |
| Storage Tank Capacity | 2.8 Gallons |
| Installation Type | Under Sink |
| Power Source | Water Pressure |
| Upper Temperature Rating | 130°F (54°C) |
| Special Feature | Chlorine Reduction |
| UPC | 818368010131 |
Warranty and Support
Premier Water Systems products are manufactured to high-quality standards. For specific warranty details regarding your 5 Stage Reverse Osmosis Home Drinking Water Filter System, please refer to the warranty card included with your product packaging or contact Premier Water Systems directly.
For technical support, replacement parts, or any inquiries, please contact Premier Water Systems customer service. Contact information can typically be found on the manufacturer's website or on your product packaging.
Note: Extended protection plans may be available for purchase separately.
Ask a question about this manual
Ask about setup, troubleshooting, compatibility, parts, safety, or missing instructions. Manuals+ will review the question and use this page’s manual context to help answer it.