
AmScope MU2003-BI-CK
AmScope 20MP USB3.0 BSI C-Mount Microscope Camera
Model: MU2003-BI-CK
Brand: AmScope
1. Introduction
This manual provides instructions for the installation, operation, and maintenance of your AmScope 20MP USB3.0 BSI C-Mount Microscope Camera, model MU2003-BI-CK. This camera is equipped with a back-illuminated CMOS sensor (IMX183) for superior light sensitivity and low noise performance, enabling high-quality image and video capture for various microscopy applications. It connects via USB 3.0 and is compatible with Windows, Mac, and Linux operating systems.
2. Package Contents
Verify that all items are present in your package:
- One AmScope 20MP USB3.0 BSI C-Mount Microscope Camera (MU2003-BI-CK)
- One C-mount dust cap
- One USB 3.0 cable
- One calibration slide
3. System Requirements
Software OS Requirements:
- Windows (32/64 bit) XP/Vista/7/8/10
- Mac OS 10.8+
- Linux kernel 3.13+
Hardware Requirements:
- Intel Core2 2.8GHz or comparable processor
- 4GB RAM
4. Setup
4.1 Camera Installation
- Ensure your microscope has a C-mount interface. For 23mm photo ports, a 1X compensating lens (such as AmScope RU100, sold separately) may be required for optimal performance.
- Carefully remove the C-mount dust cap from the camera.
- Thread the camera onto the C-mount port of your microscope until it is securely attached.
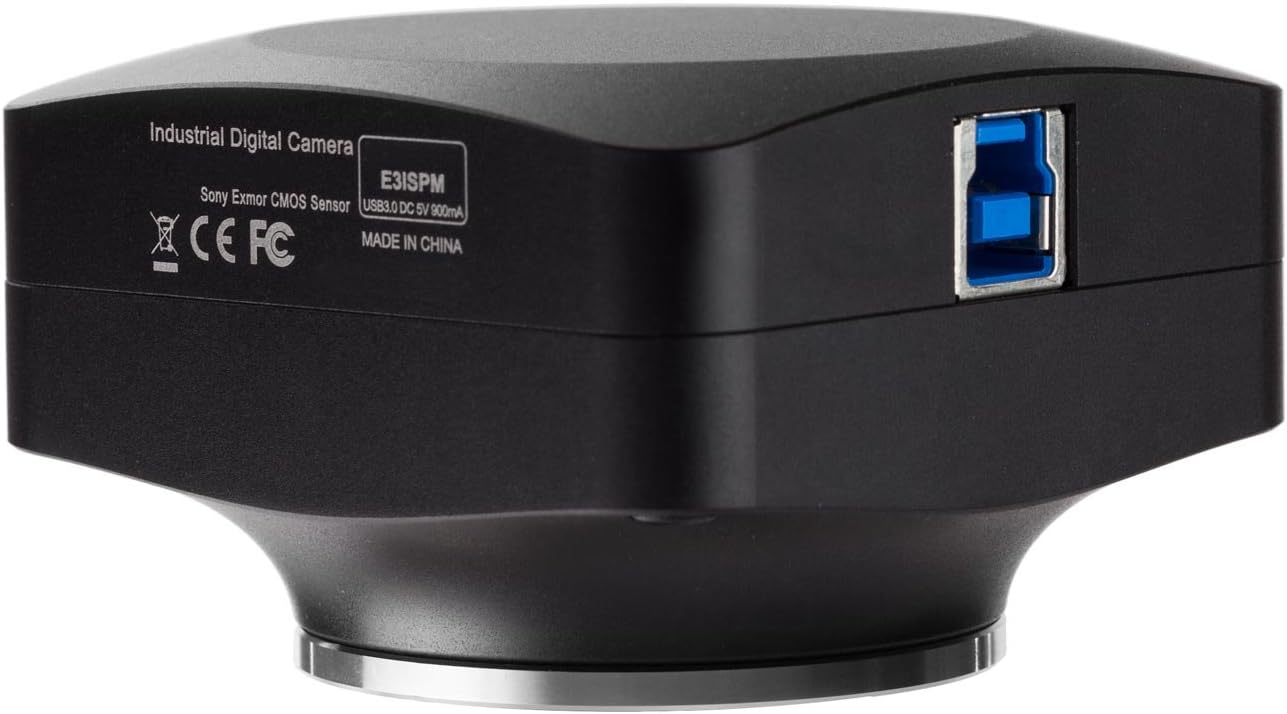
Figure 1: Front view of the AmScope 20MP USB3.0 BSI C-Mount Microscope Camera, showing the C-mount lens interface.
4.2 Software Installation
The camera requires software for operation. The included software provides imaging solutions for photography and videography. Refer to the software CD or AmScope's official website for the latest software version and detailed installation instructions.
- Insert the software CD into your computer's drive or download the appropriate software package from the AmScope website.
- Follow the on-screen prompts to install the software. Administrator privileges may be required.
- Once the software is installed, connect the camera to your computer using the provided USB 3.0 cable. The USB 3.0 port is located on the side of the camera.

Figure 2: Side view of the AmScope 20MP USB3.0 BSI C-Mount Microscope Camera, highlighting the USB 3.0 port for computer connection.
The camera is powered via the USB connection (5VDC 9mA).
5. Operating Instructions
After successful installation, launch the AmScope imaging software. The software interface will vary slightly between operating systems, with the Windows version offering the most extensive toolset.
5.1 Live Video Preview
Upon launching the software, a live video feed from the camera should appear. Adjust your microscope's focus and illumination for a clear image.
5.2 Image and Video Capture
- Still Images: Use the designated button or menu option within the software to capture still images. The camera supports resolutions up to 5440x3648 pixels.
- Video Recording: Select the video recording function to capture live video. The camera offers various framerates depending on the resolution (e.g., 15fps at 5440x3648, 60fps at 1824x1216).
- Time-lapse Capture: The Windows version of the software supports time-lapse capture for observing dynamic processes.
5.3 Image Controls and Processing
The software provides various controls to optimize your images:
- Exposure and White-balance: Adjust these settings to achieve proper brightness and color accuracy.
- Color Adjustment: Fine-tune color parameters.
- Digital Binning: Available in the Windows version, this feature can improve sensitivity and framerate at lower resolutions.
- Dark-field Correction: (Windows only) Improves image quality by reducing noise in dark areas.
- Image Processing: (Windows only) Includes various filters and enhancements.
5.4 Measurement and Analysis Tools
Both Windows and Mac/Linux versions offer measurement capabilities:
- Measurement Tools: Draw and measure lines, arcs, polygons, and other geometric shapes directly on the live or captured image.
- Calibration: Use the included calibration slide to accurately calibrate the software for precise measurements at different magnifications.
- Segmentation and Counting Tools: (Windows only) For advanced analysis, such as object counting and area segmentation.
- Image-stitching, Extended Depth-of-Field, HDR: (Windows only) Advanced features for creating composite images with wider fields of view, greater depth of focus, or improved dynamic range.
- Fluorescence Color-mapping: (Windows only) Specific tools for fluorescence microscopy applications.
6. Specifications
| Feature | Description |
|---|---|
| Model Name | MU2003-BI |
| Sensor Model | IMX183 (color) |
| Sensor Type | Back-illuminated CMOS |
| Optical Format | 1" |
| Active Pixels | 19.85M (5440 x 3648) |
| Pixel Size | 2.4µm x 2.4µm |
| Active Sensor Area | 13.06mm x 8.76mm |
| Shutter | Electronic rolling shutter |
| Sensitivity | 462mV @ 1/30s (f/5.6) |
| Spectral Response | 380-650nm with IR-cut filter |
| Binning | 1x1, 2x2, 3x3 |
| Video Capture Framerate | 15fps @ 5440x3648, 50fps @ 2736x1824, 60fps @ 1824x1216 |
| Photo Capture Resolution | 5440x3648, 2736x1824, 1824x1216 |
| Connectivity | USB 3.0 |
| Lens-mount | C-mount |
| Power | 5VDC 9mA over USB |
| Operating Temperature | -10-50°C |
| Operating Humidity | 30-80% |
| Material | Plastic and Glass |
| Color | White |
| Item Weight | 5 pounds |
| Package Dimensions | 26.77 x 20.08 x 9.06 inches |
7. Maintenance
- Cleaning: Use a soft, dry cloth to clean the exterior of the camera. For the sensor or lens, use specialized optical cleaning solutions and cloths to avoid scratches.
- Storage: When not in use, store the camera in a dry, dust-free environment. Keep the C-mount dust cap on to protect the sensor.
- Handling: Avoid dropping or subjecting the camera to strong impacts.
8. Troubleshooting
- No Live Image:
- Ensure the USB cable is securely connected to both the camera and the computer.
- Verify that the software is correctly installed and the camera is selected as the active device.
- Check your computer's device manager to ensure the camera is recognized.
- Slow Framerate:
- Ensure you are using a USB 3.0 port on your computer. USB 2.0 ports will significantly reduce performance.
- Increase the illumination on your microscope specimen. The camera performs best with adequate lighting.
- Reduce the resolution in the software settings. Lower resolutions yield higher framerates.
- Close other demanding applications on your computer to free up system resources.
- Unsharp or Blurry Image:
- Adjust the focus on your microscope.
- Clean the camera sensor and microscope optics if dust or smudges are visible.
- Ensure the camera is securely mounted and not vibrating.
- Color Inaccuracies:
- Adjust the white balance settings in the software.
- Ensure your microscope's light source is appropriate for color imaging.
9. Support and Warranty
For technical support, software updates, or service inquiries, please contact AmScope customer support through their official website or the contact information provided with your product documentation. While specific warranty details are not included in this manual, AmScope typically offers a limited warranty on its products. Please refer to your purchase documentation or the AmScope website for detailed warranty terms and conditions.
No official product videos are available for embedding in this manual.
Related documentsMU2003-BI-CK


Ask a question about this manual
Ask about setup, troubleshooting, compatibility, parts, safety, or missing instructions. Manuals+ will review the question and use this page’s manual context to help answer it.