1. Introduction
The Kaito KA768 is a versatile LED lantern designed for both indoor and outdoor use. It features twin adjustable LED panels, a built-in flashlight, and multiple charging options including solar and AC power. This manual provides essential information for the safe and effective operation and maintenance of your KA768 lantern.

Figure 1: Kaito KA768 Multi-functional Twin-Panel Rechargeable & Portable Solar LED Lantern.
2. Safety Instructions
- Do not expose the lantern to extreme temperatures or direct flame.
- Avoid disassembling the unit, as this may void the warranty and cause damage.
- Keep out of reach of children.
- Ensure the AC power cord is properly connected to a suitable power outlet during charging.
- Do not immerse the lantern in water. It is water-resistant, not waterproof.
- Regularly charge the battery, even when not in use, to maintain battery health. A full charge every three months is recommended.
3. Package Contents
- Kaito KA768 LED Lantern
- AC Power Cord
4. Product Overview
The KA768 lantern features several key components for its multi-functional operation:
- Twin LED Panels: Each panel contains 21 SMD LEDs, providing bright illumination. They are adjustable with 180-degree tilt and 270-degree swivel capabilities.
- Built-in Flashlight: Located at the base of the unit for focused illumination.
- Solar Panel: Integrated on one of the LED panels for convenient solar charging.
- Control Switches: For power, LED panel selection (single/dual), and flashlight activation.
- Charging Ports: AC input for wall charging and a USB output port for charging external devices.
- Carrying Handle: For easy portability.

Figure 2: Front view of the Kaito KA768, highlighting the solar panel and control area.
5. Setup
5.1 Initial Charging
Before first use, fully charge the lantern's internal battery. This can be done via AC power or solar power.
- AC Charging: Connect the included AC power cord to the lantern's AC input port and plug the other end into a standard wall outlet (90-240V, 50/60 Hz). The charging indicator light will illuminate. Allow approximately 8-10 hours for a full charge.
- Solar Charging: Place the lantern with the solar panel facing direct sunlight. The solar panel is located on one of the LED panels. Solar charging is slower than AC charging and its effectiveness depends on sunlight intensity.
It is recommended to perform an initial full AC charge for optimal battery performance.
6. Operating Instructions
6.1 Powering On/Off and LED Panel Operation
The main control switch is located on the front of the lantern.
- Slide the switch to "ON" to activate the LED panels.
- Select "L" for low brightness (one LED panel) or "H" for high brightness (both LED panels).
- Slide the switch to "OFF" to turn off the LED panels.

Figure 3: Illustration of the KA768's various lighting and charging modes.
6.2 Adjusting LED Panels
The two LED panels can be independently adjusted to direct light where needed.
- Tilt: Each panel can tilt up to 180 degrees.
- Swivel: Each panel can swivel up to 270 degrees.

Figure 4: Demonstrating the adjustable tilt angles of the LED panels.
6.3 Using the Flashlight
The flashlight is located at the bottom of the lantern. A separate switch or button controls its operation. Refer to the unit's markings for specific flashlight control.

Figure 5: The integrated flashlight at the base of the lantern.
6.4 Charging External Devices (USB Output)
The KA768 features a USB output port that allows you to charge small electronic devices, such as smartphones, using the lantern's internal battery. Connect your device's USB charging cable to the lantern's USB output port.
7. Maintenance
- Cleaning: Wipe the lantern with a soft, damp cloth. Do not use abrasive cleaners or solvents.
- Battery Care: To prolong battery life, fully charge the lantern at least once every three months, even if it has not been used. This prevents deep discharge and maintains battery capacity.
- Storage: Store the lantern in a cool, dry place away from direct sunlight when not in use for extended periods.
8. Troubleshooting
| Problem | Possible Cause | Solution |
|---|---|---|
| Lantern does not turn on. | Battery is depleted. | Charge the lantern using the AC adapter or solar panel. |
| Solar charging is slow or ineffective. | Insufficient direct sunlight; solar panel is dirty. | Ensure the solar panel is exposed to direct, strong sunlight. Clean the solar panel surface. |
| LED panels are dim. | Low battery charge; selected low brightness mode. | Recharge the battery. Ensure the switch is set to "H" for high brightness. |
| Cannot charge external device via USB. | Lantern battery is low; device not compatible. | Ensure the lantern is sufficiently charged. Verify device compatibility and cable connection. |
9. Specifications
| Feature | Detail |
|---|---|
| Model Number | KA768 |
| Light Source | 42 SMD LEDs (21 per panel), 1 Watt Flashlight LED |
| Battery Type | 1 Lithium Ion (2,500 mAh capacity) |
| Voltage | 3.7 Volts |
| Power Sources | AC (90-240V, 50/60 Hz), Solar Panel |
| Material | ABS Plastic |
| Dimensions (Folded) | 22.86 x 6.99 x 14.61 cm (9.5 x 6.5 x 3.2 inches) |
| Weight | 595.34 g (1.2 lbs / 21 ounces) |
| Water Resistance | Water Resistant |
| UPC | 855851007179 |
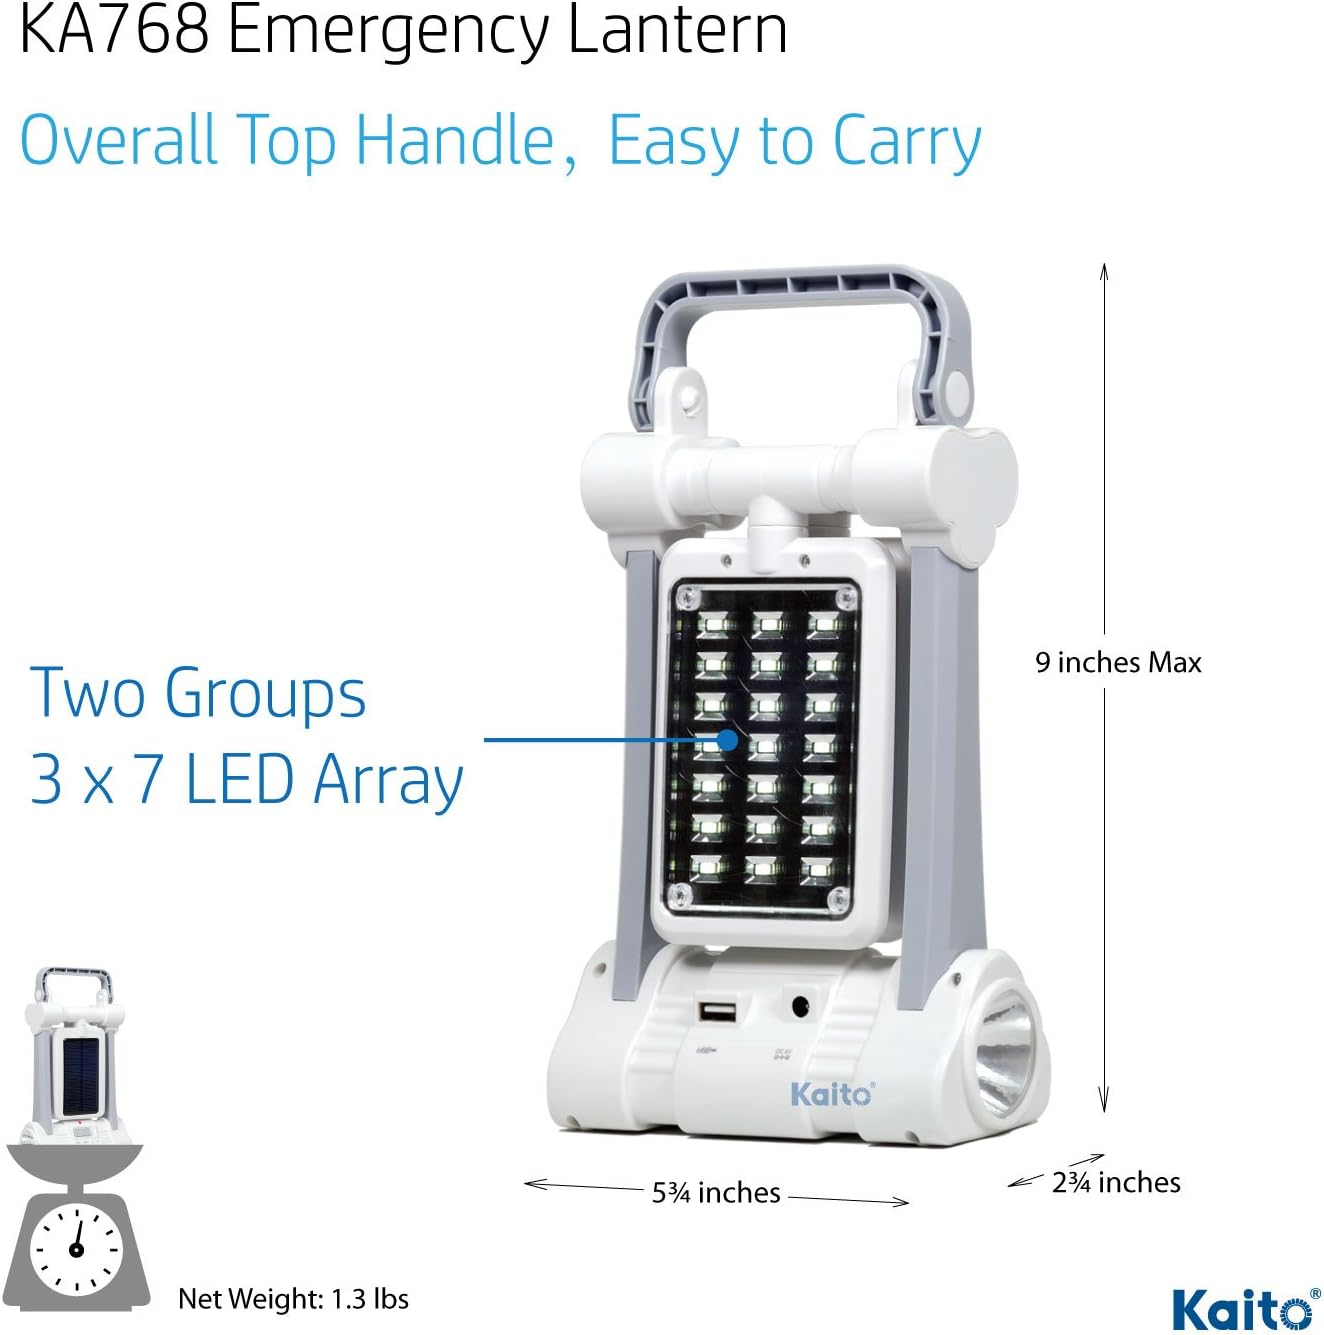
Figure 6: Dimensions of the Kaito KA768 Lantern.
10. Warranty and Support
10.1 Warranty Information
Kaito products are manufactured to high-quality standards. For specific warranty details, please refer to the warranty card included with your product or contact Kaito customer support directly. Keep your purchase receipt as proof of purchase.
10.2 Customer Support
If you encounter any issues or have questions regarding your Kaito KA768 lantern, please contact Kaito customer support. Contact information can typically be found on the product packaging or the official Kaito website.


