
Thule Bicycle rack Elite G2 motorhome HH Standard
Thule Elite G2 Motorhome Bike Carrier HH Standard Instruction Manual
Model: Bicycle rack Elite G2 motorhome HH Standard (Part No. 972764)
1. Introduction
This manual provides essential instructions for the safe and correct installation, operation, and maintenance of your Thule Elite G2 Motorhome Bike Carrier HH Standard. Please read this manual thoroughly before installation and use, and retain it for future reference. Incorrect installation or use may result in damage to the product, vehicle, or personal injury.
2. Safety Guidelines
- Always ensure the bike carrier is securely mounted to the motorhome according to the installation instructions.
- Do not exceed the maximum load capacity of 60 kg (132.3 lbs) for the carrier.
- Ensure all bicycles are properly secured to the carrier before driving. Check straps and clamps regularly.
- Be aware of the increased length and width of your vehicle when the carrier is installed and loaded.
- Drive at reduced speeds, especially on uneven roads, and avoid sudden braking or sharp turns.
- Regularly inspect the carrier for any signs of wear, damage, or loose components.
- Keep children away from the carrier during installation and loading.
3. Product Overview and Components
The Thule Elite G2 Motorhome Bike Carrier HH Standard is designed for secure transport of bicycles on the rear of motorhomes. It features a robust construction and user-friendly design for easy loading and unloading.

Image 3.1: The Thule Elite G2 Motorhome Bike Carrier HH Standard. This image displays the complete bike carrier assembly, including the main frame, wheel trays, and bike attachment arms.
Key components include the main support frame, adjustable wheel trays, bike frame holders, and securing straps.
4. Installation Instructions
Follow these steps carefully to install your Thule Elite G2 Motorhome Bike Carrier.
4.1. Prepare the Mounting Area
Identify the designated mounting points on the rear of your motorhome. Ensure the surface is clean, dry, and structurally sound to support the carrier and bicycles. Consult your motorhome manufacturer's guidelines for specific recommendations.
4.2. Attach the Main Support Frame
Position the main support frame against the motorhome. Secure it using the provided mounting hardware. Ensure all bolts are tightened to the specified torque settings. Verify that the carrier is level and stable before proceeding.
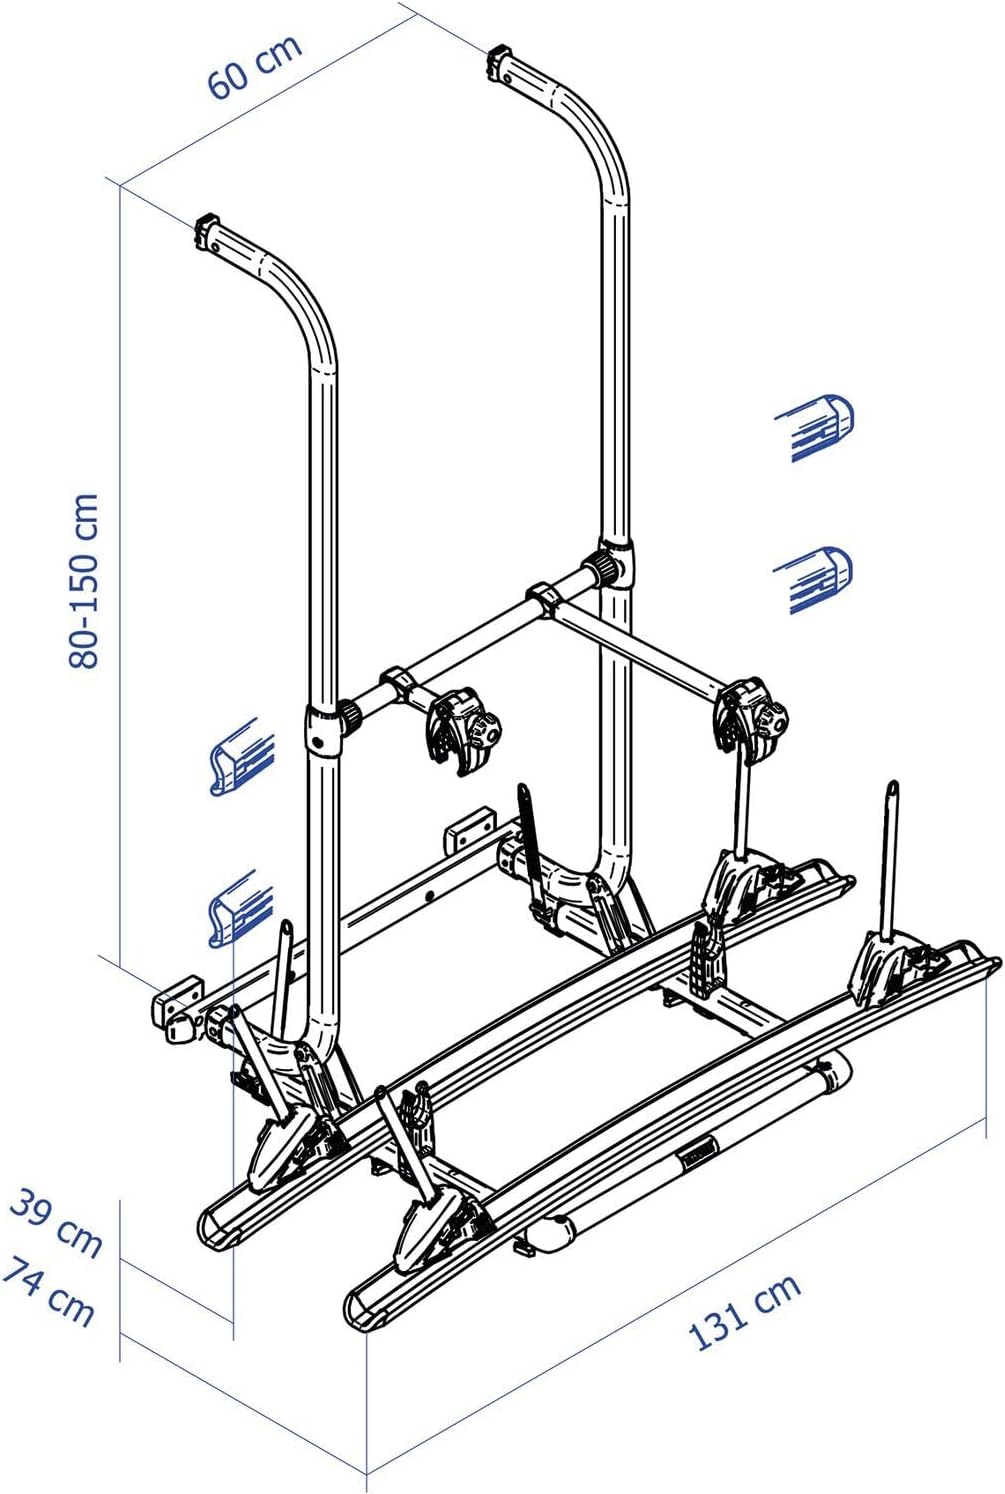
Image 4.2: Close-up view of the Thule Elite G2 Motorhome Bike Carrier's main frame attachment points. This image illustrates how the carrier's vertical bars connect to the motorhome's rear panel.
4.3. Install Wheel Trays and Bike Holders
Attach the adjustable wheel trays to the horizontal bars of the carrier. Ensure they are spaced appropriately for your bicycles. Install the bike frame holders onto the vertical support bars. These holders are designed to secure the bicycle frames.
4.4. Final Checks
Before first use, double-check all connections, bolts, and straps to ensure they are securely fastened. Gently shake the carrier to confirm stability. Refer to the dimensional diagram in the specifications section for proper clearances.
5. Operating the Bike Carrier
This section details how to load and secure your bicycles onto the Thule Elite G2 carrier.
5.1. Loading Bicycles
Lift each bicycle onto the carrier, placing the wheels into the designated wheel trays. Ensure the bicycle is centered and stable before proceeding to secure it.
5.2. Securing Bicycle Wheels
Use the provided wheel straps to firmly secure both wheels of each bicycle to the wheel trays. Pull the straps tight to prevent movement during transit.
5.3. Securing Bicycle Frames
Attach the bike frame holders to the bicycle frames. Adjust the clamps to firmly grip the frame without causing damage. Ensure the bikes are stable and do not touch each other or the motorhome.
5.4. Pre-Drive Check
Before every journey, perform a thorough check: confirm all bikes are securely fastened, straps are tight, and the carrier itself is stable. Check for any loose parts or excessive movement.
6. Maintenance and Care
- Clean the carrier regularly with mild soap and water, especially after exposure to road salt or dirt.
- Inspect all moving parts, bolts, and straps for wear or damage before each use. Replace any worn or damaged components immediately.
- Lubricate moving parts, such as hinges and clamps, periodically with a suitable lubricant to ensure smooth operation.
- Store the carrier in a dry place when not in use to prevent corrosion and prolong its lifespan.
7. Troubleshooting Common Issues
| Problem | Possible Cause | Solution |
|---|---|---|
| Carrier feels unstable after installation | Mounting bolts not sufficiently tightened; incorrect mounting points used. | Re-tighten all mounting bolts to specified torque. Ensure correct mounting points are utilized as per motorhome manufacturer guidelines. |
| Bicycles move during transit | Wheel straps or frame holders are loose; bikes not properly positioned. | Ensure all wheel straps are taut and frame holders are securely clamped. Reposition bikes for optimal stability. |
| Difficulty attaching bike frame holders | Holder position incorrect; obstruction from other bikes. | Adjust the position of the frame holders along the vertical bars. Load bikes strategically to avoid interference. |
8. Technical Specifications
Below are the key specifications for the Thule Elite G2 Motorhome Bike Carrier HH Standard.

Image 8.1: Dimensional drawing of the Thule Elite G2 Motorhome Bike Carrier. This diagram provides key measurements including height (80-150 cm), width (131 cm), and depth (60 cm), essential for installation planning.
| Feature | Detail |
|---|---|
| Model | Bicycle rack Elite G2 motorhome HH Standard |
| Manufacturer Part Number | 972764 |
| Item Model Number | MOV9983364 |
| Brand | Thule |
| Load Capacity | 60 kg (132.3 Pounds) |
| Item Weight | 8.98 kg (19.8 pounds) |
| Mounting Type | Power Click (refer to specific installation guide for details) |
| Package Dimensions | 132.2 x 74.8 x 16.8 cm (52.05 x 29.45 x 6.61 inches) |
9. Warranty Information
Thule products are tested and are subject to strict quality controls and are guaranteed against defects in material and workmanship. For detailed information regarding the Thule Guarantee and warranty claims, please visit the official Thule website or contact Thule customer support.
10. Customer Support
For further assistance, technical questions, or to purchase replacement parts, please contact Thule customer support or visit the official Thule website:
- Thule Website: www.thule.com
- Contact Information: Refer to the 'Contact Us' section on the Thule website for regional support details.
Related documentsBicycle rack Elite G2 motorhome HH Standard


Ask a question about this manual
Ask about setup, troubleshooting, compatibility, parts, safety, or missing instructions. Manuals+ will review the question and use this page’s manual context to help answer it.