1. Introduction
Thank you for choosing the Invision DXL-DE-IA TV Wall Mount. This mount is designed to securely hold 37-75 inch flat and curved televisions, offering swivelling, tilting, and extension capabilities for an optimal viewing experience. Constructed from high-strength cold-rolled carbon steel, it supports up to 50 kg and is compatible with various VESA patterns. This manual provides detailed instructions for safe installation, operation, and maintenance of your TV wall mount.
2. Important Safety Information
- Read all instructions carefully before installation. If you have any doubts, consult a qualified professional.
- Ensure the wall structure can safely support the combined weight of the mount and your television. The mount has been safety tested to four times its maximum weight capacity of 50 kg.
- Do not exceed the maximum weight capacity of 50 kg (110 lbs).
- This product is intended for indoor use only.
- Use only the provided mounting hardware. Do not use the tilt adjustment and mounting key for wall mounting.
- Keep children and pets away during installation.
- Periodically check all screws and connections to ensure they remain secure.
3. Package Contents
Please verify that all components are present before beginning installation:
- Invision DXL-DE-IA TV Wall Mount bracket
- Instruction Manual
- Mounting hardware kit, including:
- A selection of M6 and M8 TV mounting screws
- 6 high-quality wall fixings suitable for concrete and wooden walls (for single or double studs)
- Washers and spacers
- Three-axis spirit level
- Tilt adjustment and mounting key
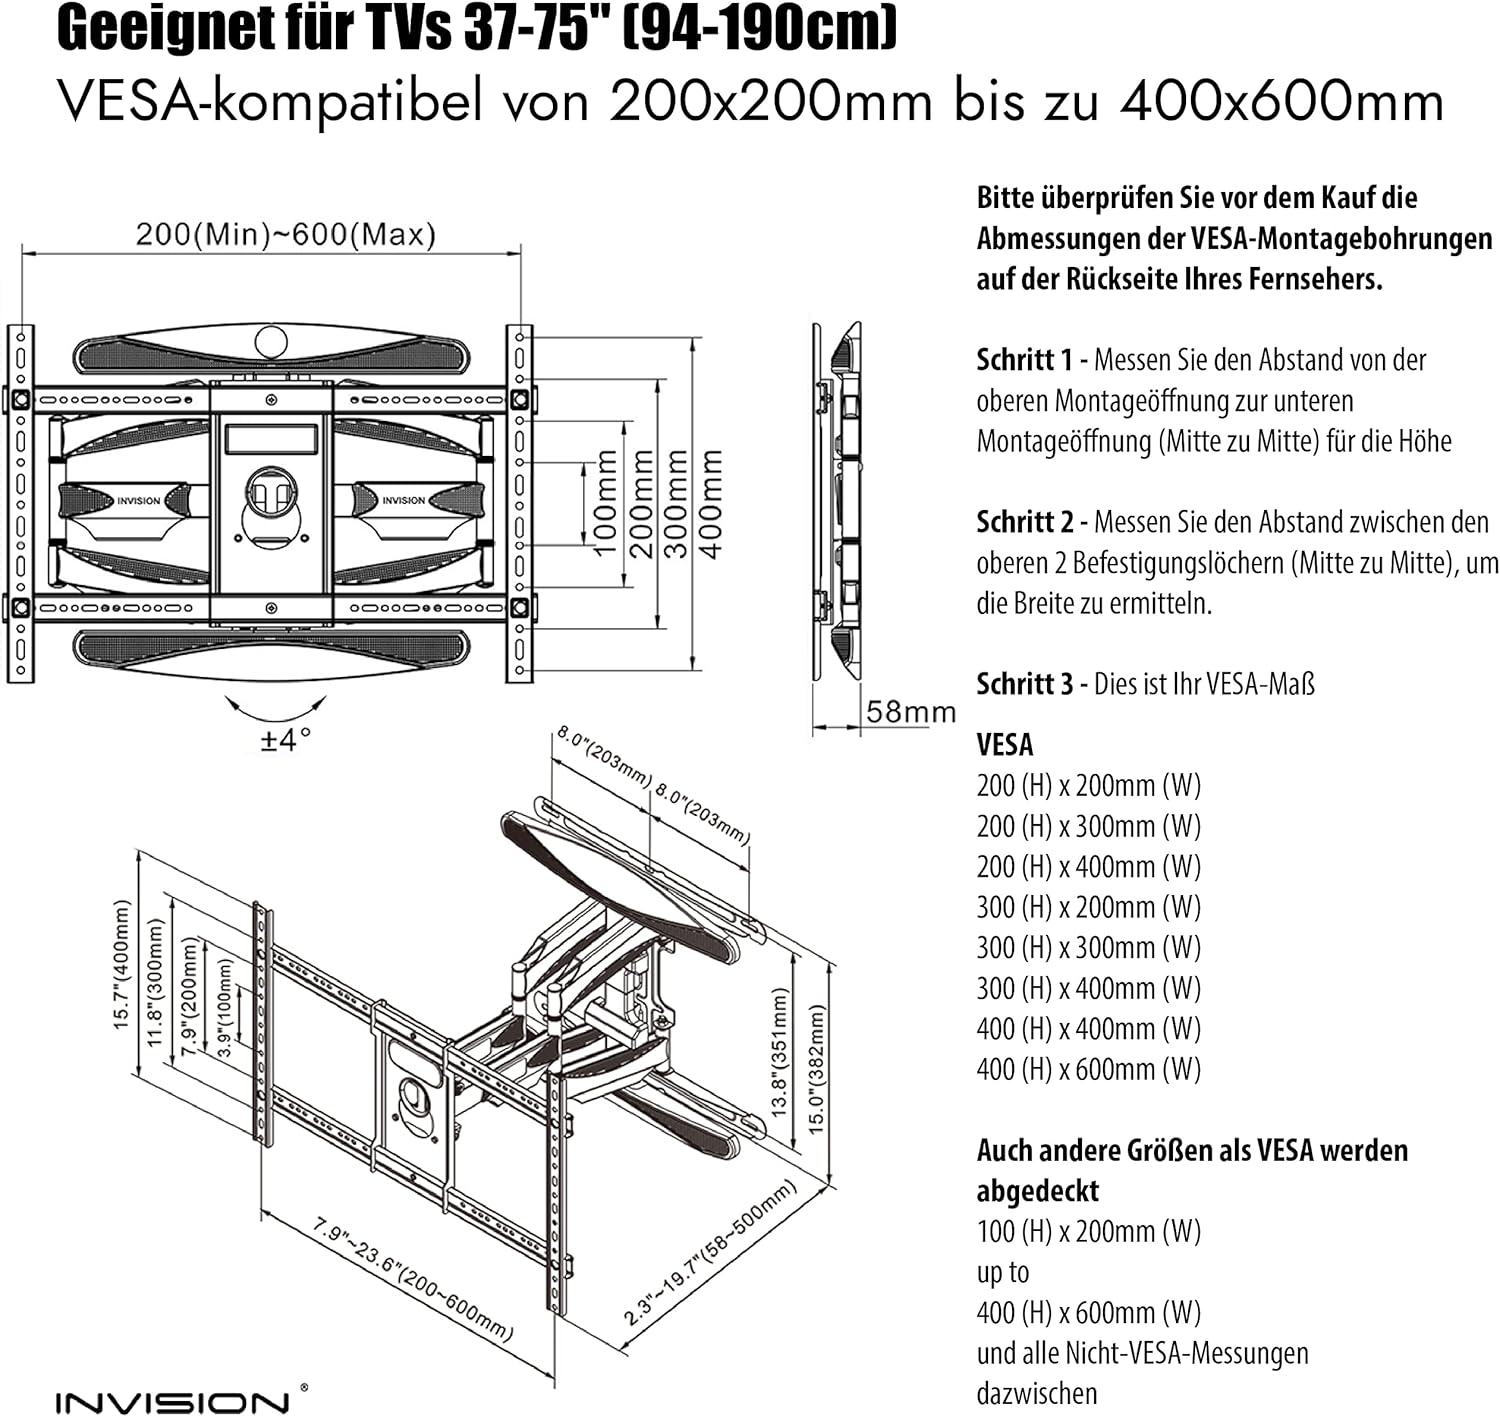
4. Specifications
| Model | DXL-DE-IA |
| Compatible Screen Sizes | 37 - 75 inches (94 - 190 cm) |
| Maximum Weight Capacity | 50 kg (110 lbs) |
| VESA Compatibility | 200x100mm, 200x200mm, 200x300mm, 200x400mm, 270x270mm, 300x200mm, 300x250mm, 300x300mm, 300x400mm, 350x350mm, 400x200mm, 400x300mm, 400x400mm, 600x200mm, 600x300mm, 600x400mm |
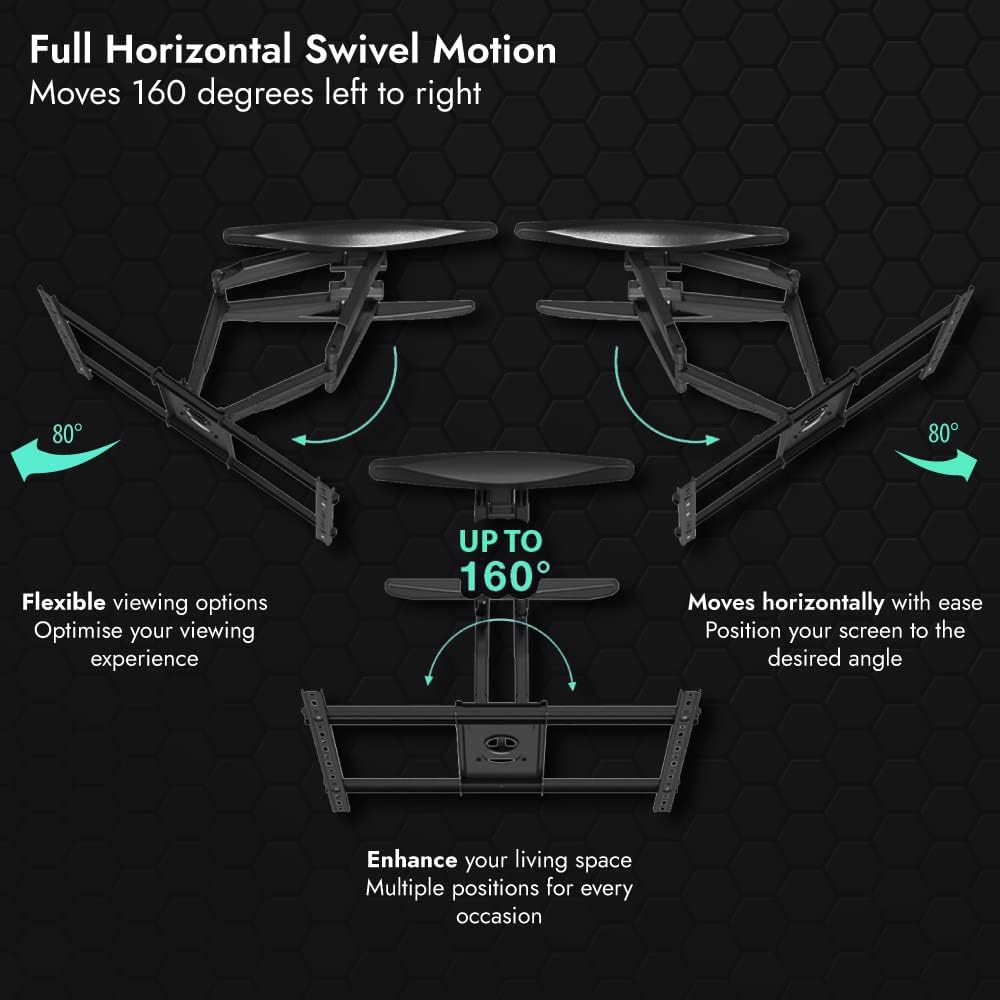
| Horizontal Swivel Angle | Up to 160 degrees (80 degrees left / 80 degrees right) |
| Vertical Tilt Angle | -5 degrees to +8 degrees |
| Distance from Wall | Minimum 58 mm, Maximum 500 mm |
| Material | Cold-rolled high-strength carbon steel |
| Color | Matte Black |
| Mount Weight | Approx. 7.63 kg (including packaging) |
5. Setup and Installation
5.1 Pre-Installation Checklist
- Verify TV VESA Pattern: Before installation, measure the horizontal and vertical distance between the mounting holes on the back of your TV. This is your TV's VESA measurement. Ensure it falls within the compatible range listed in Section 4.
- Check Wall Type: Identify your wall type (e.g., concrete, wood studs). The provided wall fixings are suitable for these types. For other wall types, consult a professional.
- Gather Tools: You will need a drill, stud finder (for wood walls), level, screwdriver, and a pencil.
5.2 Wall Mounting the Bracket
- Determine the desired height and position for your TV. Mark the drilling points for the reinforced wall mounting plate on the wall.
- Drill pilot holes at the marked locations. Ensure the holes are appropriate for the provided wall fixings and your wall type.
- Insert the wall fixings into the drilled holes.
- Align the reinforced wall mounting plate with the wall fixings and secure it firmly using the provided screws. Use the three-axis spirit level to ensure the mount is perfectly horizontal.

5.3 Attaching the TV to the Mount
- Attach the TV brackets to the back of your television using the appropriate M6 or M8 screws and washers from the hardware kit. Ensure they are securely fastened.
- Carefully lift the television and hook the TV brackets onto the wall mounting plate. Ensure the TV is properly seated and locked into place.
- If your TV has screen leveling bolts (as shown in Figure 6.3), use them to make fine horizontal adjustments (+/- 4 degrees) if needed.
6. Operating and Adjustments
The Invision DXL-DE-IA mount offers flexible adjustments to achieve your desired viewing angle.
6.1 Extension and Retraction
- Gently pull the TV forward to extend the arm up to 500 mm from the wall.
- Push the TV back towards the wall to retract the arm to a minimum distance of 58 mm for an ultra-slim profile. The mount is designed to prevent bending even at maximum extension.

6.2 Swivel Adjustment
- The mount allows for a horizontal swivel of up to 160 degrees (80 degrees left and 80 degrees right).
- Gently push the side of the TV to rotate it to your desired viewing angle.
6.3 Tilt Adjustment
- The mount supports a vertical tilt range from -5 degrees (downward) to +8 degrees (upward).
- Use the provided tilt adjustment and mounting key to adjust the torque of the nut and screw. This allows you to tilt the TV by hand to eliminate glare or achieve a comfortable viewing angle, and it can also be locked in position.

6.4 Cable Management
- The mount features integrated cable cladding panels to conceal and secure cables.
- Route your TV and power cables through these panels to maintain a clean aesthetic and prevent cables from getting pinched when adjusting the mount.


7. Maintenance
- Regular Inspection: Periodically (e.g., every 6 months) check all mounting screws and connections to ensure they are tight and secure.
- Cleaning: Clean the mount with a soft, dry cloth. Do not use abrasive cleaners or solvents, as they may damage the finish.
- Lubrication: The compression hinges are designed for durability and reduced friction. No additional lubrication is typically required.
8. Troubleshooting
8.1 TV Not Level
- If your TV appears slightly unlevel after installation, use the screen leveling bolts (if applicable to your TV model) on the TV brackets to make fine horizontal adjustments.
- Recheck the wall mounting plate with the spirit level to ensure it is perfectly horizontal. Adjust wall fixings if necessary.
8.2 Mount Feels Unstable
- Ensure all wall fixings are securely tightened and that the wall type is appropriate for the installation.
- Verify that the TV is correctly seated and locked onto the wall plate.
- Do not exceed the maximum weight capacity of 50 kg.
8.3 Difficulty Adjusting Movement
- Check for any obstructions preventing full movement.
- Ensure that screws on moving parts are not overtightened. For tilt adjustment, use the provided key to adjust the torque as needed.
- If the mount is stiff, try moving it through its full range of motion a few times.
9. Warranty and Customer Support
Invision prides itself on the construction and durability of this wall mount. For any questions regarding warranty coverage or if you require further assistance with installation or operation, please do not hesitate to contact our friendly customer support team. You can reach us by sending an email to the address provided on our official website or product packaging.