1. Introduction and Overview
The DS18 GEN-X1200.2D is a Class AB 2-channel high-power amplifier designed for car audio systems. It delivers 1200 watts peak output and 2 x 180 watts RMS at 2 Ohms. This amplifier series is stable at both 2 and 4 ohms, offering versatility for various speaker configurations. It incorporates advanced features to optimize sound performance and user control.
Key features include:
- Class A/B Technology for efficient power delivery.
- Fully adjustable 12dB/Octave crossover with differential circuitry.
- Subsonic filter to protect subwoofers.
- Fully adjustable bass equalizer for precise sound tuning.
- Mute and delay soft start technology to prevent turn-on thumps.
- Phase control switch for optimal sound staging.
- Remote dashboard subwoofer control for convenient bass adjustment.
- Full IC-controlled protection circuitry for reliability.
- Professional peak limiter circuitry for distortion-free audio.

Figure 1: Front view of the DS18 GEN-X1200.2 Amplifier with included bass remote.
2. Safety Information
Please read all instructions carefully before installing and operating your amplifier. Failure to follow these guidelines may result in damage to the amplifier, speakers, or vehicle, and may void your warranty.
- Always disconnect the vehicle's negative battery terminal before beginning any installation.
- Ensure proper grounding of the amplifier to the vehicle chassis.
- Use appropriate gauge power and ground wires as specified in the installation section.
- Avoid mounting the amplifier in areas exposed to excessive heat, moisture, or direct sunlight.
- Protect all wiring from sharp edges and moving parts.
- Do not attempt to open or modify the amplifier. Refer all servicing to qualified personnel.
- Always use fuses of the specified rating.
3. What's in the Box
Upon opening the package, verify that all items are present:
- DS18 GEN-X1200.2 Amplifier
- Bass Remote Control
- Owner's Manual (this document)
- Mounting Screws

Figure 2: Packaging of the DS18 GEN-X1200.2 Amplifier.
4. Specifications
| Specification | Value |
|---|---|
| RMS Power @ 14.4VDC (4 Ohm) | 120W x 2 |
| RMS Power @ 14.4VDC (2 Ohm) | 180W x 2 |
| Bridge Power @ 14.4VDC (4 Ohm) | 300W x 1 |
| THD Distortion | 0.08% |
| Low Pass Filter (LPF) | 50Hz - 500Hz |
| High Pass Filter (HPF) | 50Hz - 500Hz |
| Frequency Response | 20Hz - 20KHz |
| Fuse Rating | 25A x 2 |
| Number of Channels | 2 |
| Voltage | 14.4V |
| Dimensions (L x W x H) | 400 x 190 x 60 mm (15.74 x 7.5 x 2 inches) |
| Item Weight | 8 pounds |
5. Installation and Setup
Proper installation is crucial for optimal performance and safety. If you are unsure about any steps, consult a professional car audio installer.
5.1 Mounting the Amplifier
Choose a secure, dry location with adequate ventilation. Avoid mounting on carpet or directly to metal surfaces without insulation. Ensure the amplifier is easily accessible for wiring and adjustments.
5.2 Wiring Connections
Refer to the diagram below for proper wiring connections. Use high-quality cables of appropriate gauge.

Figure 3: Rear panel showing power, ground, remote, fuse, and speaker output connections.
- Power Connection (B+): Connect a heavy-gauge power cable (e.g., 4 AWG) directly from the positive terminal of the vehicle's battery to the B+ terminal on the amplifier. Install an in-line fuse holder within 18 inches of the battery.
- Ground Connection (GND): Connect a heavy-gauge ground cable (same gauge as power) from the GND terminal on the amplifier to a clean, unpainted metal surface on the vehicle chassis. Ensure a solid, low-resistance connection.
- Remote Turn-On (REM): Connect a remote turn-on wire (e.g., 18 AWG) from your head unit's remote output to the REM terminal on the amplifier. This turns the amplifier on and off with your head unit.
- RCA Input Connection: Connect RCA cables from your head unit's pre-amp outputs to the CH1 and CH2 RCA input jacks on the amplifier.
- Speaker Output Connection: Connect your speakers to the SPEAKER output terminals. Ensure correct polarity (+ to + and - to -). For bridged mode, connect to the designated bridged terminals.
5.3 Initial Settings
Before powering on, set the amplifier's controls to their initial positions:
- GAIN: Set to minimum (fully counter-clockwise).
- X-OVER: Set to FULL for initial setup, or LPF/HPF as needed for your speaker type.
- FREQUENCY: Set to the middle of the range.
- BASS BOOST: Set to 0dB.
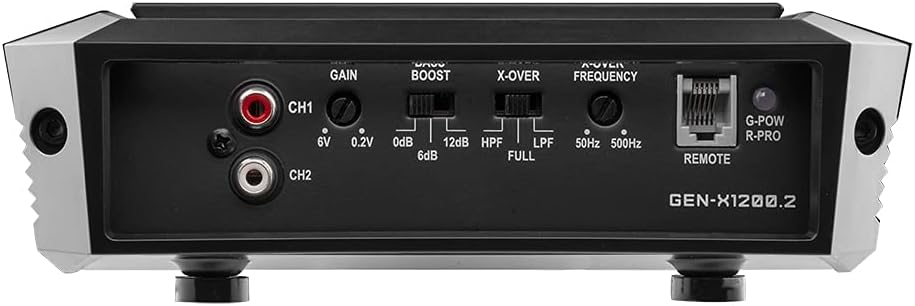
Figure 4: Front panel showing gain, bass boost, crossover, and frequency controls.
6. Operating Instructions
Once installed, follow these steps to operate your amplifier and fine-tune your audio system:
- Power On: Turn on your vehicle and head unit. The amplifier's power indicator LED should illuminate.
- Gain Adjustment: Play a familiar piece of music at a moderate volume on your head unit (around 75% of max volume). Slowly increase the amplifier's GAIN control until you hear slight distortion, then back it off slightly. This matches the amplifier's input sensitivity to your head unit's output.
- Crossover Adjustment: Adjust the X-OVER switch and FREQUENCY knob according to your speaker type. For full-range speakers, use FULL. For subwoofers, use LPF (Low Pass Filter) and set the frequency to cut off high notes. For component speakers, use HPF (High Pass Filter) and set the frequency to cut off low notes.
- Bass Boost Adjustment: Use the BASS BOOST control sparingly. Excessive bass boost can cause distortion and damage speakers. Adjust to enhance bass response as desired, ensuring clarity.
- Remote Bass Knob: Connect the included bass remote to the 'REMOTE' port on the amplifier. This allows convenient adjustment of the subwoofer level from the driver's seat.

Figure 5: Included bass remote control for convenient adjustment.
6.1 Product Video Overview
Watch this video for a visual overview of the DS18 GEN-X1200.2D amplifier and its features.
Video 1: Overview of the DS18 GEN-X1200.2D 2-Channel Amplifier, highlighting its design and features.
7. Troubleshooting
If you encounter issues with your amplifier, refer to the following common problems and solutions:
| Problem | Possible Cause | Solution |
|---|---|---|
| No Power / Amplifier does not turn on | Blown fuse, poor power/ground connection, no remote signal. | Check in-line fuse and amplifier fuses. Verify power and ground connections are secure. Check remote wire for 12V signal. |
| No Sound Output | RCA cables disconnected, speaker wires disconnected/shorted, amplifier in protect mode. | Check RCA and speaker connections. Ensure speaker wires are not touching each other or chassis. If protect light is on, refer to amplifier protection section. |
| Distorted Sound | Gain set too high, improper crossover settings, poor quality audio source. | Reduce gain setting. Adjust crossover frequencies. Test with a different audio source. |
| Amplifier Overheats | Inadequate ventilation, improper impedance load, prolonged high-volume use. | Ensure proper airflow around the amplifier. Verify speaker impedance matches amplifier's capabilities. Reduce listening volume. |
8. Maintenance
To ensure the longevity and performance of your DS18 GEN-X1200.2 amplifier, follow these simple maintenance guidelines:
- Keep Clean: Regularly wipe the amplifier's exterior with a soft, dry cloth to remove dust and debris. Avoid using harsh chemicals or abrasive cleaners.
- Check Connections: Periodically inspect all power, ground, remote, RCA, and speaker connections to ensure they are secure and free from corrosion. Loose connections can lead to poor performance or damage.
- Ventilation: Ensure that the amplifier's cooling fins are not obstructed. Proper airflow is essential to prevent overheating.
- Fuse Inspection: If the amplifier stops working, check the fuses. Replace blown fuses only with fuses of the exact same type and rating.
9. Warranty and Support
DS18 products are designed and manufactured to the highest quality standards. For specific warranty terms and conditions, please refer to the warranty card included with your product or visit the official DS18 website. Keep your purchase receipt as proof of purchase for warranty claims.
For technical support, troubleshooting assistance, or service inquiries, please contact DS18 customer support through their official website or authorized service centers. Provide your product model number (GEN-X1200.2) and a detailed description of the issue when seeking support.
Official DS18 Website: ds18.com


