1. Introduction
This manual provides detailed instructions for the safe and effective operation of your Proster PST095-PST262 Dual Channel Digital Thermometer. This professional instrument is designed for precise temperature measurement using various thermocouple types, including K, J, T, E, R, S, and N. It features dual-channel input, allowing simultaneous measurement of two distinct temperatures, and an LCD backlight for clear readings in various lighting conditions.
The thermometer is suitable for a wide range of applications, from measuring liquid and vapor temperatures to surface temperatures of solid objects. Common uses include monitoring temperatures in fish tanks, pools, furnaces, ceramic kilns, pottery, and molten metal processes.
2. Safety Information
- Read all instructions carefully before operating the device.
- Do not expose the thermometer to extreme temperatures, humidity, or direct sunlight.
- Ensure correct battery polarity when installing batteries. Replace batteries promptly when the low battery indicator appears to prevent inaccurate readings.
- Use only the specified thermocouple types (J/K/T/E/N/R/S) with the thermometer. Ensure correct positive (+) and negative (-) polarity when connecting thermocouples.
- Avoid applying excessive force to the thermocouple connectors or cables.
- Do not attempt to repair or modify the device. Refer all servicing to qualified personnel.
- Keep the device out of reach of children.
3. Package Contents
Verify that all items are present in the package:
- 1 x Proster Digital Thermometer Unit
- 2 x K-type Thermocouples (Cable length approximately 38.78 inches / 98.5 cm each)
- 3 x 1.5V AAA Batteries
- 1 x English User Manual
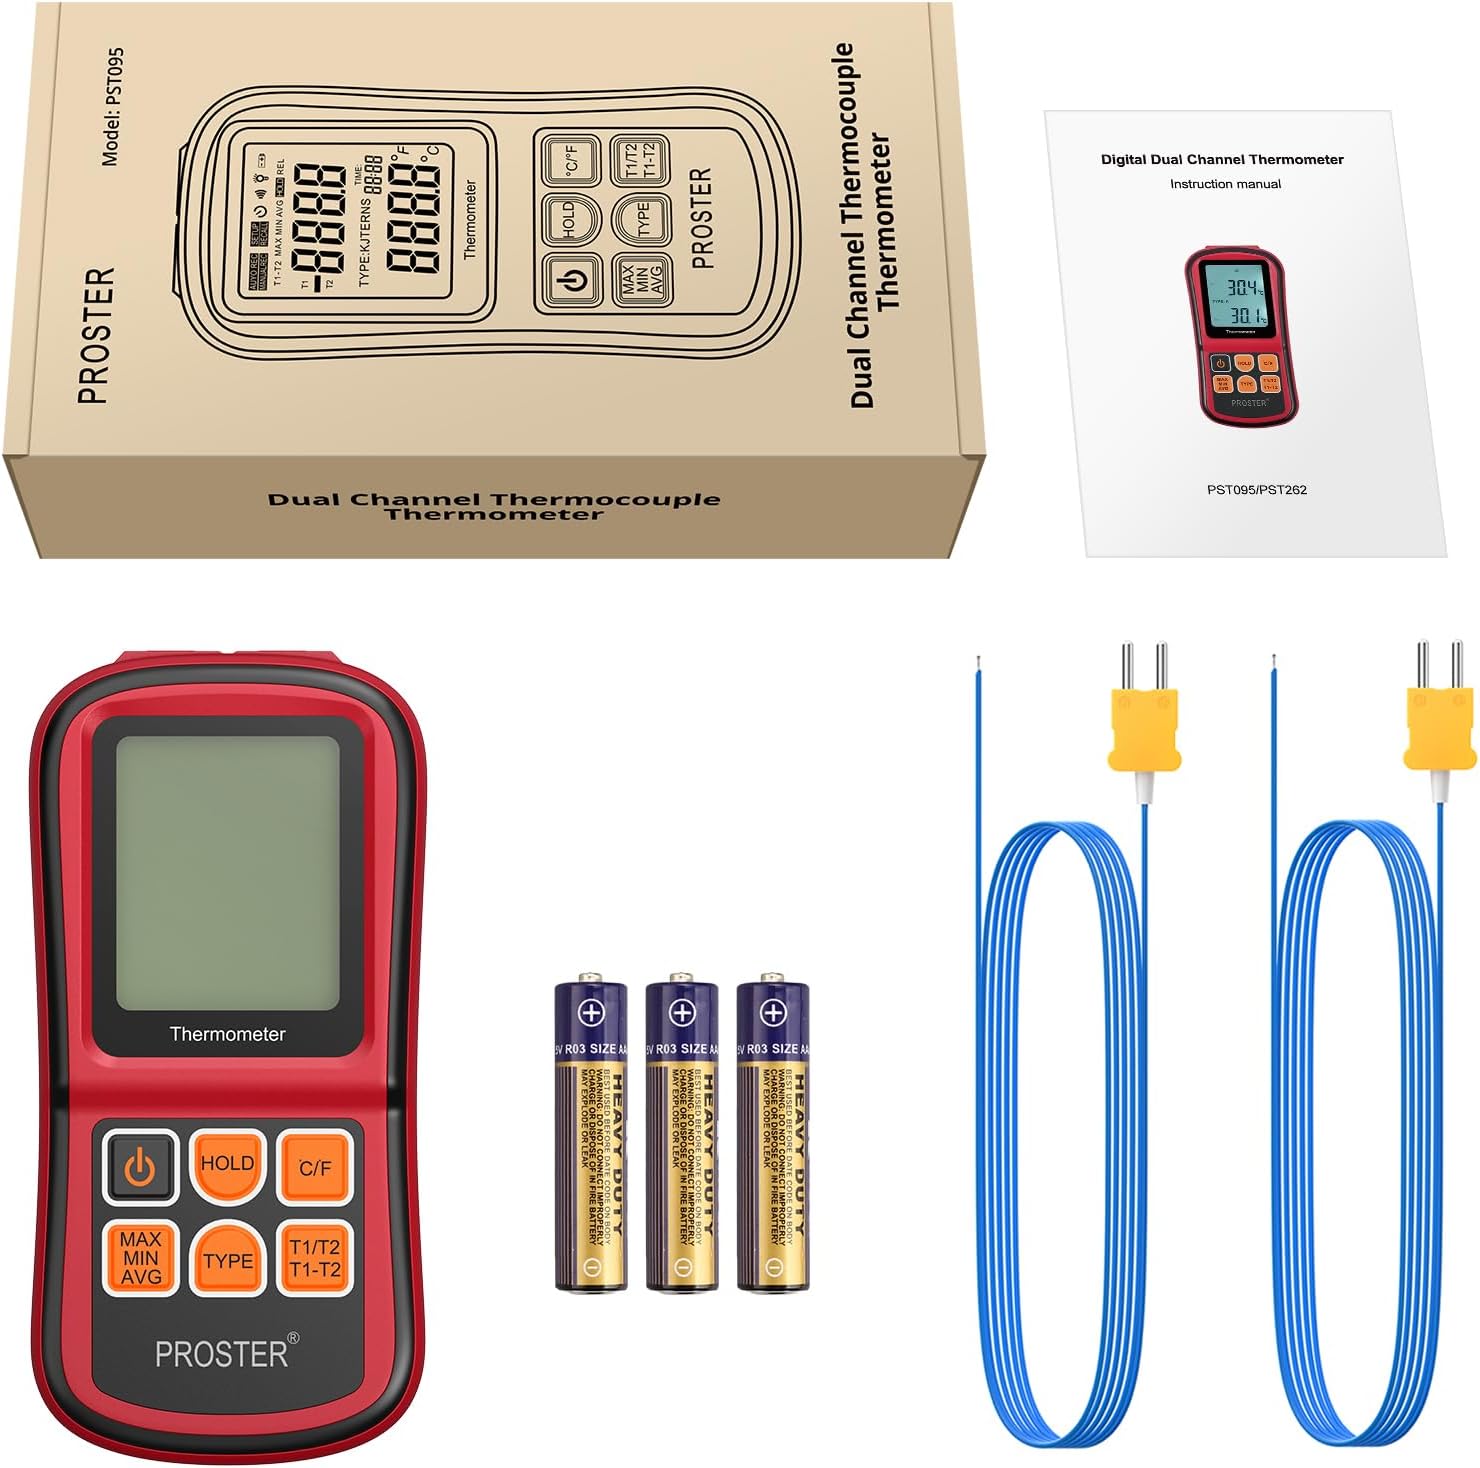
Figure 3.1: Package Contents
This image displays the complete contents of the Proster Digital Thermometer package. It shows the main red and black thermometer unit, two blue K-type thermocouple probes with yellow connectors, three AAA batteries, and a printed English instruction manual, all neatly arranged.
4. Product Overview
The Proster PST095-PST262 Digital Thermometer features a robust design with an easy-to-read LCD display and intuitive button controls.

Figure 4.1: Proster Digital Thermometer with K-type Thermocouples
This image shows the front of the red and black Proster Digital Thermometer. The LCD screen displays temperature readings, and below it are six control buttons. Two K-type thermocouples with blue cables and yellow connectors are plugged into the top of the device.
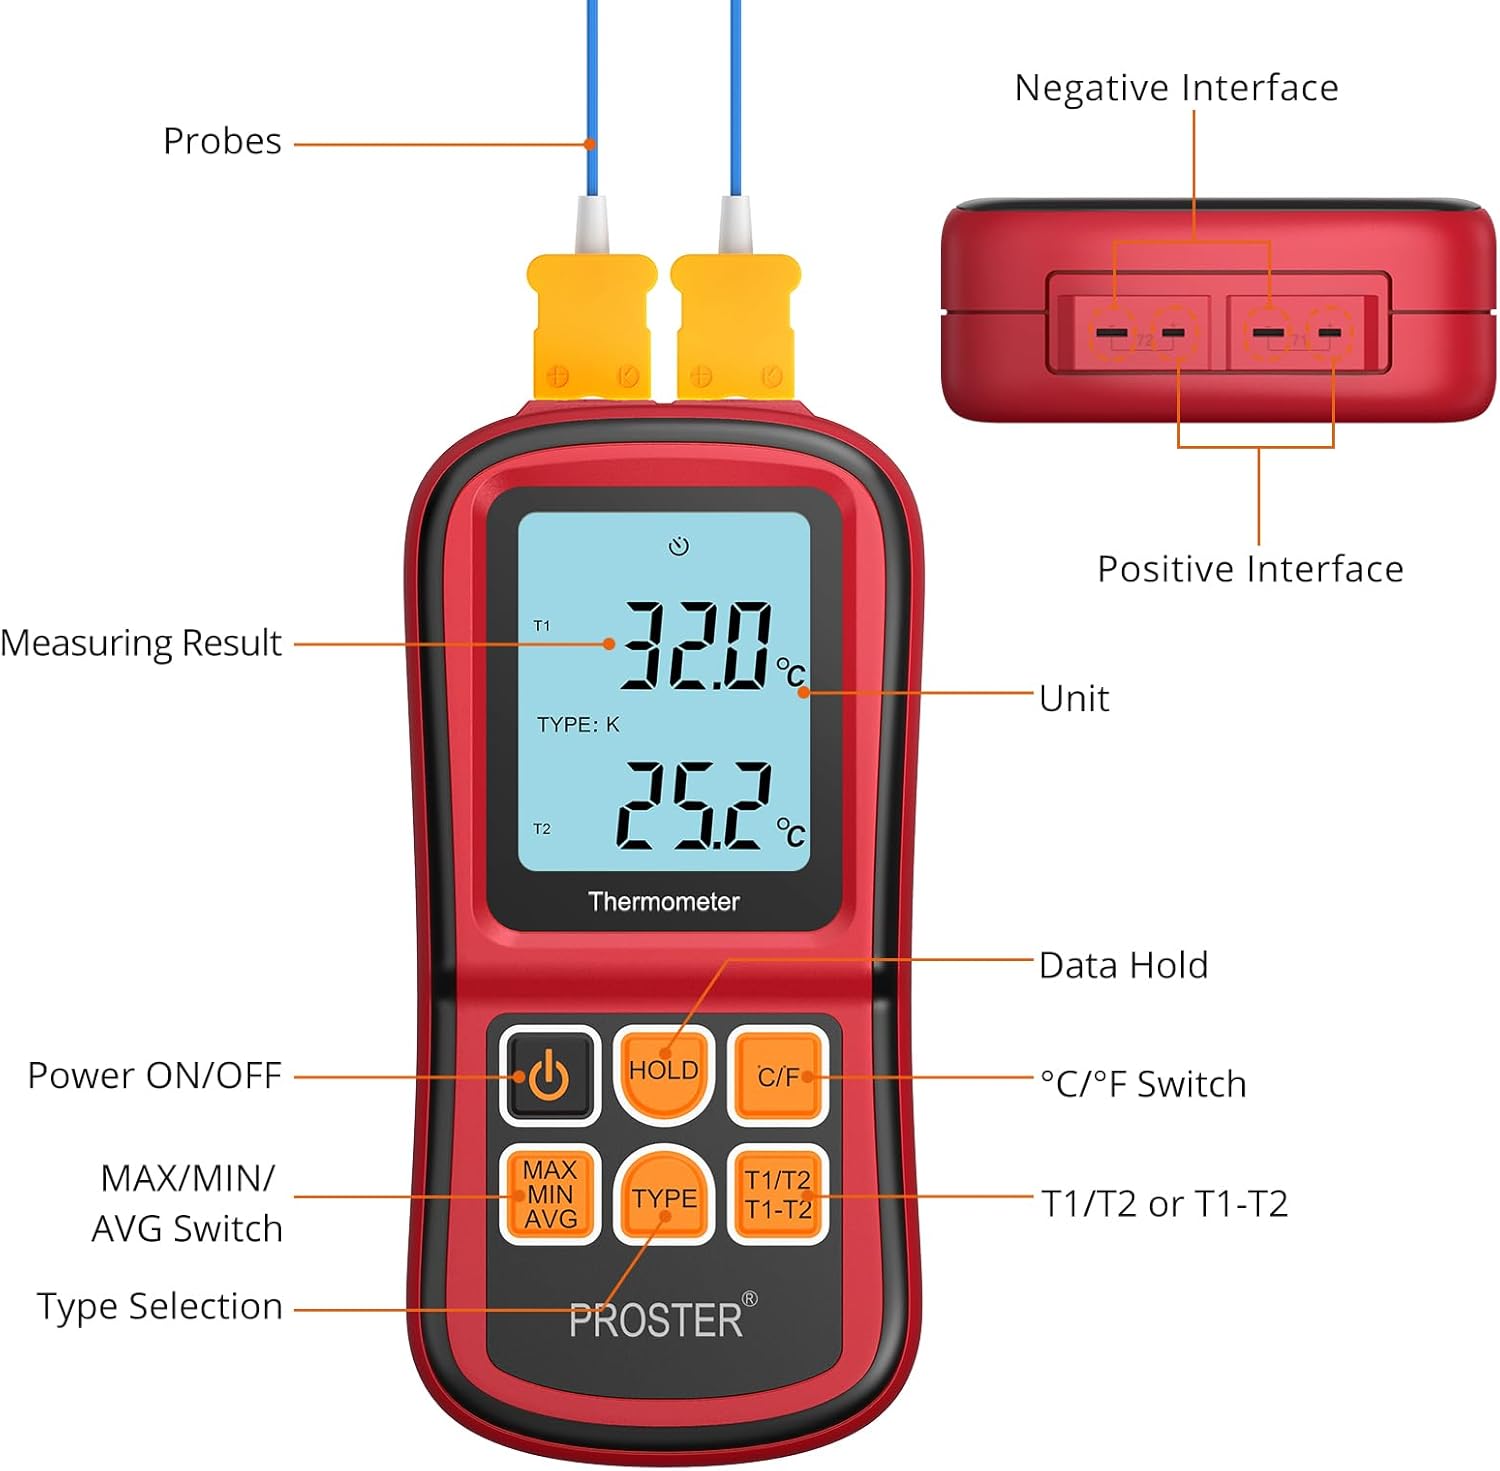
Figure 4.2: Thermometer Components and Controls
This diagram provides a detailed view of the Proster Digital Thermometer, labeling its key components. It highlights the LCD display showing measuring results and units, the positive and negative interfaces for probes, and the functions of each button: Power ON/OFF, Data Hold, °C/°F Switch, MAX/MIN/AVG Switch, Type Selection, and T1/T2 or T1-T2 mode selection.
4.1. Display Elements
- T1/T2: Indicates the active channel for temperature measurement.
- TYPE: Displays the currently selected thermocouple type (K, J, T, E, R, S, N).
- °C/°F: Indicates the selected temperature unit (Celsius or Fahrenheit).
- MAX/MIN/AVG: Shows maximum, minimum, or average temperature readings.
- HOLD: Indicates that the current reading is held on the display.
- Battery Indicator: Shows battery level.
4.2. Control Buttons
- Power Button (⏻): Turns the thermometer ON or OFF.
- HOLD Button: Freezes the current temperature reading on the display. Press again to release.
- °C/°F Button: Toggles between Celsius (°C) and Fahrenheit (°F) temperature units.
- MAX/MIN/AVG Button: Cycles through Maximum, Minimum, and Average temperature readings for the selected channel.
- TYPE Button: Selects the thermocouple type (J, K, T, E, R, S, N) to match the connected probe.
- T1/T2 | T1-T2 Button: Switches between displaying T1, T2, or the temperature difference (T1-T2).
5. Setup
5.1. Battery Installation
- Locate the battery compartment cover on the back of the thermometer.
- Open the cover.
- Insert three 1.5V AAA batteries, ensuring that the positive (+) and negative (-) polarities match the markings inside the compartment.
- Close the battery compartment cover securely.
Note: Replace batteries immediately when the low battery indicator appears on the display to ensure accurate measurements.
5.2. Thermocouple Connection
- Identify the thermocouple input ports at the top of the thermometer. There are two sets of ports for T1 and T2.
- Connect the desired thermocouple probe(s) into the corresponding input port(s). Ensure the positive (+) and negative (-) terminals of the thermocouple plug align with the markings on the thermometer's input ports.
- For accurate readings, ensure the thermocouple type selected on the thermometer matches the type of probe connected (e.g., K-type probe with K-type setting).

Figure 5.1: Dual Channel Measurement Setup
This image illustrates the dual-channel capability of the Proster Digital Thermometer. The device is shown in a laboratory environment, with two thermocouple probes inserted into separate beakers containing different liquids, demonstrating simultaneous temperature measurement from two sources.
6. Operating Instructions
6.1. Powering On/Off
- Press the ⏻ (Power) button to turn the thermometer ON.
- Press and hold the ⏻ (Power) button for approximately 2 seconds to turn the thermometer OFF.
6.2. Selecting Temperature Unit (°C/°F)
- Press the C/F button to switch between Celsius (°C) and Fahrenheit (°F) temperature units. The selected unit will be displayed on the LCD.
6.3. Selecting Thermocouple Type
- Press the TYPE button to cycle through the available thermocouple types (J, K, T, E, R, S, N). Ensure the displayed type matches the connected probe for accurate readings.
6.4. MAX/MIN/AVG Function
- Press the MAX MIN AVG button to view the maximum, minimum, or average temperature recorded since the device was powered on or the function was reset.
- Each press will cycle through MAX, MIN, AVG, and then return to real-time measurement.
6.5. Data Hold Function
- Press the HOLD button to freeze the current temperature reading on the display. The 'HOLD' indicator will appear.
- Press the HOLD button again to release the held reading and return to real-time measurement.
6.6. T1/T2 and T1-T2 Modes
- Press the T1/T2 | T1-T2 button to switch between displaying the temperature of channel 1 (T1), channel 2 (T2), or the temperature difference between the two channels (T1-T2).

Figure 6.1: Various Display Modes
This composite image demonstrates the various display modes available on the Proster Digital Thermometer. It shows examples of temperature readings in Celsius and Fahrenheit, as well as the maximum (MAX), minimum (MIN), T1/T2 individual readings, T1-T2 difference, and average (AVG) temperature values.
6.7. Auto Power Off
- The thermometer is equipped with an auto power-off feature that activates after approximately 1 minute of inactivity to conserve battery life.
- To disable auto power-off: While the device is OFF, remove one battery. Press and hold the Power button, then reinsert the battery. The device will power on and the auto power-off function will be disabled until the device is powered off manually or batteries are removed again.
7. Specifications

Figure 7.1: Expandable Temperature Range Application
This image shows the Proster Digital Thermometer in use, measuring high temperatures in a molten metal environment. The display shows readings of 1132°C and 1252°C, highlighting the device's capability to handle an expandable temperature range with appropriate probes.
| Feature | Specification |
|---|---|
| Model Number | PST095-PST262 |
| Measuring Range (J-type) | -210°C to 1200°C (-346°F to 2192°F) |
| Measuring Range (K-type) | -200°C to 1372°C (-328°F to 2501°F) |
| Measuring Range (T-type) | -250°C to 400°C (-418°F to 752°F) |
| Measuring Range (E-type) | -150°C to 1000°C (-238°F to 1832°F) |
| Measuring Range (N-type) | -200°C to 1300°C (-328°F to 2372°F) |
| Measuring Range (R- and S-type) | 0°C to 1767°C (32°F to 3212°F) |
| Resolution | 0.1°C/°F (<1000°C/°F), 1°C/°F (≥1000°C/°F) |
| Accuracy | ±0.1% + 0.6°C |
| Input | Bi-channel input |
| Operating Temperature | 0°C ~ 40°C |
| Storage Temperature | -10°C ~ 50°C |
| Storage Humidity | 20 ~ 90% RH |
| Power Supply | 3 x 1.5V AAA Battery |
| Auto Power Off | Approx. 1 minute without operation |
| Display Type | LCD with Backlight |
| Product Dimensions | 14.5 x 0.01 x 0.01 cm |
| Item Weight | 222 g |
| Outer Material | Metal |
| Response Time | 0.5 seconds |
8. Maintenance
- Cleaning: Wipe the thermometer's exterior with a soft, damp cloth. Do not use abrasive cleaners or solvents. Ensure the device is dry before storage or next use.
- Storage: Store the thermometer in a cool, dry place away from direct sunlight and extreme temperatures. If storing for extended periods, remove the batteries to prevent leakage.
- Thermocouple Care: Handle thermocouple probes with care. Avoid bending or kinking the cables sharply. Inspect probes regularly for signs of damage or wear.
9. Troubleshooting
| Problem | Possible Cause | Solution |
|---|---|---|
| Thermometer does not power on. | Dead or incorrectly installed batteries. | Check battery polarity. Replace with new AAA batteries. |
| Low battery indicator displayed. | Batteries are low. | Replace all three AAA batteries immediately to avoid false readings. |
| Inaccurate or fluctuating readings. |
|
|
| Display shows 'OL' or '---'. | Temperature is outside the measurement range of the selected thermocouple type, or probe is disconnected/faulty. | Ensure the probe is correctly connected and the temperature is within the specified range for the thermocouple type. Check probe for damage. |
| Auto power-off is too frequent. | Auto power-off feature is enabled. | Disable auto power-off as described in Section 6.7. |
10. Warranty and Support
Proster products are manufactured to high-quality standards. For specific warranty information, please refer to the warranty card included with your purchase or visit the official Proster website. If you encounter any issues or require technical assistance, please contact Proster customer support through the contact information provided with your product or on the manufacturer's website.


