
1. Product Overview
The ExpertPower 20A 12/24V Intelligent PWM Solar Charge Controller is designed to manage the power flow from your solar panel to your battery, ensuring efficient charging and protecting your battery from overcharge and over-discharge. It is compatible with 12V and 24V systems and supports various battery types including lead-acid (FLD/GEL/AGM), ternary lithium, and lithium iron phosphate (LiFePO4) batteries. Featuring a clear LCD display and dual USB ports, this controller offers comprehensive protection and user-friendly operation.
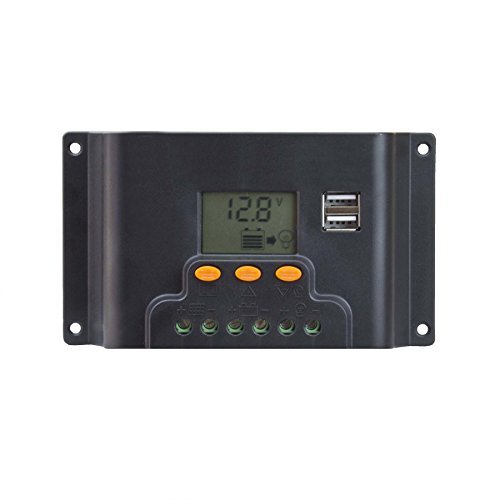
Figure 1: ExpertPower 20A Solar Charge Controller
2. Safety Instructions
- Ensure proper ventilation around the controller.
- Connect the battery first, then the solar panel, and finally the load. Disconnect in reverse order.
- Verify correct polarity for all connections to prevent damage.
- Do not attempt to repair or modify the controller. Contact qualified personnel for service.
- Keep the controller away from water and corrosive substances.
- Cover the solar panel during connection to minimize the risk of electrical shock.
3. Key Features
- Battery Compatibility: Suitable for 12V/24V lead-acid (FLD/GEL/AGM), ternary lithium, and lithium iron phosphate (LiFePO4) batteries.
- Advanced Control: 32-bit high-speed master control chip for efficient management.
- LCD Display: Large screen LCD for clear display of charge and discharge parameters.
- Adjustable Parameters: User-adjustable charge and discharge settings.
- Multi-stage PWM Charging: Complete multi-stage Pulse Width Modulation charge management.
- Dual USB Ports: Two USB ports with a maximum current of 2A for charging phones, tablets, and other devices.
- Comprehensive Protection: Built-in reverse connection protection, open-circuit protection, high-temperature protection, over-current/short-circuit protection. All protections are self-recovery.
- Efficient Design: Double MOS anti-backflow circuit for ultra-low heat generation.
4. Product Components and Display

Figure 2: Front view of the controller with labeled components.
- LCD Screen
- USB Port (Dual)
- Home Page Button
- Turn ON/OFF Button (Load)
- Scroll Down / Manual Button
- Solar Panel Interface (Input)
- Load Port (Output)
- Battery Port

Figure 3: LCD Display Interface and Button Functions.
MENU: Switch between different displays or enter/exit settings by long pressing.
UP: Press to increase value.
DOWN: Press to decrease value.
5. Installation Instructions
Follow these steps carefully to install your solar charge controller. Incorrect wiring can damage the device or connected components.
- Prepare Wiring: Ensure all connections are secure. The package includes 6 spade terminals for convenience.
- Connect Battery: Connect the battery to the controller's battery terminals (labeled 8 in Figure 2). Ensure correct polarity (+ to + and - to -). The controller will power on and display battery voltage. It is recommended that the battery is charged before connecting.
- Connect Solar Panel: Connect the solar panel to the controller's solar panel terminals (labeled 6 in Figure 2). Ensure correct polarity. It is recommended to cover the solar panel during connection to prevent accidental power surges. The solar icon will appear on the display when sufficient power is received.
- Connect Load: Connect your DC load (e.g., lights, fan) to the controller's load terminals (labeled 7 in Figure 2). Ensure correct polarity.

Figure 4: Wiring Diagram. Connect battery first, then solar panel, then load.
Important: Always connect the battery first to allow the controller to detect the system voltage. Disconnect in the reverse order: load, then solar panel, then battery.
6. Operating Instructions
6.1 LCD Display Browsing
Press the MENU button (labeled 3 in Figure 2) to cycle through different display interfaces:
- Main Display: Shows current battery voltage, solar panel charge status, and load output status.
- Float Voltage: Displays the voltage at which the battery enters float charge mode.
- Discharge Reconnect Voltage: The voltage at which the load will reconnect after being disconnected due to low battery.
- Discharge Stop Voltage: The voltage at which the load will be disconnected to protect the battery from over-discharge.
- Work Mode: Configures the load output mode (e.g., 24 hours, dusk to dawn).
- Type of Battery: Displays the currently selected battery type.

Figure 5: Browsing and Parameter Setting Interface Flow.
6.2 Load Control
To manually turn the load ON or OFF, short press the DOWN button (labeled 5 in Figure 2) on the main display interface.
6.3 USB Charging
The dual USB ports (labeled 2 in Figure 2) provide up to 2A current for charging compatible devices like phones and tablets. USB charging is active when the controller is powered.
7. Parameter Settings
To enter manual settings for parameters (Float Voltage, Discharge Reconnect, Discharge Stop, Work Mode, Battery Type):
- While browsing interfaces 2-5 (Float Voltage, Discharge Reconnect, Discharge Stop, Work Mode), long press the MENU button for five seconds. The number on the display will flash.
- Use the UP and DOWN buttons to adjust the parameter value.
- Once the desired value is set, long press the MENU button again for five seconds to save the setting and exit.
To restore default settings, in interface 2-5, press and hold the UP button for five seconds.
7.1 Battery Type Selection
The controller supports various battery types. Ensure the correct type is selected for optimal charging and battery longevity.
- b01: Lead-acid (FLD/GEL/AGM)
- b02: Ternary Lithium
- b03: Lithium Iron Phosphate (LiFePO4)
To change the battery type, navigate to the "Type of battery" interface (labeled 6 in Figure 5), then follow the parameter setting steps above.
8. Maintenance
- Regularly check all wiring connections for tightness and corrosion.
- Keep the controller clean and free from dust and debris.
- Ensure adequate ventilation around the controller to prevent overheating.
- Periodically verify that the charging parameters match your battery type and system requirements.
9. Troubleshooting
| Problem | Possible Cause | Solution |
|---|---|---|
| Controller not powering on. | Battery not connected or low voltage. Incorrect battery polarity. | Ensure battery is connected first and has sufficient charge. Verify correct polarity. |
| Solar panel not charging. | Solar panel not connected or insufficient sunlight. Incorrect panel polarity. | Check solar panel connections and polarity. Ensure panel is exposed to direct sunlight. |
| Load not working. | Load disconnected or incorrect polarity. Battery voltage too low (discharge stop). Load output turned off. | Check load connections and polarity. Check battery voltage; if below discharge stop, charge battery. Short press DOWN button to turn load on/off. |
| LiFePO4 battery not charging after deep discharge. | Battery Management System (BMS) has shut off the battery due to low voltage, preventing the controller from detecting it. | Charge the LiFePO4 battery using an external charger to bring its voltage above the BMS cutoff, allowing the solar controller to detect and charge it. |
10. Technical Specifications
- Model: 20A
- System Voltage: 12V/24V Auto-sensing
- Max Charge Current: 20A
- Battery Compatibility: Lead-acid (FLD/GEL/AGM), Ternary Lithium, LiFePO4
- USB Output: Dual USB, 5V/2A Max
- Display: LCD
- Product Dimensions: 6.7 x 4 x 1.6 inches (170 x 102 x 41 mm approx)
- Item Weight: 7 ounces (198 grams approx)
- Operating Temperature: -35°C to +60°C
11. Video Guide
Watch this video for a visual demonstration of a similar solar charge controller's features and operation.
Video: 30A Solar Charge Controller 12V/24V Solar Panel Charge. This video demonstrates the functionality of a solar charge controller, similar to the ExpertPower 20A model, including its display and connection points. Note that the model shown is 30A, but the operational principles are largely the same.


