
Product Overview
The BN-LINK Digital Timer Outlet is a versatile and energy-efficient device designed to automate the power supply to your appliances. Featuring two independently controllable outlets and a 7-day programmable schedule, it offers convenience and enhanced security for your home or office.

Front view of the BN-LINK Digital Timer Outlet, showing the LCD display and control buttons.
Key Features:
- Dual Independent Outlets: Two control buttons (Mode1 and Mode2) allow for independent management of each outlet, or synchronization for a single schedule.
- Energy-Efficient: Helps reduce electricity costs and extends appliance lifespan by automating power.
- Random Mode (Vacation Mode): Varies programmed light schedules to create a 'lived-in' appearance, enhancing home security when you are away.
- Customizable Programming: Set up to 8 independent ON/OFF schedules with timings as short as one minute.
- Backup Battery: Retains settings during power outages.
- Safety Certified: ETL certified and meets UL Standards 60730-1 and 60730-2-7.
Initial Setup
Before programming, ensure the timer is plugged into a live outlet for at least 30 minutes to charge the internal backup battery. This will ensure your settings are saved during power interruptions.
Setting Current Time and Day:
- Press the CLOCK button. The display will show the current time.
- Press the WEEK button repeatedly to select the current day of the week.
- Press the HOUR button to set the current hour.
- Press the MIN button to set the current minute.
- Once the time and day are set, press the CLOCK button again to exit the setting mode.
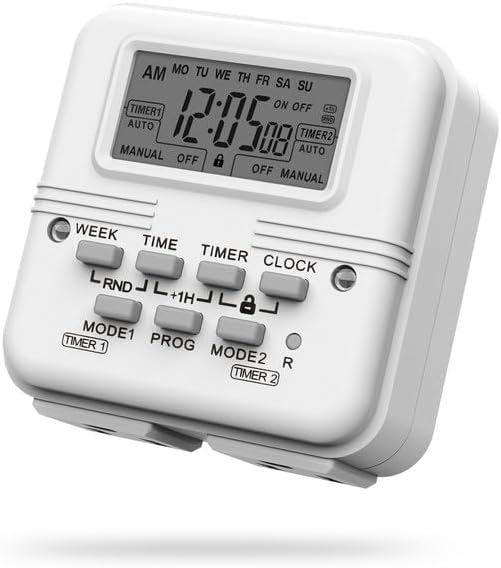
Angled view of the BN-LINK Digital Timer Outlet, providing a clear look at its display and button layout.
Programming and Operation
The timer allows for up to 8 ON/OFF programs, which can be set for specific days, weekdays, weekends, or daily operation.

Detailed view of the timer's display highlighting its 8 ON/OFF program capability, 7-day programmability, and dual independent receptacles.
Setting Programs (ON/OFF Times):
- Press the PROG button. The display will show "1 ON".
- Press WEEK to select the desired day(s) for this program (e.g., MO TU WE TH FR SA SU, MO TU WE TH FR, SA SU, MO, etc.).
- Press HOUR and MIN to set the ON time.
- Press PROG again. The display will show "1 OFF".
- Repeat steps 2 and 3 to set the OFF time for the first program.
- Continue pressing PROG to cycle through and set up to 8 ON/OFF programs.
- After setting all desired programs, press the CLOCK button to return to the current time display.
Independent Outlet Control:
The BN-LINK timer features two independent outlets. You can assign programs to each outlet using the MODE1 and MODE2 buttons.
- Press MODE1 to cycle through ON, AUTO, or OFF for Timer 1.
- Press MODE2 to cycle through ON, AUTO, or OFF for Timer 2.
- Select AUTO for the timer to follow the programmed schedules.

The BN-LINK timer plugged into a wall outlet, showcasing its two grounded receptacles and compact design.
Random Mode (Vacation Mode):
To activate the random function, which varies your programmed ON/OFF times by a few minutes to simulate occupancy:
- While in normal clock mode, press the WEEK and TIME buttons simultaneously.
- The display will show "RND" to indicate Random Mode is active.
- To deactivate, press WEEK and TIME simultaneously again.

Illustration of the 'Random Function' feature, designed to deter intruders by varying light schedules.
Daylight Saving Time (DST):
To adjust for Daylight Saving Time:
- While in normal clock mode, press the TIME and TIMER buttons simultaneously.
- The display will show "+1H" and the time will advance by one hour.
- To revert, press TIME and TIMER simultaneously again.
Manual Override:
To manually turn the timer ON or OFF, overriding the current program:
- Press the MODE1 or MODE2 button repeatedly until the desired state (ON or OFF) is displayed for the respective timer.
- To return to programmed operation, select AUTO.
Care and Maintenance
- Clean the timer with a dry, soft cloth. Do not use abrasive cleaners or solvents.
- Do not immerse the timer in water or expose it to excessive moisture.
- The internal backup battery is designed for long-term use and does not require replacement under normal conditions.
Troubleshooting Guide
| Problem | Possible Cause | Solution |
|---|---|---|
| Timer not turning ON/OFF at programmed times. | Timer is not in AUTO mode; incorrect program settings; power outage. | Ensure AUTO is selected for the respective timer. Review and correct program settings. Check power supply. |
| Display is blank or dim. | Timer not plugged in; backup battery low. | Plug the timer into a live outlet. Allow 30 minutes for the backup battery to charge. |
| Cannot set time or programs. | Buttons not responding; unit frozen. | Press the R (Reset) button with a pointed object (e.g., paperclip) to reset the unit. Re-enter all settings. |
Technical Specifications
| Model Number | SU105 |
| Operating Voltage | 125 Volts |
| Current Rating | 8 Amps |
| Wattage | 1000 Watts (Tungsten or Electronic Ballast) / 1875 Watts (Resistive) |
| Operation Mode | ON-OFF |
| Connector Type | Plug In (3-Prong) |
| Dimensions (L x W x H) | 4.9 x 8.5 x 10.39 inches |
| Item Weight | 7.4 ounces |
| Certifications | ETL Certified, UL Standards 60730-1 and 60730-2-7 |

Dimensional view of the BN-LINK Digital Timer Outlet, showing its compact size and design from multiple angles.
Important Safety Information
- For indoor use only. Do not expose to rain or moisture.
- Do not exceed the maximum load rating of 15A/1875W resistive or 8A/1000W tungsten/electronic ballast.
- Always plug the timer directly into a wall outlet. Do not use with extension cords or power strips if connecting high-wattage appliances like space heaters, unless the cord/strip is explicitly rated for the appliance's wattage.
- Ensure the appliance plugged into the timer is in good working condition and its plug is not damaged.
- Keep out of reach of children.
Warranty and Customer Support
BN-LINK products are designed for reliability and performance. This product is ETL certified and meets stringent UL safety standards.
For any questions, technical support, or warranty inquiries, please contact BN-LINK customer service. Refer to the official BN-LINK website or your purchase documentation for contact details.
An electronic version of this user manual is available for download: Download User Manual (PDF)