1. Introduction
This manual provides detailed instructions for the installation, operation, and maintenance of your SUNPIE 7-inch LED Headlights and 4-inch Fog Lights. These lights are designed to enhance visibility and safety for compatible Jeep models, featuring advanced LED technology with white/amber halo, turn signal, DRL, high beam, and low beam functionalities. Please read this manual thoroughly before installation and use.
2. Product Features
- Super Bright White Halo/Amber Turn Signal LED Headlights: Equipped with high-power bright LEDs and clear lenses for superior brightness (4500LM high beam, 3200LM low beam) and focused light output compared to OEM halogen lights. Features pure amber halo turn signals and white DRL. Fog lights also support amber or white light.
- Perfect Fit Plug and Play: Designed for direct replacement of OEM 7-inch halogen headlights. Compatible with 2007-2018 JK/JKU, 1997-2016 TJ, 2004-2006 LJ, and 1976-1986 CJ Jeep models.
- IP67 Waterproof & DOT Approved: Engineered with IP67 waterproof rating, ensuring reliable performance in various weather conditions and off-road environments. DOT approved for legal on-road use. Provides 6000K pure white color and over 60,000 hours service life.
- High Efficiency Heat Dissipation & Built-in CANBUS: Constructed with an aluminum metal base for efficient heat dissipation, preventing LED chip damage from high temperatures and ensuring stable high/low beam functions. New version headlights include built-in LED CANBUS to reduce flickering issues and eliminate the need for an external decoder.
3. Package Contents
Verify that all components are present and undamaged upon opening the package.
- 2 x 7-Inch LED Headlights with White/Amber Halo
- 2 x 4-Inch LED Fog Lights (Amber/White Halo)
- Necessary Wiring Adapters and Connectors

4. Compatibility
These LED headlights and fog lights are compatible with the following Jeep models:
- Jeep Wrangler JK/JKU (2007-2018)
- Jeep Wrangler TJ (1997-2016)
- Jeep Wrangler LJ (2004-2006)
- Jeep CJ (1976-1986)
5. Installation Guide
The installation process is designed to be plug-and-play for most compatible models. Basic wiring knowledge may be required for connecting the halo and turn signal functions.
5.1. Headlight Installation Steps
- Preparation: Park your vehicle on a level surface, engage the parking brake, and turn off the engine. Disconnect the negative terminal of the battery to prevent electrical shorts.
- Remove Front Grille: Carefully remove the clips or screws securing the front grille. Gently pull the grille forward to detach it from the vehicle.
- Remove Old Headlights: Unscrew the retaining ring around the existing 7-inch headlights. Disconnect the wiring harness from the back of the headlight and remove the old headlight assembly.
- Connect New Headlights: Connect the main wiring harness of the new LED headlight to the vehicle's OEM headlight connector. Use the provided adapter cable if necessary.
- Connect Halo/DRL/Turn Signal Wires: The new headlights feature separate wires for the white halo DRL and amber turn signal functions.
- The white halo DRL wire (ACC) should be connected to an ignition-switched power source (e.g., an 'add-a-fuse' circuit in the fuse box, or a dedicated DRL circuit).
- The amber turn signal wire should be connected to the vehicle's existing turn signal wiring. This allows the halo to switch to amber and blink with the turn signal.
- Secure New Headlights: Place the new LED headlight into the bucket and secure it with the retaining ring. Ensure it is seated properly.
- Reinstall Grille: Reattach the front grille by aligning the clips/screws and pressing it firmly into place.

5.2. Fog Light Installation Steps
Installation of the fog lights typically involves removing the front bumper or accessing the fog light housing from underneath the vehicle. Connect the fog light wiring to the vehicle's existing fog light harness. Wiring for amber/white halo functions on fog lights may require similar connections as the headlights.
5.3. Video Guide: Headlight Installation Overview
Video 5.1: This video provides an unboxing and installation guide for 7-inch halo headlights, demonstrating the process of replacing existing headlights with new LED units. It covers the steps from removing the old lights to connecting the new ones, including wiring for halo functions.
5.4. Video Guide: Product Features and Waterproof Test
Video 5.2: This video showcases the DVISUV 7-inch LED headlights (Model J003T), highlighting their features such as low beam, high beam, turn signal, and white DRL. It also includes a demonstration of the IP68 waterproof rating.
6. Operating Instructions
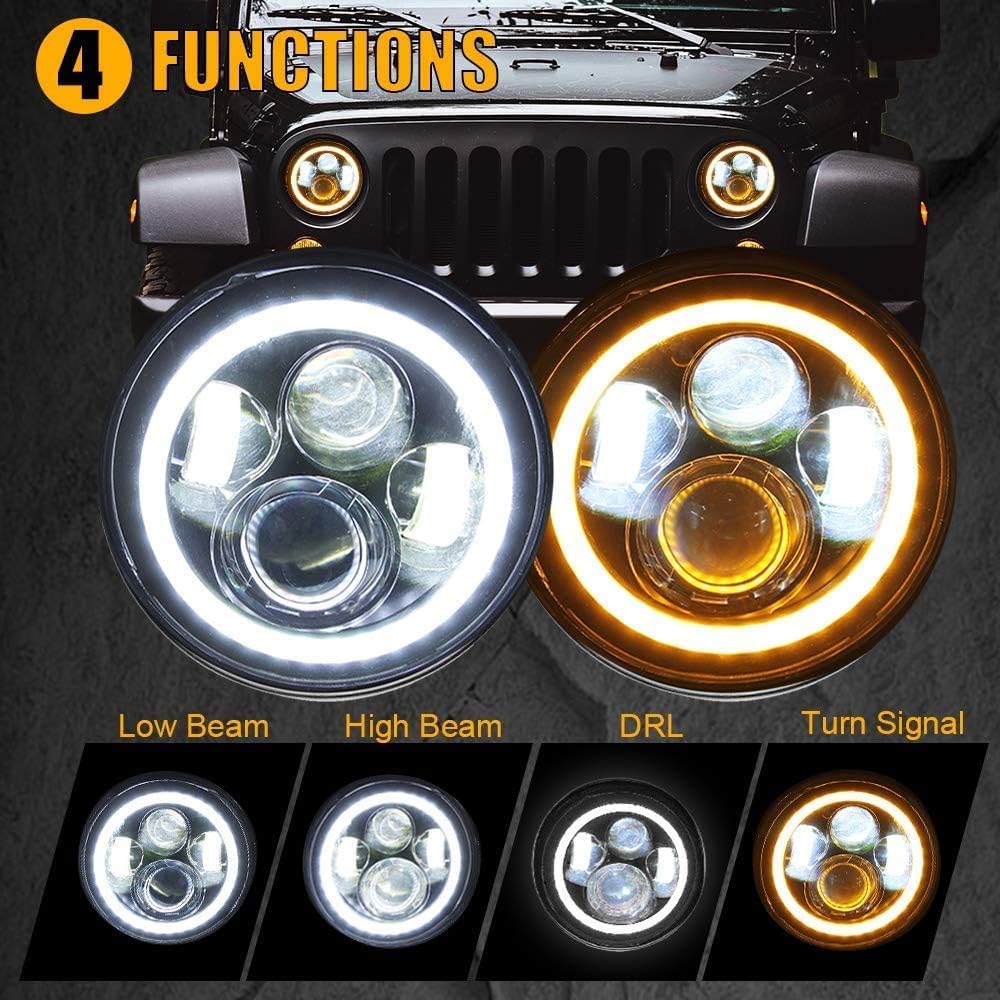
Your new LED headlights and fog lights offer multiple lighting modes:
- Low Beam: Provides standard illumination for regular driving conditions.
- High Beam: Offers maximum illumination for enhanced visibility on dark roads.
- DRL (Daytime Running Light): The white halo ring illuminates when the vehicle is on, increasing daytime visibility.
- Turn Signal: When the turn signal is activated, the halo ring on the corresponding headlight will switch from white to amber and flash.
- Fog Lights: Can be operated independently or with headlights, providing additional illumination in foggy or low-visibility conditions. They can emit either amber or white light depending on wiring.
7. Maintenance
To ensure optimal performance and longevity of your SUNPIE LED lights:
- Cleaning: Regularly clean the lenses with a soft cloth and mild soap solution to remove dirt and debris. Avoid abrasive cleaners.
- Inspection: Periodically check all wiring connections to ensure they are secure and free from corrosion.
- Damage: If any damage to the housing or lens is observed, contact customer support for assistance.
8. Troubleshooting
If you encounter issues with your LED lights, refer to the following common problems and solutions:
- Flickering Lights: The headlights have built-in CANBUS to reduce flickering. If flickering occurs, ensure all connections are secure. In rare cases, an additional anti-flicker harness (not included) might be needed for specific vehicle electrical systems.
- Lights Not Turning On: Check all wiring connections, especially the main power and ground. Verify that the vehicle's fuses are intact.
- Improper Fit/Rattling: Ensure the headlights are correctly seated in the bucket and the retaining ring is tightened. If there is still a slight gap or rattling, a thin strip of weather stripping (e.g., EPDM D-Profile self-stick weatherseal) can be applied around the edge of the headlight to create a snug fit.
- Halo/Turn Signal Not Functioning: Double-check the specific wiring connections for the DRL (ACC) and turn signal leads. Ensure they are connected to the correct power sources.
9. Specifications
| Specification | Value |
|---|---|
| Brand | SUNPIE |
| Model Number | J002 |
| Color | White/Amber Halo |
| Specific Uses For Product | Head Lights |
| Vehicle Service Type | JK TJ LJ |
| Special Feature | High Beam, Waterproof |
| Wattage | 30 watts |
| Auto Part Position | Front |
| Lens Color | Clear |
| Lens Material | Acrylic |
| Item Dimensions L x W x H | 11.81 x 8.66 x 5.51 inches |
| Item Weight | 7.19 pounds |
| Mirror Lighting Type | Turn Signal Indicator |
| High Beam Output | 4500LM |
| Low Beam Output | 3200LM |
| Color Temperature | 6000K |
| Service Life | 60,000+ hours |
10. Warranty and Support
SUNPIE provides a 1-year warranty for this product. If you have any questions or encounter issues during installation or use, please contact SUNPIE customer support for assistance. We are committed to providing the best products and service.


