
1. Introduction and Overview
This manual provides essential information for the safe and effective operation, maintenance, and troubleshooting of your Makita 18V LXT Brushless 6-1/2" Sub-Compact Circular Saw (Model DHS660ZB). Please read this manual thoroughly before initial use and keep it for future reference.
The DHS660ZB is engineered for cutting and ripping applications, offering a compact and ergonomic design. It features a Makita-built brushless motor, Automatic Torque Drive Technology (ADT), dual L.E.D. lights, an electric brake, and Extreme Protection Technology (XPT) for enhanced durability.

Figure 1: Makita 18V LXT Brushless 6-1/2" Sub-Compact Circular Saw (Model DHS660ZB). This image shows the overall design of the circular saw, highlighting its compact form factor.
2. Safety Information
Always follow basic safety precautions to reduce the risk of fire, electric shock, and personal injury. Keep this manual and all safety warnings for future reference.
General Power Tool Safety Warnings:
- Work Area Safety: Keep work area clean and well lit. Cluttered or dark areas invite accidents.
- Electrical Safety: Do not expose power tools to rain or wet conditions. Water entering a power tool will increase the risk of electric shock.
- Personal Safety: Always wear eye protection (safety glasses or goggles) and hearing protection (ear muffs or earplugs) when operating the saw. Use a dust mask if operating in dusty conditions.
- Tool Use and Care: Do not force the power tool. Use the correct power tool for your application. It will do the job better and safer at the rate for which it was designed.
- Battery Tool Use and Care: Use the tool only with specifically designated battery packs. Use of any other battery packs may create a risk of injury and fire.
- Service: Have your power tool serviced by a qualified repair person using only identical replacement parts. This will ensure that the safety of the power tool is maintained.
Circular Saw Specific Safety Warnings:
- Hold the tool firmly with both hands. Always use the auxiliary handle if provided.
- Keep hands away from cutting area and the blade. Keep your second hand on the auxiliary handle, or motor housing. If both hands are holding the saw, they cannot be cut by the blade.
- Do not reach underneath the workpiece. The guard cannot protect you from the blade below the workpiece.
- Adjust the cutting depth to the thickness of the workpiece. Less than a full tooth of the blade should be visible below the workpiece.
- Never hold the workpiece in your hands or across your leg while cutting. Secure the workpiece to a stable platform. It is important to support the workpiece properly to minimize body exposure, blade binding, or loss of control.
- Use extreme caution when cutting into existing walls or other blind areas. The protruding blade may cut objects that can cause kickback.
- WARNING: Using fake or knock-off batteries is dangerous, voids your warranty, and offers poor performance. Always use genuine Makita batteries.
- Dust Extraction: When connecting to a vacuum system, ensure it is an anti-static system to prevent static charge buildup, which can damage the tool's control board.
3. Components and Features
Familiarize yourself with the key components and features of your circular saw for optimal performance and safety.
- Brushless DC Motor: Generates less heat buildup, ideal for prolonged use, and provides up to 50% longer run time compared to non-brushless motors.
- Automatic Torque Drive Technology (ADT): Adjusts cutting speed and torque under load for optimum cutting performance.
- eXtreme Protection Technology (XPT): Offers maximum protection against dust, debris, and liquids for optimal performance in extreme conditions.
- Dual L.E.D. Lights: Illuminates the cutting line for improved visibility, with pre-glow and afterglow features.
- Electric Brake: Stops the blade rapidly after the trigger is released, enhancing operator safety.
- Dust Nozzle: Allows connection to a vacuum system for improved dust extraction.
- Trigger Lock-Off Button: Prevents accidental startup of the saw.
- Blade Guard: Retracts during cutting and covers the blade when not in use for safety.
- Depth Adjustment Lever: For setting the desired cutting depth.
- Bevel Adjustment Lever: For setting the desired bevel angle (0° to 50°).
- Guide Rule: Used for making straight cuts parallel to an edge.
- Battery Indicator: Displays the remaining battery capacity.

Figure 2: Key features of the Makita DHS660ZB Circular Saw. This diagram labels important components such as the blower, trigger lock-off button, high power brushless motor, bevel capacity, electric brake, and twin LED job lights.

Figure 3: Dual L.E.D. lights. The image shows the bright LED lights positioned to illuminate the cutting area, enhancing visibility during operation.

Figure 4: Battery charge indicator. This image highlights the battery indicator on the tool, allowing users to monitor the remaining charge.
4. Setup
4.1 Battery Installation and Removal
This tool is designed for use with Makita 18V LXT Lithium-Ion batteries (sold separately). Ensure the battery is fully charged before use.
- To Install: Align the battery pack with the battery housing on the saw. Slide the battery into place until it locks with a click.
- To Remove: Press the release button on the battery pack and slide it out of the tool.
4.2 Blade Installation and Removal
Always disconnect the battery before installing or removing the blade.
- Ensure the saw is unplugged or the battery is removed.
- Press the shaft lock button to prevent the blade from rotating.
- Use the provided hex wrench to loosen the blade bolt by turning it counter-clockwise.
- Remove the blade bolt, outer flange, and the old blade.
- Clean any sawdust or debris from the blade area.
- Install the new 6-1/2" C.T. Blade (24T, A-85092) or a compatible blade, ensuring the teeth are pointing in the direction of rotation indicated on the saw.
- Replace the outer flange and blade bolt. Tighten the blade bolt securely by turning it clockwise while pressing the shaft lock button.
- Ensure the blade guard moves freely.
4.3 Adjusting Cutting Depth
The cutting depth should be set so that the blade extends slightly below the workpiece to ensure efficient cutting and minimize kickback.
- Loosen the depth adjustment lever.
- Raise or lower the saw base to achieve the desired cutting depth.
- Align the desired depth marking on the scale with the indicator.
- Securely tighten the depth adjustment lever.

Figure 5: Depth adjustment. This image shows the lever and scale used to adjust the cutting depth of the saw.
4.4 Adjusting Bevel Angle
The saw can make bevel cuts from 0° to 50°.
- Loosen the bevel adjustment lever.
- Tilt the saw base to the desired angle.
- Align the desired angle marking on the scale with the indicator.
- Securely tighten the bevel adjustment lever.
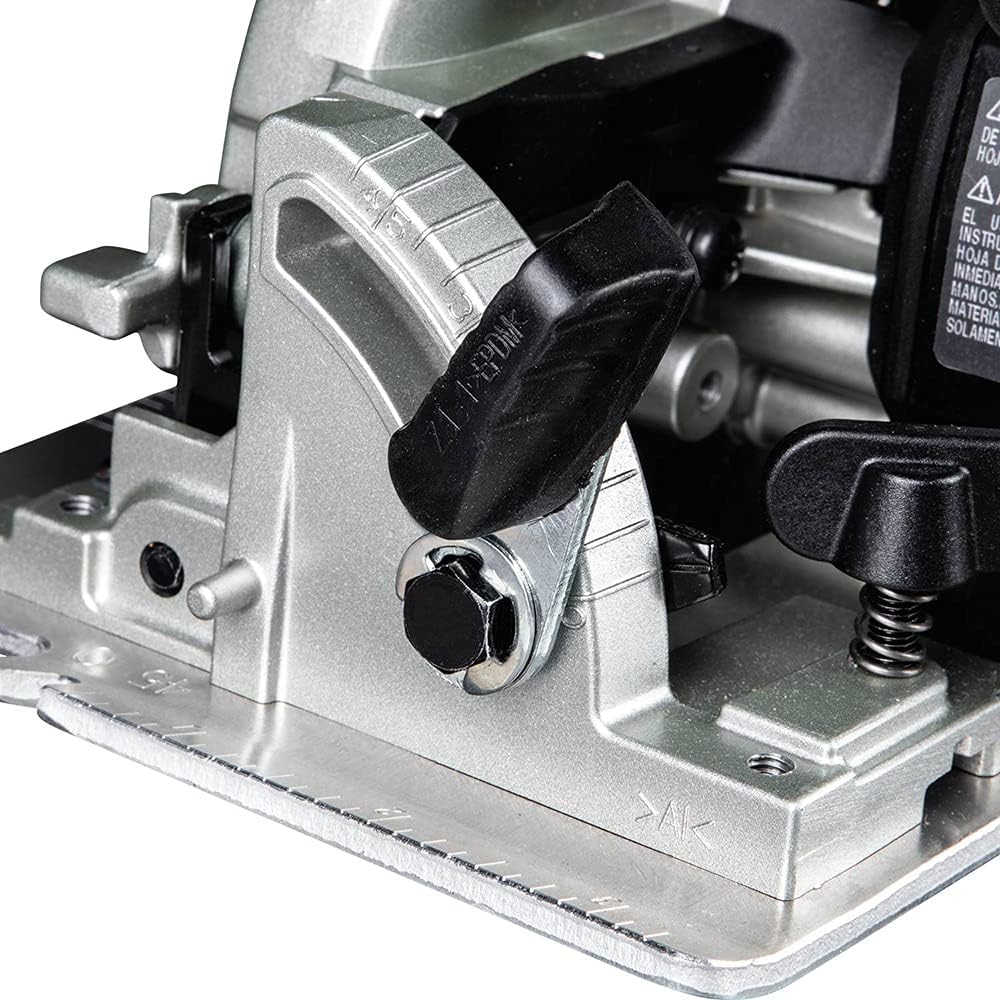
Figure 6: Bevel adjustment. This image displays the lever and scale for setting the saw's bevel angle for angled cuts.
4.5 Attaching the Guide Rule
The guide rule (164095-8) helps make straight cuts parallel to the edge of the workpiece.
- Slide the guide rule into the slots on the front of the saw base.
- Adjust the guide rule to the desired width from the blade.
- Tighten the screw to secure the guide rule in place.
5. Operating Instructions
5.1 Starting and Stopping the Saw
- To Start: Depress the trigger lock-off button, then pull the trigger switch.
- To Stop: Release the trigger switch. The electric brake will rapidly stop the blade.

Figure 7: Operating the saw. This image demonstrates the correct hand placement for operating the saw, with the thumb on the lock-off button and finger on the trigger.
5.2 Cutting Techniques
- Straight Cuts: Use the guide rule or a clamped straight edge for accurate straight cuts.
- Bevel Cuts: Adjust the bevel angle as described in Section 4.4.
- Plunge Cuts: For plunge cuts, ensure the blade guard is fully retracted before slowly lowering the saw into the workpiece.
- Cutting Material: The saw is ideal for cutting wood and wood-based materials. Ensure the correct blade is used for the material.

Figure 8: Saw in action. The circular saw is shown actively cutting through a wooden board, demonstrating its cutting capability.

Figure 9: Overhead view of saw cutting. This image provides an overhead perspective of the saw making a cut, illustrating the saw's maneuverability.
5.3 Dust Extraction
For a cleaner work environment and improved visibility of the cutting line, connect a dust extraction system to the saw's dust nozzle.

Figure 10: Dust nozzle. A close-up view of the dust nozzle, designed for connecting to an external vacuum system to manage sawdust.
6. Maintenance
Regular maintenance ensures the longevity and safe operation of your tool.
- Cleaning: Keep the tool clean and free of sawdust and debris. Use a soft cloth to wipe down the exterior. Do not use strong solvents.
- Blade Care: Regularly inspect the saw blade for sharpness and damage. Replace dull or damaged blades promptly.
- Lubrication: The tool is factory lubricated and does not require additional lubrication.
- Inspection: Periodically check all screws and fasteners for tightness. Tighten any loose components.
7. Troubleshooting
- Saw not starting:
- Ensure the battery is fully charged and properly inserted.
- Check if the trigger lock-off button is fully depressed before pulling the trigger.
- Reduced cutting performance:
- The blade may be dull or damaged; replace it if necessary.
- Ensure the cutting depth is correctly set for the material.
- The battery may be low on charge.
- Static charge buildup when using dust extraction:
- This can occur, especially in dry conditions, and may affect the tool's electronics. Use an anti-static vacuum hose system to mitigate this risk. Makita recommends consulting a service professional if this issue persists.
8. Specifications
| Specification | Value |
|---|---|
| Model Number | DHS660ZB |
| Power Source | 18V LXT Lithium-Ion Battery (Battery and Charger Sold Separately) |
| Blade Diameter | 6.5 Inches (165 mm) |
| No Load Speed | 5000 RPM |
| Max Cutting Depth (90°) | 2-1/4" (57 mm) |
| Max Cutting Depth (45°) | 1-5/8" (41 mm) |
| Bevel Capacity | 0° - 50° |
| Item Weight | 2.54 kg (5.6 lbs) |
| Product Dimensions | 33.6 x 22.61 x 20.8 cm |
| Included Components | Tool Only. 6-1/2" C.T. Blade 24T (A-85092), Guide Rule (164095-8), Dust Nozzle Set (199230-9) |
| Manufacturer | Makita Canada |
| Country of Origin | China |
9. Warranty and Support
For warranty information, service, or technical support, please refer to the official Makita website or contact Makita customer service directly. Keep your purchase receipt as proof of purchase for warranty claims.
Important: Use of non-genuine Makita parts or accessories may void your warranty and can lead to product malfunction or injury.


