1. Introduction
The GQ GMC-500 is a portable Geiger counter designed for detecting X-ray, gamma, and beta radiation. This device provides real-time radiation measurements, offering an effective tool for personal safety and environmental monitoring. This manual provides essential information for the proper setup, operation, and maintenance of your GMC-500 Geiger Counter.
2. Safety Information
Please read and understand the following safety precautions before using the device:
- Do not attempt to open or modify the device. This may expose you to internal components and void the warranty.
- Keep the device away from extreme temperatures, direct sunlight, and high humidity.
- Avoid dropping the device or subjecting it to strong impacts.
- Use only the specified battery type (Lithium-ion) and charging methods.
- This device is for informational purposes and personal monitoring. It should not be used as a substitute for professional radiation safety equipment or procedures.
- If using near radioactive sources, place the device in a plastic bag to prevent contamination.
3. Package Contents
While specific package contents are not detailed, a typical package for the GQ GMC-500 Geiger Counter usually includes:
- GQ GMC-500 Geiger Counter unit
- Lithium-ion battery (pre-installed or separate)
- USB charging cable
- User manual (this document)
- Wrist strap (as seen in product images)
4. Device Overview
The GQ GMC-500 is a compact and portable device. Familiarize yourself with its physical features:
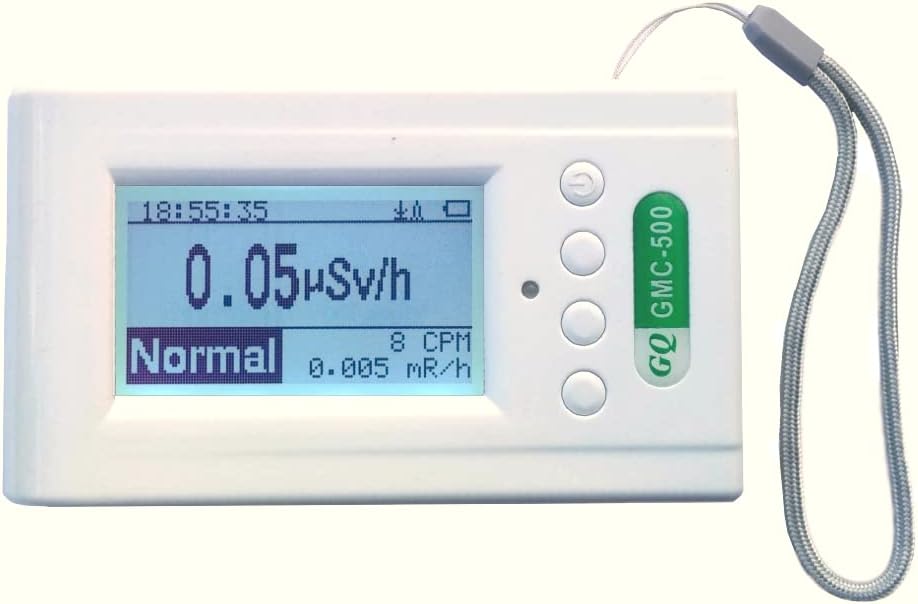
Figure 4.1: Front view of the GQ GMC-500 Geiger Counter, showing the LCD display, control buttons on the right side, and a wrist strap. The display shows a reading of 0.05 µSv/h and "Normal" status.
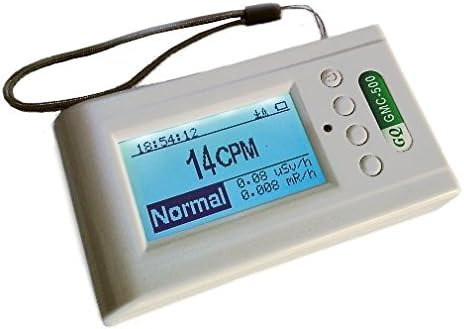
Figure 4.2: Angled view of the GQ GMC-500, highlighting its compact design and the arrangement of the display and side buttons. The screen shows 14 CPM and a "Normal" radiation level.
4.1. Display Interface
The LCD display provides real-time radiation readings and device status. Key indicators include:
- Time/Date: Current time and date.
- Battery Indicator: Shows remaining battery life.
- Radiation Level: Main reading in µSv/h (microsieverts per hour) or CPM (counts per minute).
- Status Indicator: Displays "Normal" or "High" depending on the detected radiation level.
- mR/h: Milliroentgens per hour reading.
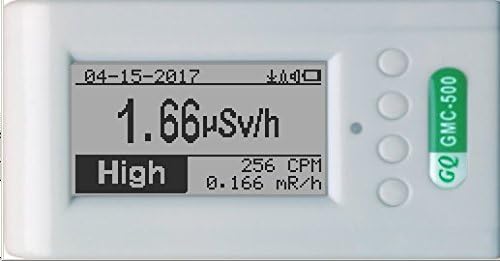
Figure 4.3: Close-up of the display showing a "Normal" radiation reading of 1.66 µSv/h, 256 CPM, and 0.166 mR/h.

Figure 4.4: The device's display automatically reorients when held vertically, showing a "High" radiation reading of 744 CPM, 4.84 µSv/h, and 0.484 mR/h.
4.2. Control Buttons
The device features several buttons for navigation and control. While specific button functions are typically detailed in the device's internal menu or a quick start guide, common functions include:
- Power Button: Long press to turn on/off. Short press for menu access or selection.
- Navigation Buttons: Used to scroll through menu options and adjust settings.
- Mode/Function Button: To switch between display modes or confirm selections.
5. Setup
5.1. Initial Charging
- Connect the provided USB charging cable to the device's charging port.
- Plug the other end of the USB cable into a compatible USB power adapter (not typically included) or a computer's USB port.
- Allow the device to charge fully before first use. The battery indicator on the display will show charging status.
5.2. Powering On/Off
- To Power On: Press and hold the power button (usually the top button) for a few seconds until the display illuminates.
- To Power Off: Press and hold the power button again for a few seconds until the device shuts down.
5.3. Basic Settings
Upon first use or after a factory reset, you may need to configure basic settings such as date, time, and measurement units.
- Access the main menu by short-pressing the power button or a designated menu button.
- Navigate through the menu using the up/down buttons.
- Select "Init Setup" or a similar option to adjust date, time, and other preferences.
- Confirm changes before exiting the menu.
6. Operating Instructions
6.1. Taking Measurements
- Ensure the device is powered on and fully charged.
- Hold the device in the area you wish to monitor. The Geiger counter will begin detecting radiation automatically.
- Observe the display for real-time readings in µSv/h, CPM, and mR/h.
- The device's internal motion detector will reorient the display for optimal viewing, whether held horizontally or vertically.
6.2. Understanding Readings
- CPM (Counts Per Minute): This indicates the number of radiation particles detected by the Geiger-Müller tube per minute. It's a direct measure of the detection rate.
- µSv/h (Microsieverts Per Hour): This is a measure of the equivalent dose rate, indicating the biological effect of radiation. It is a more standardized unit for assessing radiation exposure.
- mR/h (Milliroentgens Per Hour): Another unit for measuring exposure rate, often used in older contexts.
- Status Indicator: The "Normal" or "High" indicator provides a quick visual alert based on pre-set or user-defined thresholds.
6.3. Menu Navigation and Advanced Features
The GMC-500 offers various menu options for advanced functionality.

Figure 6.1: Screenshot of the GMC-500's Main Menu, displaying options such as "Save Data," "Timed Count," "WiFi," "Server," "Init Setup," "Others," and "About."
- Save Data: Allows you to record measurement data over time.
- Timed Count: Initiates a measurement for a specified duration.
- WiFi: Accesses Wi-Fi settings for network connectivity.
- Server: Configures settings for connecting to a data server, potentially for remote monitoring or data upload.
- Init Setup: For initial device configuration, including date, time, and unit preferences.
- Others/About: Provides access to additional settings or device information.
6.4. Wi-Fi and Server Connectivity
The GMC-500 supports Wi-Fi connectivity for advanced data management and remote features.

Figure 6.2: Screenshot of the GMC-500's Wi-Fi Menu, showing options to enable/disable Wi-Fi, configure SSID, password, view signal strength, IP address, MAC address, and reset the Wi-Fi module.

Figure 6.3: Screenshot of the GMC-500's Server Menu, providing fields for Website, URL, User ID, Counter ID, Period, and a "Test Connection" option.
Refer to the device's on-screen menu for detailed instructions on configuring Wi-Fi and server settings. This functionality allows for data upload to online platforms or custom servers, enhancing monitoring capabilities.
7. Maintenance
7.1. Cleaning
- Wipe the device with a soft, dry cloth.
- Do not use abrasive cleaners, solvents, or harsh chemicals.
- Ensure no liquids enter the device openings.
7.2. Battery Care
- Recharge the Lithium-ion battery when the low battery indicator appears.
- For long-term storage, charge the battery to approximately 50% and store the device in a cool, dry place.
- Avoid fully discharging the battery frequently, as this can reduce its lifespan.
7.3. Storage
- Store the device in its original packaging or a protective case when not in use.
- Keep it away from strong magnetic fields and sources of extreme heat or cold.
8. Troubleshooting
If you encounter issues with your GQ GMC-500, refer to the following common problems and solutions:
| Problem | Possible Cause | Solution |
|---|---|---|
| Device does not power on. | Low or depleted battery. | Charge the device using the USB cable. Ensure the charging cable and power source are functional. |
| Inaccurate or inconsistent readings. | Environmental interference; device not calibrated (unlikely for new units); proximity to non-radioactive electromagnetic sources. | Move to a different location. Ensure no strong electromagnetic fields are nearby. Perform a factory reset if available in the menu (this will reset settings, not calibration). |
| Display is blank or frozen. | Software glitch; low battery. | Perform a soft reset by holding the power button until the device restarts. If unresponsive, allow the battery to fully drain and then recharge. |
| Cannot connect to Wi-Fi. | Incorrect Wi-Fi credentials; out of range; network issues. | Verify SSID and password. Ensure the device is within range of the Wi-Fi network. Check router settings. Try resetting the Wi-Fi module via the menu. |
9. Specifications
| Feature | Detail |
|---|---|
| Model | GMC-500 |
| Manufacturer | GQ Electronics LLC |
| Dimensions (L x W x H) | 7.62 x 12.7 x 2.54 cm |
| Weight | 49.9 grams |
| Battery Type | 1 Lithium-ion (included) |
| Power Source | Battery Powered |
| Color | White |
| Alarm Type | Audible |
| Operational Humidity | 95 % |
| Detection Types | X-ray, Gamma, Beta Radiation |
10. Warranty and Support
For warranty information and technical support, please refer to the documentation included with your purchase or visit the official GQ Electronics website. Specific warranty terms may vary by region and retailer.
Contact information for GQ Electronics can typically be found on their official product pages or through your point of purchase.