
iGaging 100-700-B06
iGaging Digital Electronic Caliper
Model: 100-700-B06
Absolute Origin Smart Bluetooth Connectivity - IP54 Protection / Extreme Accuracy
1. Introduction
This manual provides detailed instructions for the proper use, setup, and maintenance of your iGaging Digital Electronic Caliper. Designed for precision and durability, this caliper features Absolute Origin technology, IP54 protection, and Smart Bluetooth connectivity for efficient data logging. Please read this manual thoroughly before operation to ensure accurate measurements and prolong the life of your instrument.
2. What's in the Box
Upon opening the package, please verify that all the following items are present:
- One (1) iGaging Digital Electronic Caliper
- One (1) Battery (pre-installed or spare)
- One (1) Instruction Manual
- One (1) Protective Storage Case

Image: The iGaging Digital Electronic Caliper alongside its protective storage case.
3. Product Features
- Absolute Origin System: Retains the measuring origin point even when the power is turned off, eliminating the need to re-zero.
- Smart Bluetooth Connectivity: Allows for wireless data transmission to compatible devices for efficient data logging and analysis.
- IP54 Protection: Provides resistance against dust and splashing water, enhancing durability in various working environments.
- Extreme Accuracy: Delivers precise measurements with a typical accuracy of +/-0.001 inches.
- Large LCD Display: Clear and easy-to-read digital display for quick and accurate readings.
- Multiple Measurement Modes: Switch between inches, millimeters, and fractions.
- Durable Construction: Made from high-quality stainless steel for long-lasting performance.
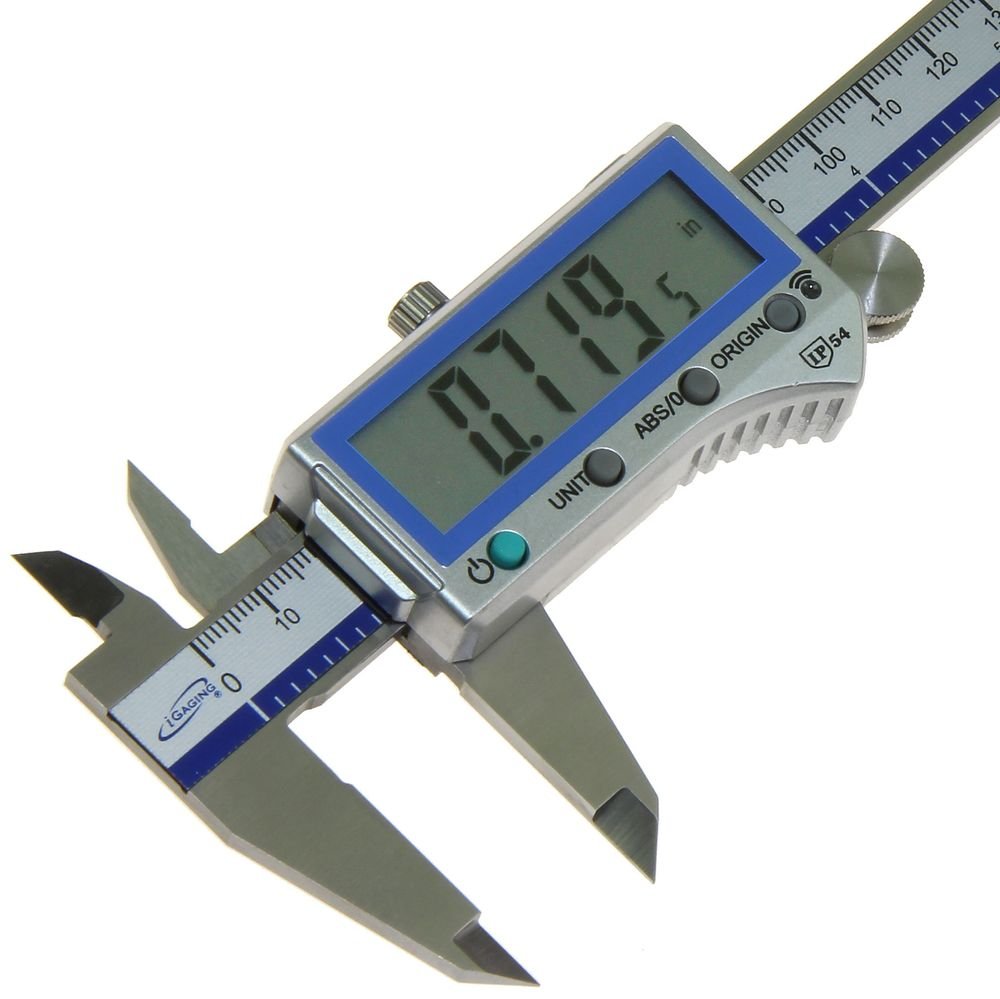
Image: A detailed view of the caliper's digital display and control buttons, including Power, Unit, ABS/INC, and Origin.
4. Setup
4.1 Battery Installation
Your caliper typically comes with a battery pre-installed or included separately. If not installed:
- Locate the battery compartment cover on the display unit.
- Slide the cover open or remove it carefully.
- Insert the battery (CR2032 or equivalent) with the positive (+) side facing up.
- Close the battery compartment cover securely.
4.2 Power On/Off
- To turn on the caliper, press the ON/OFF button (
 ).
). - To turn off the caliper, press and hold the ON/OFF button for a few seconds until the display turns off.
4.3 Initial Zeroing
Due to the Absolute Origin system, the caliper retains its zero point. However, for initial setup or if you wish to reset the origin:
- Ensure the caliper jaws are completely closed and clean.
- Press the ORIGIN button. The display should show "0.000" (or "0.00" / "0" depending on unit).
- For a hard reset of the absolute zero, locate the small recessed button next to the indicator light (often requires a pin or small tool) and press and hold it.
5. Operating Instructions
5.1 Taking Measurements
The caliper can measure external dimensions, internal dimensions, depth, and step measurements.
- External Measurement: Place the object between the main jaws.
- Internal Measurement: Use the small upper jaws to measure inside diameters.
- Depth Measurement: Extend the depth rod from the end of the caliper into a hole or recess.
- Step Measurement: Use the end face of the fixed jaw and the step on the movable jaw to measure steps.
Ensure the caliper is held perpendicular to the surface being measured and apply consistent, light pressure for accurate readings. Wait approximately one second for the reading to stabilize on the display.
5.2 Unit Conversion
Press the UNIT button to cycle through measurement units: inches (in), millimeters (mm), and fractions (in INC).

Image: The caliper's display showing various unit readings, including decimal inches, millimeters, and fractional inches.
5.3 Absolute (ABS) and Incremental (INC) Modes
Press the ABS/INC button to switch between modes:
- Absolute (ABS) Mode: Measures from the set origin point. This is the default and most common mode.
- Incremental (INC) Mode: Allows you to set a temporary zero at any point for relative measurements. Press ABS/INC again to return to absolute mode.
5.4 Bluetooth Connectivity
The iGaging caliper can transmit measurements wirelessly to a computer or mobile device. The Bluetooth functionality acts as a Bluetooth keyboard, sending the measured value followed by an 'Enter' key press.
- Enable Bluetooth: Ensure Bluetooth is enabled on your receiving device (computer, tablet, smartphone).
- Pairing: The caliper should appear as a discoverable device. Select it to pair. No PIN is typically required.
- Data Transmission: Once paired, open a text editor, spreadsheet (e.g., Excel, Google Sheets), or CAD software. Position the cursor where you want the data to appear.
- Send Data: Press the data transmission button on the caliper (often a dedicated button or combined with another function, refer to the specific button on your model, usually indicated by a Bluetooth symbol). The measurement will be sent to your device.

Image: The iGaging caliper being used to take a measurement, with the reading simultaneously displayed on a connected tablet.
6. Maintenance
6.1 Cleaning
- Regularly clean the measuring surfaces and the main beam with a clean, dry, lint-free cloth.
- Avoid using solvents or harsh chemicals, as they can damage the display or electronic components.
- Ensure no dust or debris accumulates in the sliding mechanism.
6.2 Battery Care
- If the display becomes dim or erratic, replace the battery.
- Remove the battery if the caliper will not be used for an extended period to prevent leakage.
6.3 Storage
- Store the caliper in its protective case when not in use to prevent damage from impacts or contaminants.
- Store in a dry environment, away from direct sunlight and extreme temperatures.

Image: The iGaging caliper neatly placed within its custom-fit protective storage case.
7. Troubleshooting
| Problem | Possible Cause | Solution |
|---|---|---|
| Display is blank or dim. | Low or dead battery. | Replace the battery. |
| Display shows random numbers or errors. | Debris on the measuring scale; electronic interference; faulty unit. | Clean the measuring scale thoroughly. Try resetting the origin. If problem persists, contact support. |
| Caliper does not turn off automatically. | This model does not feature auto shut-off. | Manually turn off the caliper by pressing and holding the ON/OFF button to conserve battery. |
| Bluetooth connection issues. | Device Bluetooth off; caliper not paired; interference; software issues. | Ensure Bluetooth is enabled on your device. Re-pair the caliper. Reduce distance to device. Check for driver updates or try a different application. |
| Inaccurate readings. | Dirty jaws/scale; improper technique; calibration needed. | Clean jaws and scale. Ensure jaws are closed and zeroed before measuring. Apply consistent pressure. If suspected, verify with gauge blocks. |
8. Specifications
| Feature | Specification |
|---|---|
| Model Number | 100-700-B06 |
| Measurement Range | 6 Inches (150mm) |
| Measurement Accuracy | +/-0.001 inches |
| Material | Stainless Steel |
| Protection Rating | IP54 |
| Connectivity | Smart Bluetooth |
| Power Source | Button Cell Battery (e.g., CR2032) |
| Package Dimensions | 10.12 x 3.7 x 1.3 inches |
| Item Weight | 10.41 ounces |
| Country of Origin | China |
9. Warranty and Support
iGaging products are manufactured to high standards. For specific warranty information, please refer to the documentation included with your purchase or contact iGaging directly. If you encounter any issues or require technical assistance, please reach out to iGaging customer support. Contact information can typically be found on the manufacturer's website or through your point of purchase.
Related documents100-700-B06

Ask a question about this manual
Ask about setup, troubleshooting, compatibility, parts, safety, or missing instructions. Manuals+ will review the question and use this page’s manual context to help answer it.