1. Introduction and Overview
The Aguilar AG 700 is a lightweight, high-power bass amplifier head designed for professional musicians. It delivers 700 watts of continuous power at 4 ohms, offering exceptional clarity, dynamic range, and quick transient response. This amplifier is engineered to provide a robust and articulate bass tone across various musical styles. This manual provides essential information for the safe and effective operation of your AG 700.
Please read this manual thoroughly before operating your AG 700 to ensure proper usage and to maximize its performance and longevity.
2. Key Features
- Powerful Output: 700 watts at 4 ohms, 350 watts at 8 ohms.
- Versatile EQ Section: Flexible 4-band equalizer with Treble, High Mid, Low Mid, and Bass controls.
- Tonal Shaping Switches: Includes 'Deep' and 'Bright' switches for broad low-end and high-end boosts.
- Instrument Input: Single 1/4-inch input jack with a -10dB pad for active or high-output instruments.
- Integrated Effects Loop: Series effects loop for connecting external effects processors.
- Balanced Direct Output: XLR balanced output with pre/post EQ and ground lift switches for direct connection to mixing consoles.
- Speaker Outputs: Two rear panel speakON outputs for secure speaker cabinet connections.
- Lightweight Design: Weighs approximately 6.64 pounds (3.01 kg) for easy portability.
3. Controls and Functions
3.1 Front Panel
The front panel of the AG 700 provides all essential controls for shaping your tone and managing signal flow.
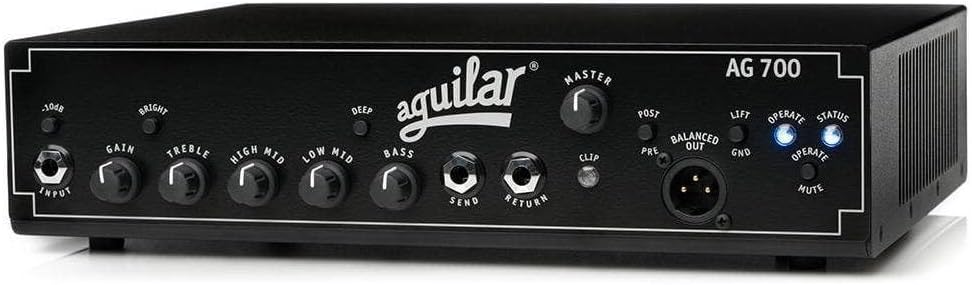
Front view of the Aguilar AG 700 bass amplifier head, showcasing its black chassis, white Aguilar logo, and all front panel controls including input, gain, EQ knobs, switches, effects loop jacks, master volume, and XLR output.
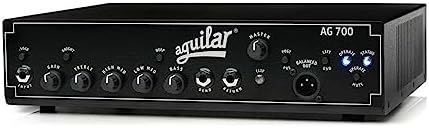
Another perspective of the Aguilar AG 700 bass amplifier head's front panel, highlighting the layout of the input, gain, EQ section (Treble, High Mid, Low Mid, Bass), Deep and Bright switches, and the Master volume control.
- INPUT Jack: Standard 1/4-inch input for your bass instrument.
- -10dB PAD Switch: Engages a -10dB attenuation for high-output instruments (e.g., active basses) to prevent input clipping.
- GAIN Control: Adjusts the input level of the amplifier. Set this to achieve a strong signal without clipping.
- BRIGHT Switch: Provides a broadband treble boost, adding presence and clarity to your tone.
- TREBLE Control: Adjusts the high-frequency response.
- HIGH MID Control: Adjusts the upper midrange frequencies.
- LOW MID Control: Adjusts the lower midrange frequencies.
- BASS Control: Adjusts the low-frequency response.
- DEEP Switch: Provides a broadband bass boost, adding fullness and depth to your tone.
- SEND Jack: 1/4-inch output for sending signal to external effects.
- RETURN Jack: 1/4-inch input for receiving signal from external effects.
- MASTER Control: Adjusts the overall output volume of the amplifier.
- CLIP Indicator: Illuminates when the signal is clipping, indicating that the input or internal signal path is too hot. Adjust GAIN or use the -10dB PAD.
- BALANCED OUT (XLR): Provides a balanced direct output for connecting to a mixing console or recording interface.
- PRE/POST Switch: Determines whether the BALANCED OUT signal is taken before (PRE) or after (POST) the amplifier's EQ section.
- LIFT/GND Switch: Ground lift switch for the BALANCED OUT, used to eliminate hum caused by ground loops.
- OPERATE/MUTE Switch: Toggles the amplifier between active (OPERATE) and silent (MUTE) modes. Mute is useful for tuning or switching instruments.
- STATUS Indicators: LEDs indicating power and operational status.
3.2 Rear Panel
The rear panel houses the power input and speaker connections.
- AC POWER Input: Connect the supplied AC power cord here.
- SPEAKER OUTPUTS (x2): Two speakON connectors for connecting speaker cabinets. Ensure proper impedance matching (minimum 4 ohms total load).
- COOLING FAN: Integrated fan for thermal management. Ensure adequate ventilation.
4. Setup
Follow these steps for initial setup:
- Power Connection: Ensure the amplifier's power switch is in the OFF position. Connect the supplied AC power cord to the AC POWER input on the rear panel and then to a grounded electrical outlet. The AG 700 operates on 110 Volts AC.
- Speaker Connection: Connect your speaker cabinet(s) to the SPEAKON OUTPUTS on the rear panel using high-quality speakON cables. The AG 700 is stable down to a 4-ohm load. Ensure the total impedance of your speaker setup is 4 ohms or higher. Connecting to an impedance lower than 4 ohms can damage the amplifier.
- Instrument Connection: Connect your bass guitar to the INPUT jack on the front panel using a standard 1/4-inch instrument cable. If you are using an active bass or an instrument with high output, engage the -10dB PAD switch.
- Effects Loop (Optional): If using external effects, connect the SEND jack to the input of your effects unit and the RETURN jack to the output of your effects unit.
- Direct Output (Optional): For connecting to a mixing console or recording device, use an XLR cable from the BALANCED OUT. Adjust the PRE/POST and LIFT/GND switches as needed for your specific setup.
5. Operating Instructions
Once setup is complete, you can begin operating your AG 700.
- Power On: Ensure the MASTER volume control is set to minimum. Flip the power switch to the ON position. The STATUS indicators will illuminate.
- Mute Function: If the OPERATE/MUTE switch is in MUTE mode, press it to switch to OPERATE mode.
- Set Gain: With your instrument playing, slowly increase the GAIN control until the CLIP indicator flashes only on your loudest notes. If it stays lit, reduce the GAIN or engage the -10dB PAD.
- Adjust Master Volume: Gradually increase the MASTER volume control to achieve your desired listening level.
- Equalization: Use the TREBLE, HIGH MID, LOW MID, and BASS controls to shape your tone. Experiment with the BRIGHT and DEEP switches to add presence or fullness.
- Power Off: Before powering off, turn the MASTER volume control to minimum. Then, flip the power switch to the OFF position.
6. Maintenance
- Cleaning: Clean the exterior of the amplifier with a soft, dry cloth. Avoid using abrasive cleaners or solvents.
- Ventilation: Ensure that the amplifier's cooling fan and vents are clear of obstructions to prevent overheating. Do not block the vents.
- Storage: Store the amplifier in a dry, temperature-controlled environment when not in use.
- No User-Serviceable Parts: The AG 700 contains no user-serviceable parts. Refer all servicing to qualified Aguilar service personnel. Opening the chassis will void your warranty.
7. Troubleshooting
If you encounter issues with your AG 700, consult the following table before seeking service.
| Problem | Possible Cause | Solution |
|---|---|---|
| No power / Unit does not turn on |
|
|
| No sound output |
|
|
| Distorted sound |
|
|
| Hum or noise |
|
|
| Amplifier overheats |
|
|
8. Specifications
| Specification | Value |
|---|---|
| Output Power | 700 Watts @ 4 ohms, 350 Watts @ 8 ohms |
| Input Impedance | 1 Megohm |
| EQ Section | Bass, Low Mid, High Mid, Treble controls; Deep and Bright switches |
| Effects Loop | Series |
| Direct Output | Balanced XLR with Pre/Post EQ and Ground Lift |
| Cooling | Fan cooled |
| Power Requirements | 110 Volts AC (Corded Electric) |
| Dimensions (W x D x H) | 14.5 x 13.5 x 5.5 inches (approximate) |
| Weight | 6.64 pounds (approximate) |
| Compatible Devices | Bass, Double Bass |
| Connector Type | 6.35mm Jack (Input), speakON (Speaker Outputs), XLR (Balanced Out) |
| Material Type | Metal |
9. Safety Information
- Electrical Safety: Always connect the amplifier to a grounded power outlet. Do not defeat the ground plug.
- Moisture: Do not expose the amplifier to rain or moisture. Keep liquids away from the unit.
- Ventilation: Ensure proper ventilation to prevent overheating. Do not block the cooling vents.
- Speaker Connections: Always use appropriate speaker cables with speakON connectors. Ensure correct impedance matching to avoid damage to the amplifier or speakers.
- Hearing Protection: Prolonged exposure to high volume levels can cause permanent hearing damage. Use caution when setting volume levels.
- Servicing: Do not attempt to service the amplifier yourself. Refer all servicing to qualified personnel.
10. Warranty and Support
For detailed warranty information, product registration, and technical support, please visit the official Aguilar Amplification website or contact your authorized Aguilar dealer. Keep your original purchase receipt as proof of purchase for any warranty claims.
Aguilar Amplification is committed to providing high-quality products and customer satisfaction. Should you have any questions or require assistance, please do not hesitate to reach out to their support team.


