1. Product Overview
The HTZSAFE HB-T001Q3+ solar wireless photoelectric beam sensor is designed for outdoor security and detection. It operates completely wirelessly, eliminating the need for complex wiring. The device is powered by a rechargeable battery, which is continuously charged by an integrated solar panel, even under cloudy or rainy conditions. For situations where solar charging is insufficient, the battery can also be charged via a DC5V-12V power adapter.
This sensor offers an infrared detection range of up to 300 feet (approximately 91 meters) and a wireless transmission range of up to 1/2 mile (approximately 800 meters) to a compatible receiver. It features a calibration hole and an LCD display for simplified installation and alignment. The sensitivity of the beam sensor is programmable to suit various application requirements.

Image 1.1: Front view of the HTZSAFE Solar Wireless Outdoor Photoelectric 3 Beam Sensor units.
2. Key Features
- Wireless Operation & Self-Powered: No wiring required for power or signal transmission. The unit is self-powered by solar-recharged batteries. Natural light, even on cloudy or rainy days, can charge the batteries.
- Wide Application Range: The infrared detection range extends up to 300 feet (91 meters), allowing the sensing terminals to be mounted far apart. The wireless alarm signal can transmit up to 1/2 mile (800 meters) to a compatible receiver. Actual range may vary based on terrain. The detection sensitivity is adjustable for various applications.
- Reduced False Alarms: Utilizes active and multiple infrared beams to minimize false alarms caused by small animals, small objects (like birds or falling leaves), and adverse weather conditions (rain, fog, snow). Infrared analysis technology helps prevent interference from other natural light sources, such as direct sunlight.
- Easy Setup: Equipped with self-calibration tools, including a calibration hole and a digital calibration screen, enabling quick and accurate long-range alignment.

Image 2.1: Diagram illustrating the solar charging capability and wireless transmission range of the beam sensors.
3. Components and Identification
Familiarize yourself with the key components of the beam sensor for proper installation and operation.

Image 3.1: Detailed view of the sensor showing the solar panel, LCD display, calibration hole, ON/OFF switch, and charge jack. Note the red plug covering the charge jack, which needs to be removed for wired charging.
- Solar Panel: Charges the internal rechargeable battery.
- LCD Display: Provides feedback during alignment and operation.
- Calibration Hole: Used for precise alignment of the beams.
- ON/OFF Switch: Controls the power to the sensor.
- Charge Jack: Allows for charging the battery with a DC5V-12V power adapter if solar charging is insufficient. This port is typically covered by a red plug.
- Infrared Beam Emitters/Receivers: The active components that create and detect the infrared beams.
4. Setup and Installation
Proper installation and alignment are critical for optimal performance and to minimize false alarms.
4.1 Mounting Considerations
- Choose a location where the two sensor units can be mounted facing each other with a clear line of sight, up to 300 feet apart.
- Mount the sensors securely on a stable surface such as a wall or a sturdy post. Ensure they are at an appropriate height to detect the intended targets (e.g., vehicles, people).
- Consider environmental factors such as direct sunlight, which can interfere with beam alignment if not properly managed.

Image 4.1: Top-down view of the sensors, illustrating the mounting brackets and screw holes for installation.
4.2 Beam Alignment
The sensors must be precisely aligned for the infrared beams to function correctly. The built-in calibration tools assist in this process.
- Mount both sensor units facing each other.
- Turn on both sensors using the ON/OFF switch.
- Utilize the calibration hole and the LCD display on each sensor to achieve optimal alignment. The LCD display will provide a numerical reading (e.g., 100+) indicating the strength of the beam connection. Aim for the highest possible reading.
- Adjust the angle of each sensor incrementally until the LCD display shows a stable, high value, indicating proper beam alignment.

Image 4.2: Illustration of the calibration hole and the digital calibration display, which aids in aligning the infrared beams between the two sensor units.

Image 4.3: Example of a real-world installation, showing the sensor mounted on a wooden post in an outdoor environment.
5. Operation
Once installed and aligned, the HTZSAFE beam sensor operates by detecting interruptions in its infrared beams. When an object or person breaks the beams, a wireless signal is sent to a compatible HTZSAFE alarm receiver.
5.1 Sensitivity Adjustment
The detection sensitivity of the sensor can be adjusted to suit specific needs, helping to prevent false alarms from minor disturbances while ensuring detection of significant events. Refer to the detailed user manual (PDF) for specific instructions on adjusting sensitivity.
5.2 Compatibility with Receivers
This sensor is designed to work seamlessly with various HTZSAFE alarm receivers, including indoor models (e.g., HB-404S, HB-MFR) and outdoor solar receivers (e.g., HB-JHD-2). The wireless signal transmission range is up to 1/2 mile (800 meters).
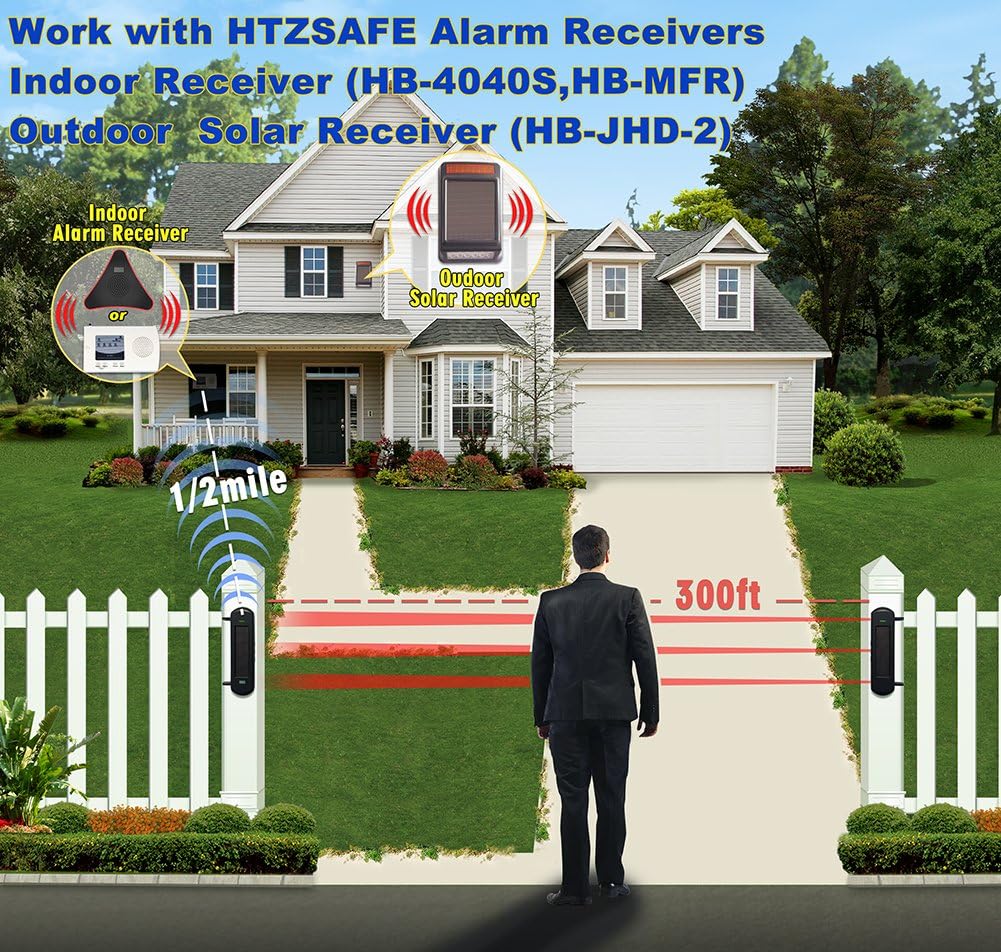
Image 5.1: Diagram illustrating how the solar beam sensors integrate with HTZSAFE indoor and outdoor alarm receivers to form a complete security system.
6. Maintenance
To ensure long-term performance and reliability of your HTZSAFE beam sensor, follow these maintenance guidelines:
- Solar Charging: Ensure the solar panel is kept clean and free from obstructions (e.g., dirt, leaves, snow) to allow for efficient charging. Even on cloudy days, the natural light will charge the battery.
- Battery Charging (Optional): If the battery level becomes critically low, or during prolonged periods of insufficient sunlight, the internal battery can be charged using a DC5V-12V power adapter via the charge jack. Remove the red protective plug before charging.
- Cleaning: Periodically clean the sensor lenses and solar panel with a soft, damp cloth to remove any dust or debris that might obstruct the infrared beams or reduce charging efficiency.
- Alignment Check: Occasionally verify the beam alignment, especially after severe weather conditions or if the sensor has been physically disturbed.
7. Troubleshooting
If you encounter issues with your HTZSAFE Solar Wireless Outdoor Photoelectric 3 Beam Sensor, consider the following common solutions:
| Problem | Possible Cause | Solution |
|---|---|---|
| Sensor not detecting / No alarm signal |
|
|
| Frequent false alarms |
|
|
| LCD display not showing readings |
|
|
8. Specifications
| Attribute | Detail |
|---|---|
| Model Number | HB-T001Q3+ |
| Manufacturer | HTZSAFE |
| Power Source | Battery powered, Solar |
| Voltage | 12 Volts |
| Item Weight | 4 pounds (approx. 1.81 kg) |
| Package Dimensions | 15 x 11.25 x 2.5 inches (approx. 38.1 x 28.6 x 6.35 cm) |
| Infrared Detection Range | Up to 300 feet (approx. 91 meters) |
| Wireless Transmission Range | Up to 1/2 mile (approx. 800 meters) |
| Waterproof Rating | IP66 (implied from product title) |
| Mounting Type | Wall Mount |
9. Warranty and Support
For specific warranty information, please refer to the documentation included with your product or visit the official HTZSAFE website. For technical support, troubleshooting beyond this manual, or inquiries regarding parts and service, please contact HTZSAFE customer service.
A detailed User Manual (PDF) is available for download: HTZSAFE HB-T001Q3+ User Manual PDF


