1. Introduction
The TP-Link Archer CR500 is an AC1200 Wi-Fi DOCSIS 3.0 16x4 Cable Modem Router designed to provide high-speed internet access and wireless connectivity. This device combines a cable modem and a Wi-Fi router into a single unit, supporting DOCSIS 3.0 16x4 channel bonding for download speeds up to 680Mbps. It features 802.11ac/a/b/g/n wireless standards, offering up to 900Mbps at 5GHz and 300Mbps at 2.4GHz. The Archer CR500 includes four Gigabit Ethernet ports and two USB 2.0 ports for versatile connectivity. It is certified for use with major cable internet providers such as XFINITY by Comcast, Spectrum (including Charter, Time Warner Cable, and Bright House Networks), Suddenlink, Mediacom, and WOW.

Figure 1: TP-Link Archer CR500 Cable Modem Router
2. Package Contents
Verify that your package contains the following items:
- Archer CR500 Cable Modem Router
- Power Adapter
- 1x Ethernet Cable
- Quick Installation Guide
3. Physical Overview
The Archer CR500 features various ports and LED indicators for status monitoring and connectivity. Familiarize yourself with the device's layout before installation.

Figure 2: Front and Side View of Archer CR500, highlighting LED indicators and ports.
LED Indicators
The front panel of the Archer CR500 features several LED indicators that display the device's operational status. Refer to the Quick Installation Guide for a detailed explanation of each LED's behavior (e.g., solid green for active connection, flashing for activity).
Rear Panel Ports
- Coaxial Port: Connects to your cable service line.
- Ethernet Ports (LAN): Four Gigabit Ethernet ports for wired connections to computers, gaming consoles, or other network devices.
- USB 2.0 Ports: Two ports for connecting USB storage devices or printers for network sharing.
- Power Port: Connects to the included power adapter.
- Reset Button: Used to restore the device to factory default settings.
- WPS/Wi-Fi On/Off Button: Initiates Wi-Fi Protected Setup (WPS) for easy device connection or toggles Wi-Fi functionality.
4. Setup and Installation
Follow these steps to set up your TP-Link Archer CR500 cable modem router:
- Connect the Coaxial Cable: Connect one end of the coaxial cable to the cable wall outlet and the other end to the Coaxial port on the Archer CR500. Ensure the connection is secure.
- Connect Ethernet Devices (Optional): If you plan to use wired connections, connect Ethernet cables from your computers or other network devices to the LAN ports on the Archer CR500.
- Connect Power: Connect the power adapter to the Power port on the Archer CR500 and plug the other end into an electrical outlet. The device will power on automatically.
- Wait for Initialization: Allow the modem router to power on and initialize. This may take a few minutes. Observe the LED indicators; the Internet LED should become solid, indicating a successful connection to your Internet Service Provider (ISP).
- Activate Your Internet Service:
- Open a web browser on a computer connected to the Archer CR500 (either wired or wirelessly using the default Wi-Fi name and password found on the device label).
- You may be redirected to your ISP's self-activation page. Follow the on-screen instructions to activate your service.
- If not redirected, visit your ISP's activation portal or call their customer service. You will need the MAC address and serial number of your Archer CR500, typically found on a label on the device.
- Verify Internet Connection: Once activated, confirm that you can access the internet.
- Personalize Wi-Fi Settings (Recommended): Access the modem router's web management interface (usually via
http://tplinkmodem.netor an IP address like192.168.1.1) to change the default Wi-Fi network names (SSIDs) and passwords for both 2.4GHz and 5GHz bands. Also, change the default administrator password for security.
5. Operation
Wireless Connectivity
The Archer CR500 supports dual-band Wi-Fi (2.4GHz and 5GHz) for flexible wireless connections. The 2.4GHz band offers wider coverage, while the 5GHz band provides faster speeds for devices closer to the router. Beamforming technology helps focus the wireless signal towards connected devices for stronger, more reliable connections.
Wired Connectivity
Utilize the four Gigabit Ethernet ports for high-speed wired connections to devices that require stable and fast network access, such as desktop computers, smart TVs, or gaming consoles.
USB Sharing
The two USB 2.0 ports allow you to connect USB storage devices (like external hard drives or flash drives) to share files across your network, or connect a USB printer to make it accessible to all network users.
Tether App Management
Manage your Archer CR500 settings conveniently using the TP-Link Tether app on your mobile device. The app provides an intuitive interface for network setup, parental controls, and device management.
6. Maintenance
Placement
For optimal performance and to prevent overheating, place the Archer CR500 in an open area with good ventilation. Avoid placing it in enclosed cabinets or areas where airflow is restricted.
Firmware Updates
Regularly check the TP-Link support website for firmware updates. Keeping your device's firmware up-to-date ensures optimal performance, security, and access to new features.
Factory Reset
If you encounter persistent issues or forget your login credentials, you can perform a factory reset. Locate the Reset button on the rear panel (often a small pinhole). With the device powered on, press and hold the Reset button for 8-10 seconds until the LEDs flash, then release. The device will reboot with factory default settings.
7. Troubleshooting
No Internet Connection
- Ensure all cables are securely connected, especially the coaxial cable to the wall outlet and the modem router.
- Check the LED indicators on the front panel. The Internet LED should be solid. If it's off or flashing, there might be an issue with your ISP connection.
- Contact your Internet Service Provider (ISP) to ensure your service is active and the Archer CR500 is properly provisioned on their network. Provide them with the modem's MAC address and serial number.
- Power cycle the modem router by unplugging it from the power outlet for 30 seconds, then plugging it back in.
Slow Wi-Fi Speeds or Weak Signal
- Ensure the modem router is placed in a central location, away from obstructions and interference sources (e.g., microwaves, cordless phones).
- Try connecting to the 5GHz Wi-Fi band for faster speeds if your device supports it and is close to the router.
- Reduce the number of devices connected to the network or limit bandwidth-intensive activities.
- Consider performing a factory reset if performance issues persist after other troubleshooting steps.
WPS Button Not Working
- If the WPS button does not initiate the connection process, try a factory reset of the modem router. After the reset, the WPS functionality should be restored.
- Alternatively, connect devices manually using the Wi-Fi network name and password.
8. Specifications
Detailed technical specifications for the TP-Link Archer CR500:

Figure 3: Hardware and Wireless Features
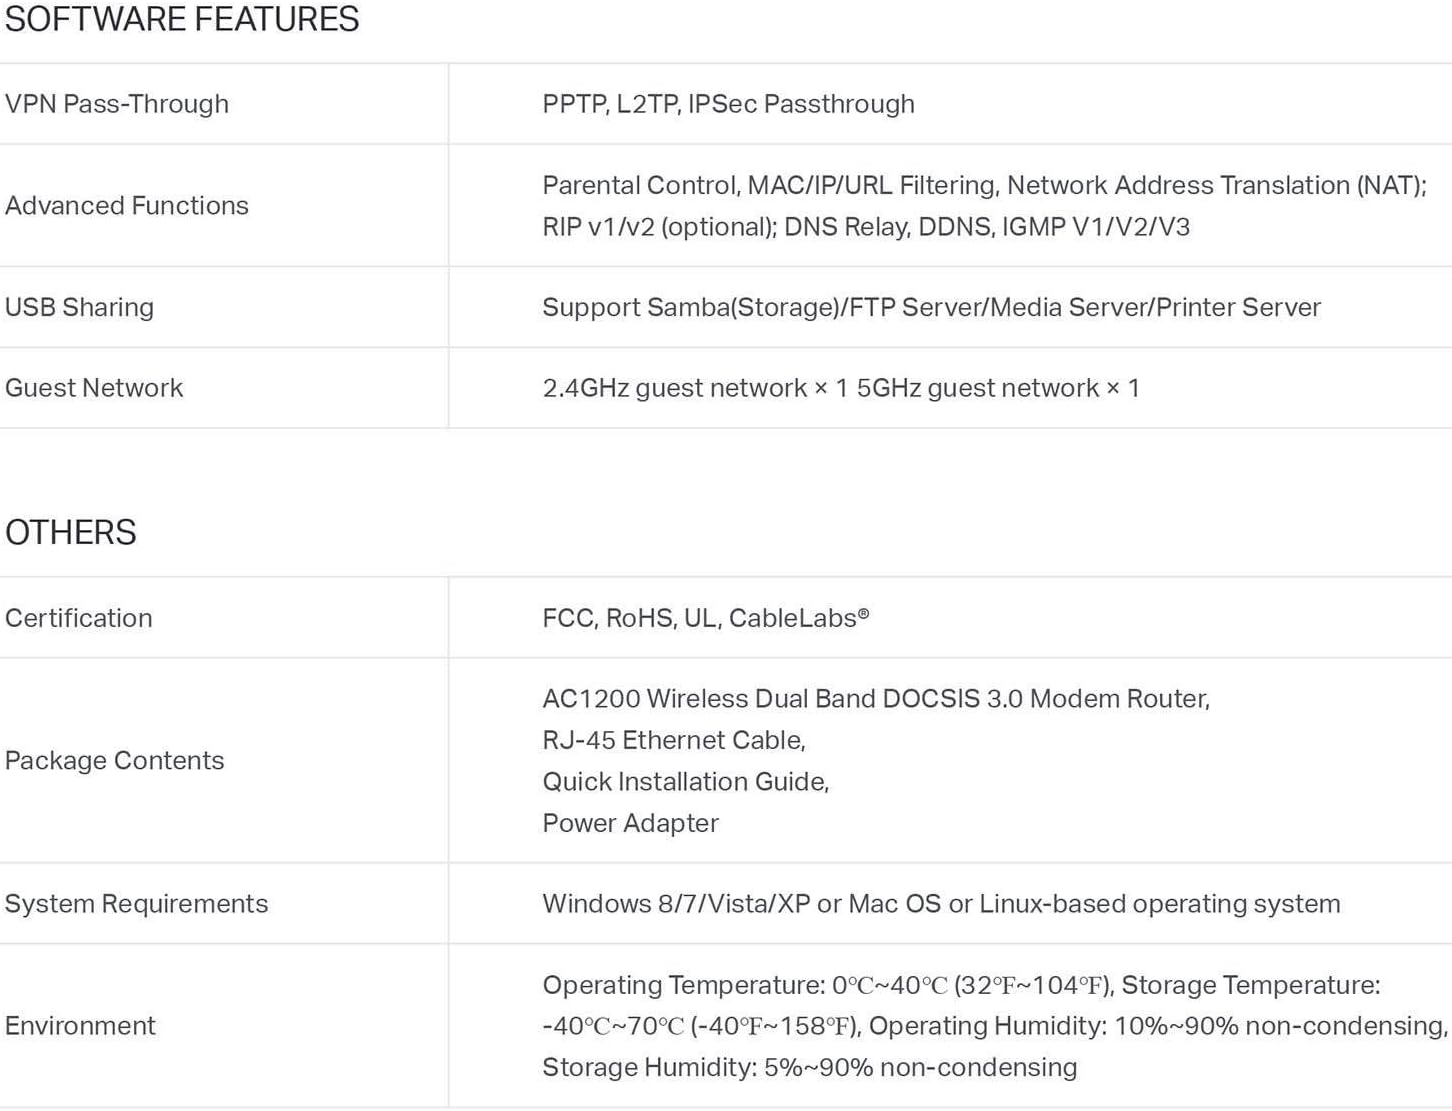
Figure 4: Software and Other Features
General Specifications
- Wireless Type: 802.11ac
- Series: Archer CR500
- Item Model Number: Archer CR500
- Operating System Compatibility: Linux, Windows Vista, Windows XP
- Item Weight: 1.4 pounds
- Product Dimensions (LxWxH): 9.7 x 7.62 x 2.48 inches
- Color: Black
- Manufacturer: TP-LINK USA
- First Available Date: April 28, 2017
- Special Feature: WPS
- Frequency Band Class: Dual-Band
- Compatible Devices: Personal Computer
- Recommended Uses: Home
- Connectivity Technology: Wi-Fi
9. Warranty and Support
Warranty Information
The TP-Link Archer CR500 comes with a 2-year warranty from the date of purchase. Please retain your proof of purchase for warranty claims.
Technical Support
TP-Link offers free 24/7 technical support for the Archer CR500. For assistance with setup, troubleshooting, or any other inquiries, please visit the official TP-Link support website or contact their customer service directly. Contact information can typically be found on the TP-Link website or in the Quick Installation Guide.