1. Introduction
The IS Christmas Tree Soldering Project is a DIY electronic assembly kit designed to enhance electronics knowledge and soldering skills. This kit is ideal for individuals over 15 years old, suitable for STEM education programs, and serves as a fun, educational project. Once assembled, it transforms into a beautiful flashing Christmas tree with 7-color LED lights, making it a unique decoration or gift.
This manual provides detailed instructions for assembling, operating, maintaining, and troubleshooting your 3D Christmas Tree Soldering Kit.
2. Setup and Assembly
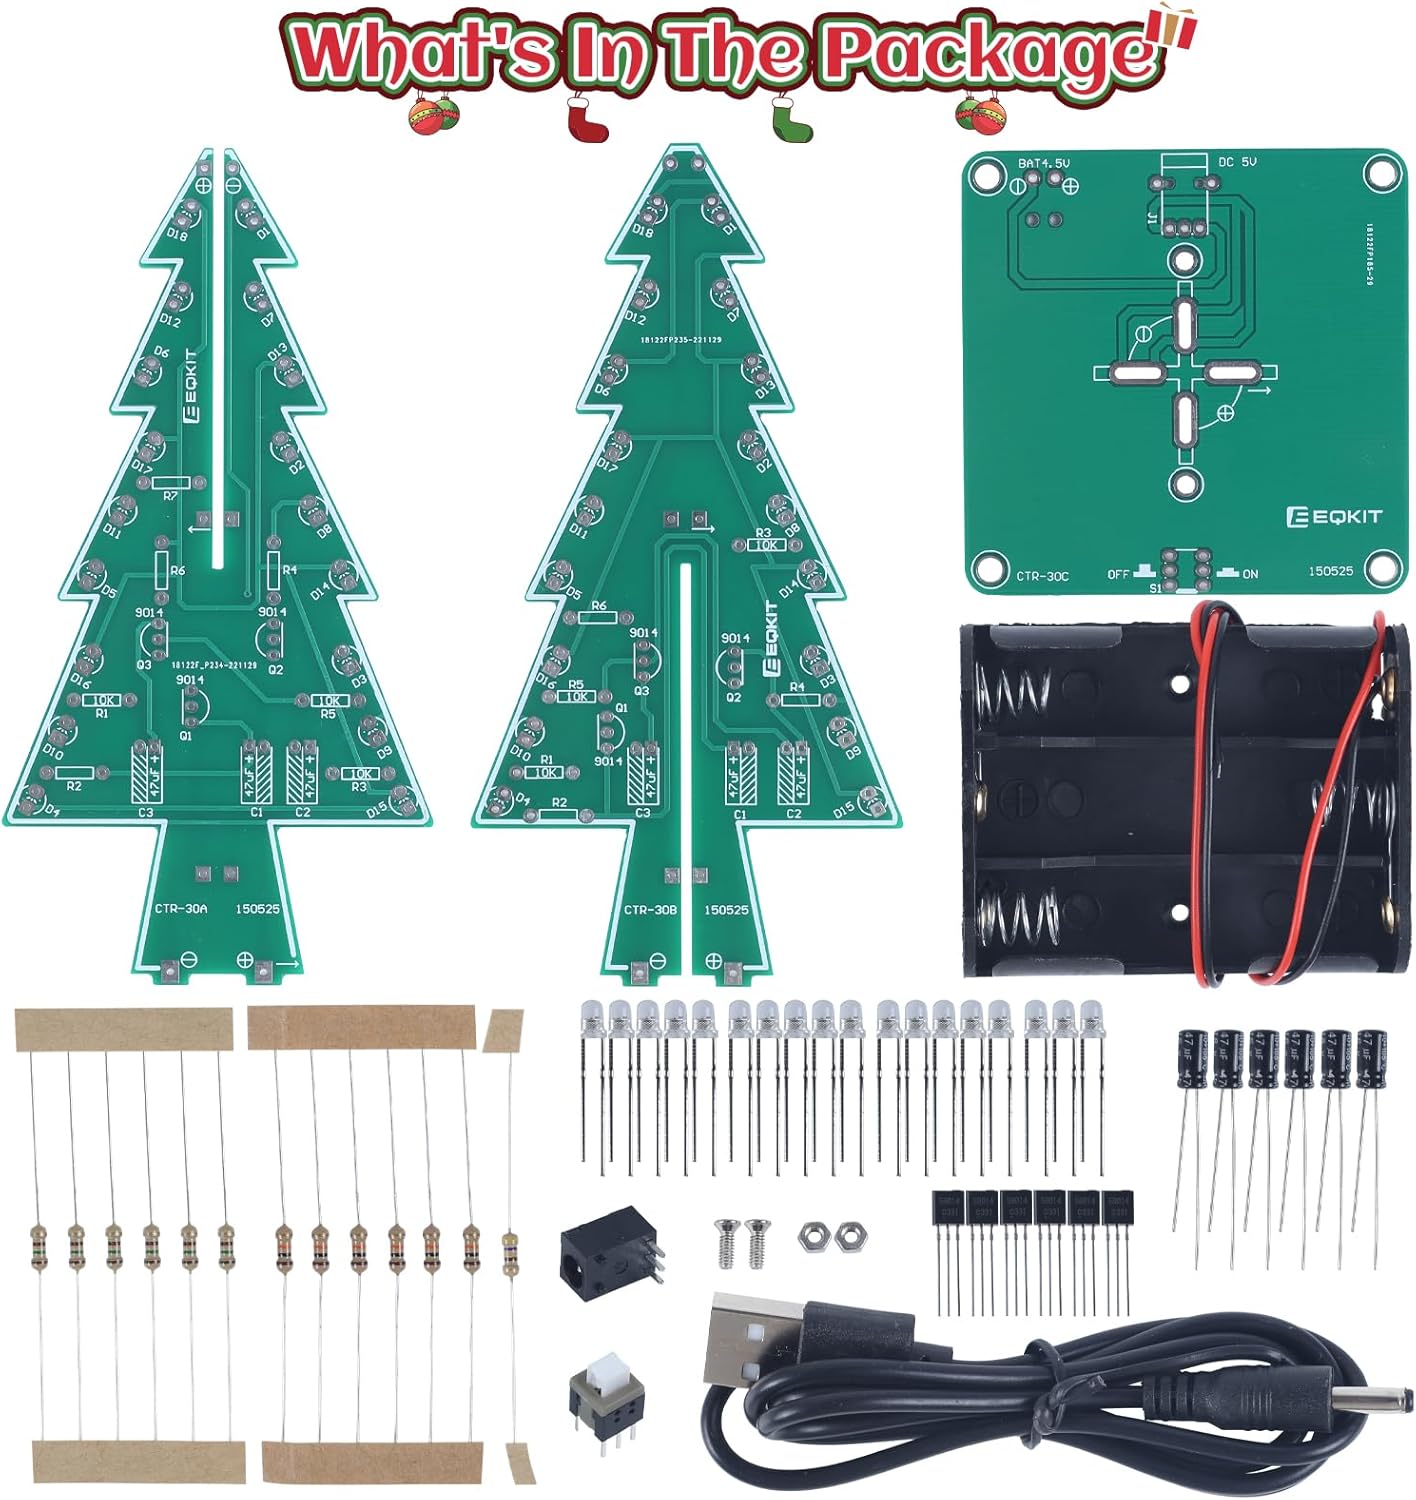
2.1 Package Contents
Before beginning assembly, verify that all components are present in your kit. The package typically includes:
- Two Christmas tree shaped PCB boards
- One rectangular base PCB board
- 36 RGB LED diodes
- Various resistors, capacitors, and transistors
- One DC power socket
- One power switch
- One 3xAA battery holder
- One USB power cable
- Mounting hardware (screws, nuts)
2.2 Tools Required
To complete the assembly and soldering process, you will need the following tools (not included in the kit):
- Electric soldering iron
- Solder wire
- Wire cutters/strippers
- Multimeter (recommended for checking component values and connections)
2.3 Assembly Instructions
Detailed assembly instructions, including schematics and step-by-step pictures, are provided in the user manual PDF. It is highly recommended to download and refer to this document for the most accurate and comprehensive guidance.

Important Assembly Notes:
- Ensure all components are inserted in the correct direction and place, especially polarized components like LEDs and capacitors. The long leg of an LED is typically positive, and the short leg is negative, corresponding to markings on the PCB.
- Verify resistor values before soldering, as some kits may have slight variations or mislabeled components.
- Ensure all solder points are clean and have good connections to prevent issues with the circuit.
3. Operating Instructions
3.1 Powering the Device
The 3D Christmas Tree Soldering Project can be powered using two methods:
- 3 x AA Batteries: Insert three AA batteries into the provided battery holder. Ensure correct polarity.
- USB Power Adapter: Connect the included USB cable to the DC power socket on the base PCB and plug the other end into a USB power adapter (e.g., phone charger, power bank) or a computer USB port.
The working voltage for the device is DC 4.5V-5V.

3.2 LED Functionality
Once powered on, the 36 RGB LED diodes will illuminate, creating a bright, colorful, and dynamic light display. The LEDs are designed to flash at different speeds, producing a beautiful light show.

4. Maintenance
To ensure the longevity and optimal performance of your Christmas Tree Soldering Project, follow these simple maintenance guidelines:
- Keep the device clean and free from dust. Use a soft, dry cloth for cleaning.
- Avoid exposing the device to moisture or extreme temperatures.
- When not in use for extended periods, remove the batteries to prevent leakage.
- Handle the assembled tree with care to avoid damaging the soldered connections or components.
5. Troubleshooting
If you encounter issues with your Christmas Tree Soldering Project, refer to the following troubleshooting tips:
5.1 LEDs Not Lighting Up
- Check Component Direction: Ensure all LEDs and other polarized components (like capacitors) are installed in the correct direction. LEDs have a positive (long leg) and negative (short leg) terminal.
- Verify Solder Connections: Inspect all solder points for poor connections, cold joints, or bridges. Re-solder any problematic areas.
- Confirm Power Supply: Ensure batteries are correctly inserted and charged, or that the USB power source is providing adequate power.
- Resistor Values: Double-check that the correct resistor values are used in their designated locations on the PCB.
5.2 Intermittent Operation
- Loose Connections: Check for any loose wires or components that may be causing intermittent contact.
- Power Source Stability: Ensure the power source (batteries or USB adapter) is stable and providing consistent voltage.
6. Specifications
| Manufacturer | icstation |
| Part Number | 7213 |
| Item Weight | 2.19 ounces |
| Product Dimensions | 1.96 x 1.57 x 0.78 inches |
| Item Model Number | Color LED 3D Christmas Tree Assemble Kit |
| Size | 1pc |
| Color | Multicolored |
| Style | 7 Color LED |
| Material | Plastic |
| Power Source | DC |
| Item Package Quantity | 1 |
| Number Of Pieces | 1 |
| Included Components | Christmas Tree Kit |
| Batteries Included? | No |
| Batteries Required? | No |
| Battery Cell Type | Alkaline (AA) |

7. Warranty and Support
7.1 Customer Support
For any product-related questions, technical assistance, or support, please contact the Icstation customer service team. They are equipped with rich technical knowledge and 15 years of experience to provide professional help and support.
You can often find additional support and resources, including the detailed user manual PDF, on the product's Amazon page or the official Icstation brand store:
- Official User Manual (PDF): Download Here
- Icstation Brand Store: Visit Store
7.2 Warranty Information
Specific warranty details for this product are not provided in the available information. For inquiries regarding warranty coverage or returns, please refer to the retailer's return policy or contact Icstation customer support directly.