
Vipack KIBE9013
VIPACK Kiddy Bed User Manual
Model: KIBE9013
1. Introduction
Thank you for purchasing the VIPACK Kiddy Bed. This manual provides essential information for the safe and correct assembly, operation, and maintenance of your new bed. Please read these instructions carefully before beginning assembly and retain them for future reference.
This bed is designed for children and includes a slatted base. It features a combination of durable MDF and solid pine wood, ensuring stability and longevity. The headboard rests on the floor, while the footboard is supported by two solid pine legs.
Key Features:
- Integrated slatted base for mattress support.
- Constructed from high-quality MDF and solid pine wood.
- Durable lacquered finish in pink.
- Modern design, easy to combine with various room decors.
2. Safety Information
Always prioritize safety during assembly and use. Failure to follow these safety guidelines may result in injury or damage to the product.
- Keep all small parts and packaging materials away from children during assembly to prevent choking hazards.
- Ensure all screws and fasteners are securely tightened before use. Periodically check and re-tighten as necessary.
- Do not allow children to jump on the bed, as this can cause structural damage or injury.
- The maximum recommended weight for this bed is 75 Kilograms. Do not exceed this limit.
- Place the bed on a flat, stable surface.
- Do not use the bed if any parts are missing, damaged, or broken. Contact customer support for replacement parts.
3. Setup and Assembly
Before you begin, ensure you have all components and the necessary tools. Assembly typically requires two adults.
3.1. Package Contents and Tools Required
Verify that all parts listed in your product's assembly diagram (usually included in the packaging) are present. Common tools required for assembly include:
- Phillips head screwdriver
- Hex key (often included with hardware)
- Hammer (for dowels, if applicable)
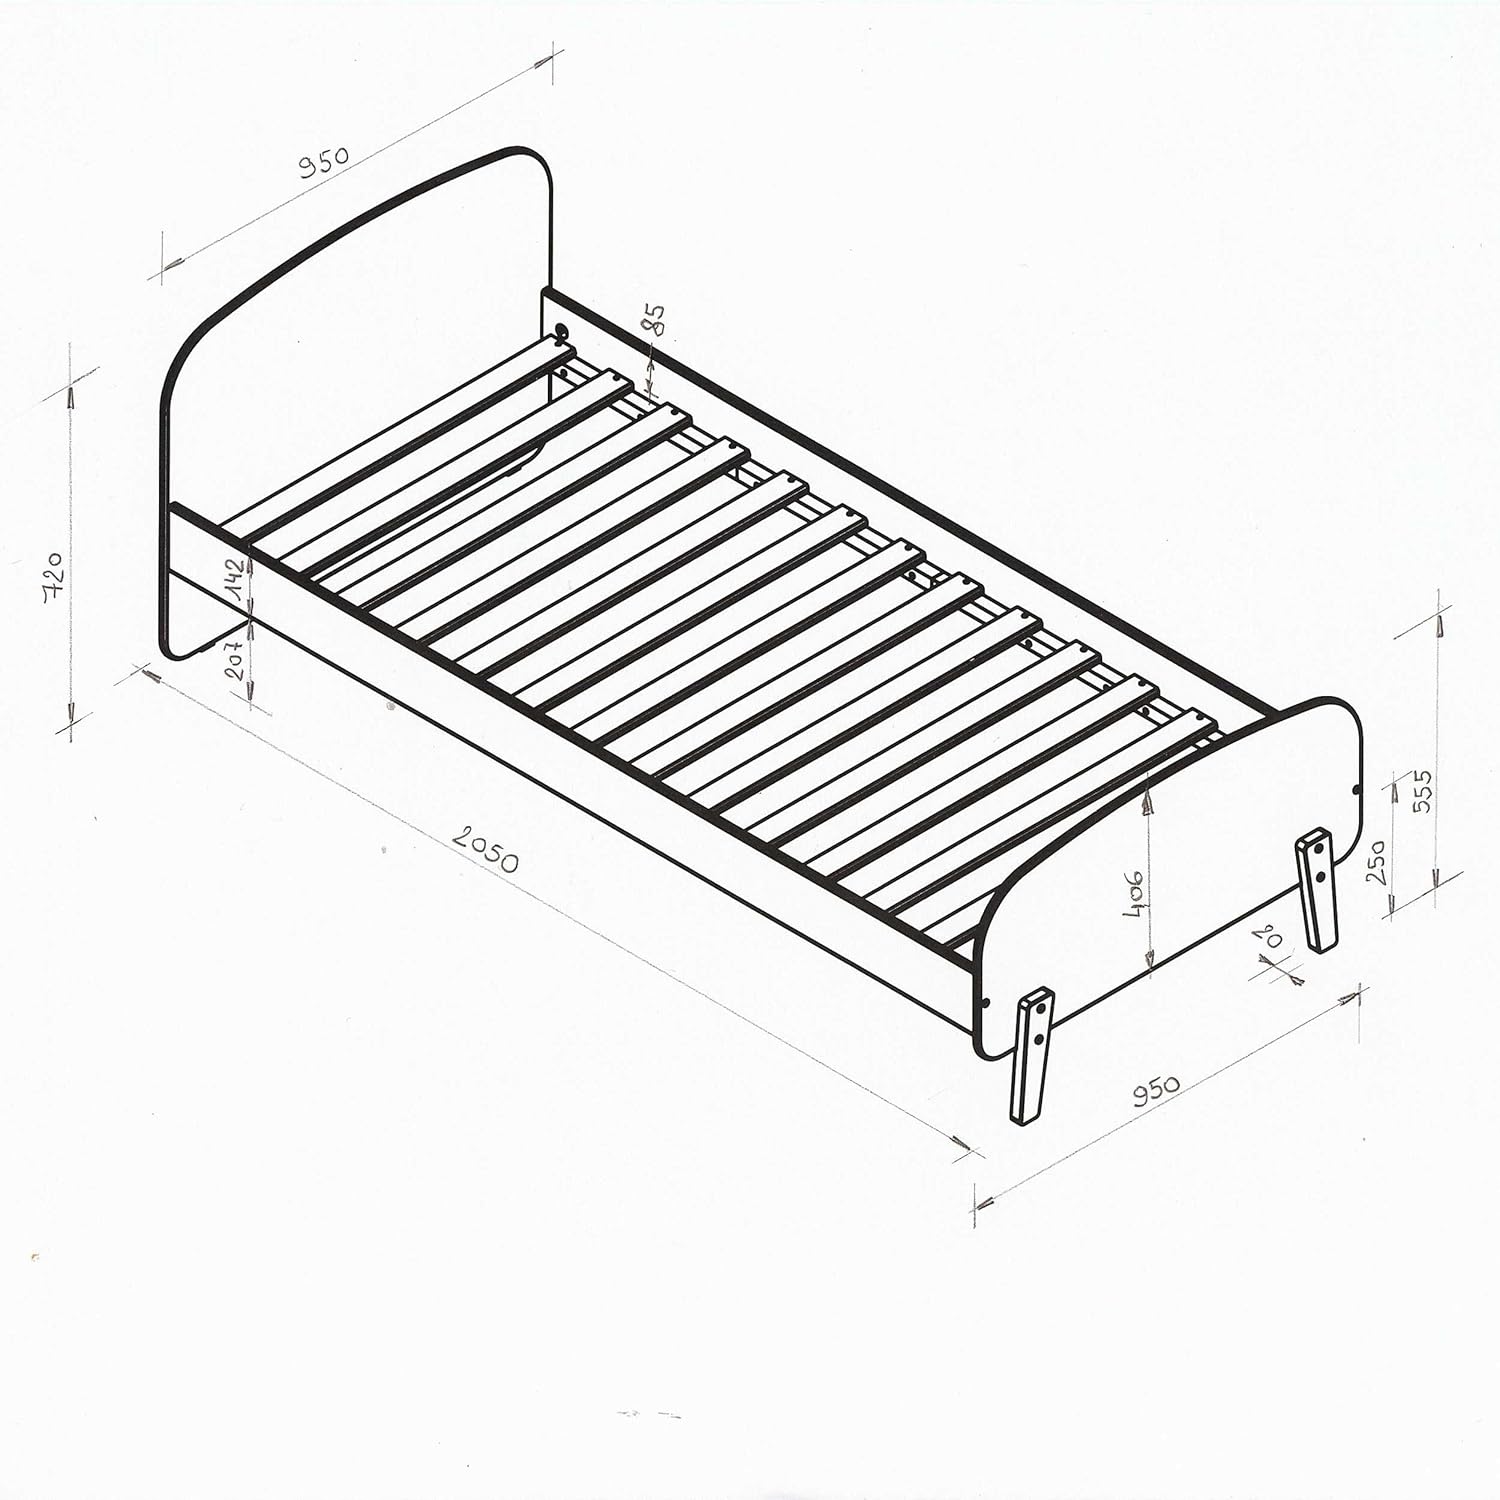
Figure 1: Technical drawing showing the bed's dimensions and structure.
3.2. Assembly Instructions
Follow the step-by-step instructions provided in the separate assembly manual that came with your product. The general steps are as follows:
- Unpack and Identify Parts: Carefully unpack all components and lay them out on a soft, clean surface to prevent scratches. Identify each part using the provided parts list.
- Attach Legs to Footboard: Secure the solid pine legs to the footboard using the designated screws and fasteners.
- Connect Side Rails: Attach the side rails to both the headboard and footboard. Ensure all connections are firm and aligned.
- Install Slatted Base: Place the slatted base onto the support ledges within the bed frame. Secure the slats according to the instructions, ensuring even spacing and stability.
- Final Tightening: Once all components are assembled, carefully go over all screws and bolts, tightening them firmly but without over-tightening.

Figure 2: Fully assembled VIPACK Kiddy Bed, ready for use.
4. Operating and Usage
The VIPACK Kiddy Bed is designed for comfortable and safe sleep for children. Once assembled, place a suitable mattress (not included) on the slatted base.
- Ensure the mattress fits snugly within the bed frame to prevent gaps.
- Regularly check the bed for any signs of wear or loose connections.
- Do not use the bed as a trampoline or play structure.

Figure 3: The VIPACK Kiddy Bed in a typical bedroom environment, demonstrating its intended use.
5. Maintenance and Care
Proper care will extend the life and appearance of your VIPACK Kiddy Bed.
- Cleaning: Wipe surfaces with a soft, damp cloth. Avoid abrasive cleaners or harsh chemicals, as they can damage the lacquered finish.
- Dusting: Regularly dust the bed with a dry, soft cloth.
- Inspections: Periodically check all screws, bolts, and connections to ensure they remain tight. Re-tighten if necessary.
- Avoid Moisture: Protect the bed from excessive moisture and direct sunlight, which can cause warping or fading.
6. Troubleshooting
If you encounter any issues with your VIPACK Kiddy Bed, refer to the following common problems and solutions:
| Problem | Possible Cause | Solution |
|---|---|---|
| Bed feels wobbly or unstable. | Loose fasteners. | Check and tighten all screws and bolts. Ensure the bed is on a level surface. |
| Squeaking noises. | Loose connections or friction between parts. | Re-tighten all fasteners. If squeaking persists, apply a small amount of silicone spray or wax to contact points between wood parts (avoiding visible surfaces). |
| Slats seem uneven or loose. | Improper installation or shifting. | Ensure each slat is correctly seated in its support and evenly spaced. Re-secure if necessary. |
7. Specifications
Detailed technical specifications for the VIPACK Kiddy Bed:
| Attribute | Detail |
|---|---|
| Brand | Vipack |
| Model Number | KIBE9013 |
| Color | Pink |
| Material | MDF and Solid Pine Wood |
| Product Dimensions (L x W x H) | 206.6 x 96 x 72 cm (81.3 x 37.8 x 28.3 inches) |
| Item Weight | 23.5 Kilograms (51.8 lbs) |
| Maximum Weight Recommendation | 75 Kilograms (165 lbs) |
| Finish Type | Lacquered |
| Country of Origin | Brazil |
8. Warranty Information
The VIPACK Kiddy Bed comes with a 2-year warranty from the date of purchase. This warranty covers manufacturing defects in materials and workmanship under normal use. It does not cover damage resulting from improper assembly, misuse, neglect, accidents, or normal wear and tear.
Please retain your proof of purchase for any warranty claims.
9. Customer Support
If you have any questions, require assistance with assembly, or need to report missing or damaged parts, please contact your retailer or the manufacturer's customer service. Have your product model number (KIBE9013) and proof of purchase ready when contacting support.
Ask a question about this manual
Ask about setup, troubleshooting, compatibility, parts, safety, or missing instructions. Manuals+ will review the question and use this page’s manual context to help answer it.