1. Introduction
The Excelvan AOK-6038 is a versatile 4-in-1 multiscanner designed to detect various materials behind walls, floors, and ceilings. It accurately locates the edges and center of wood studs, metal pipes, rebar, and live AC wiring. This device is an essential tool for DIY enthusiasts and professionals, ensuring safety and precision during construction, renovation, or decoration tasks.
2. Safety Information
- Always read and understand this manual before operating the device.
- Do not rely solely on the detector to locate items behind surfaces. Always use caution when cutting or drilling into walls, floors, or ceilings.
- Exercise extreme caution when live AC wires are detected. Turn off the power at the circuit breaker before proceeding with any work.
- Keep the device away from water and extreme temperatures.
- Do not attempt to modify or repair the device. Contact customer support for assistance.
- Remove batteries if the device will not be used for an extended period to prevent leakage.
3. Product Overview
The Excelvan AOK-6038 features a clear LCD display and intuitive controls for easy operation.

Figure 3.1: Front view of the Excelvan AOK-6038 multiscanner. This image displays the device's front, featuring the LCD screen at the top, and 'ON/OFF' and '►' (mode selection) buttons below it. The brand 'Excelvan' is visible at the bottom. The LCD shows indicators for STUD, METAL, DEEP, and AC detection modes.
3.1. Components
- LCD Display: Shows detection mode, signal strength, battery status, and detection indicators.
- ON/OFF Button: Powers the device on or off.
- Mode Selection Button (►): Cycles through different detection modes (Stud, Metal, Deep, AC).
- PUSH Button (Side): Activates the scanning function when pressed and held.
- Sensor Area: Located at the back of the device, this area must be flat against the surface for accurate scanning.
- Battery Compartment: Located on the back for battery installation.

Figure 3.2: Back view of the Excelvan AOK-6038 multiscanner. This image shows the rear of the device, including the product label with 'Model: AOK-6038 Multi-Function Detector' and 'Made in China'. Below the label is the battery compartment cover.
3.2. LCD Display Indicators
- STUD: Indicates detection of wood studs.
- METAL: Indicates detection of metal objects.
- DEEP: Indicates detection in deep scan mode.
- AC: Indicates detection of live AC electrical wiring. A lightning bolt symbol may also appear.
- Signal Strength Bars: Increase as the device approaches the target.
- Battery Icon: Shows current battery level.
4. Specifications
| Feature | Detail |
|---|---|
| Model | AOK-6038 |
| Detection Modes | Stud, Metal, Deep, AC |
| Stud Detection Depth | Up to 19 mm (0.75 inches) |
| Metal Detection Depth | Up to 50 mm (2 inches) |
| AC Wire Detection Depth | Up to 50 mm (2 inches) |
| Power Source | Battery (e.g., 9V, not included) |
| Display | LCD with backlight |
| Material | Plastic with anti-slip rubber coating |
| Color | Silver |
| Dimensions | Approx. 150mm x 73mm x 35mm (5.91in x 2.87in x 1.38in) |

Figure 4.1: Dimensions of the Excelvan AOK-6038 multiscanner. This image illustrates the approximate measurements of the device: 150mm (5.91in) in length, 73mm (2.87in) in width, and 35mm (1.38in) in thickness.
5. Setup
5.1. Battery Installation
- Locate the battery compartment cover on the back of the device.
- Slide the cover open.
- Insert a 9V battery, ensuring correct polarity (+/-).
- Close the battery compartment cover securely.
The device requires a 9V battery for operation. Ensure the battery is fresh for optimal performance.
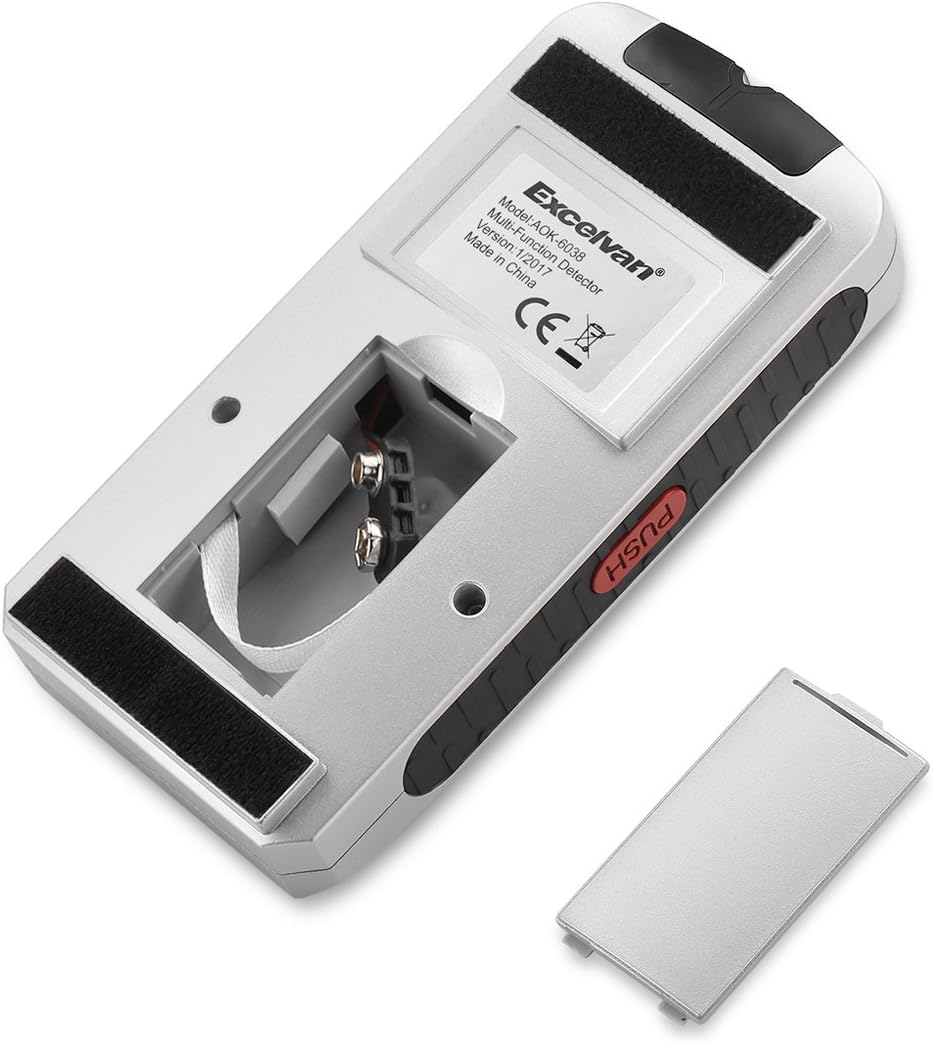
Figure 5.1: Battery compartment of the Excelvan AOK-6038 multiscanner. This image shows the back of the device with the battery cover removed, revealing the 9V battery connector and compartment.
6. Operating Instructions
6.1. Power On/Off
- Press the ON/OFF button to turn the device on. The LCD will illuminate.
- Press the ON/OFF button again to turn the device off.
6.2. Selecting a Scan Mode
After powering on, press the ► (mode selection) button to cycle through the available detection modes: STUD, METAL, DEEP, and AC. The selected mode will be indicated on the LCD display.
6.3. Scanning Procedure
- Place the device: Position the scanner flat against the surface you wish to scan. Ensure the sensor area on the back is in full contact.
- Press and Hold 'PUSH': While keeping the device flat against the surface, press and hold the PUSH button located on the side. The device will calibrate for a few seconds. Do not move the device during calibration.
- Scan the surface: Slowly slide the device horizontally across the surface. Keep it flat and maintain constant pressure.
- Interpret results: As the device detects an object, the signal strength bars on the LCD will increase, and an audible beep will sound. The specific mode indicator (STUD, METAL, DEEP, AC) will also highlight.
- Mark the location: When the signal strength is highest, mark the location. Continue scanning past the object to determine its edges.

Figure 6.1: Examples of detection modes. This image shows three scenarios: AC detection near an electrical outlet, Stud detection locating a wooden beam, and Metal detection identifying a metal pipe within a wall.

Figure 6.2: Detection indication. This image illustrates the device detecting an object, with the LCD displaying a series of arrowheads and an audible 'Beep!' indicating a find. The user is shown pressing the 'PUSH' button during detection.
6.4. Specific Mode Usage
- Stud Scan: Use to locate the edges and center of wooden studs behind drywall.
- Metal Scan: Use to detect metal pipes, rebar, or other metallic objects.
- Deep Scan: Provides increased depth for detecting studs and metal objects that are further embedded in the wall.
- AC Scan: Specifically designed to detect live unshielded AC electrical wiring. Always confirm power is off before any work.
7. Maintenance
- Cleaning: Wipe the device with a soft, damp cloth. Do not use abrasive cleaners or solvents.
- Storage: Store the device in a dry, cool place, away from direct sunlight and extreme temperatures.
- Battery: Remove the battery if the device is not used for extended periods to prevent corrosion.
8. Troubleshooting
- Device does not power on: Check battery installation and ensure the battery has sufficient charge. Replace if necessary.
- Inaccurate readings/False positives: Ensure the device is calibrated correctly by pressing and holding the PUSH button while flat against the surface before scanning. Avoid scanning over highly textured or damp surfaces.
- No detection: Verify the correct mode is selected for the target material. Ensure the device is moved slowly and consistently across the surface.
- Weak signal: The object might be deeper than the selected mode's detection capability. Try the Deep Scan mode if applicable.
9. Warranty and Support
For warranty information or technical support, please refer to the documentation provided at the time of purchase or contact your retailer. Keep your purchase receipt as proof of purchase.


