
1. Introduction
This manual provides essential information for the safe and efficient operation of your Omnitronic TRM-202MK3 Rotary DJ Mixer. Please read this manual thoroughly before using the device to ensure proper setup, optimal performance, and longevity of your equipment. The Omnitronic TRM-202MK3 is a robust 2-channel rotary DJ mixer designed for professional audio mixing applications.
2. Safety Instructions
- Electrical Safety: Always connect the device to a grounded power outlet. Do not expose the unit to rain or moisture. Disconnect the power cord before cleaning or servicing.
- Ventilation: Ensure adequate ventilation around the unit. Do not block ventilation openings.
- Liquid Avoidance: Keep liquids away from the device. Spills can cause electric shock or damage.
- Handling: Avoid dropping or subjecting the unit to heavy impacts.
- Servicing: Refer all servicing to qualified personnel. Do not attempt to repair the unit yourself.
3. Package Contents
Please check that all items are present and in good condition upon unpacking:
- Omnitronic TRM-202MK3 Rotary DJ Mixer
- Power Cable
- User Manual
4. Product Overview
4.1 Front Panel Controls
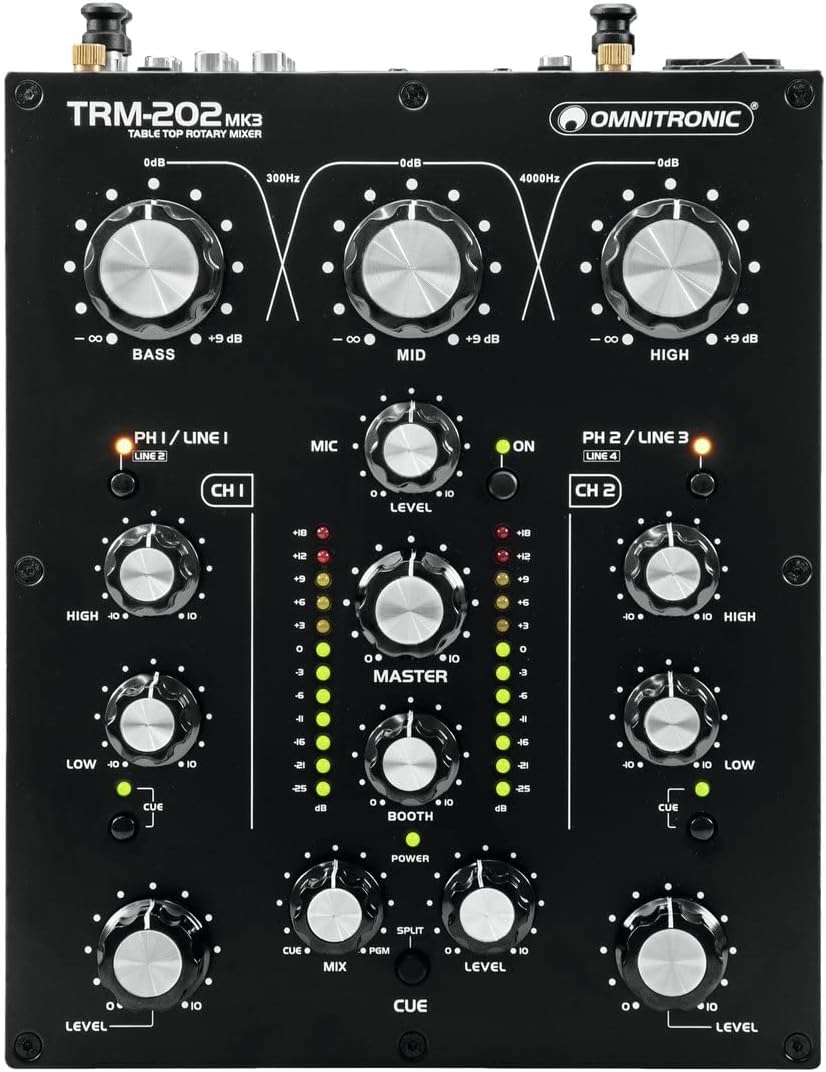
Image: Front panel view of the Omnitronic TRM-202MK3 Rotary DJ Mixer, showcasing all knobs, switches, and LED indicators.
The front panel provides access to all operational controls:
- 3-Band Isolator EQ: Large rotary knobs for BASS, MID, and HIGH frequencies, allowing precise frequency manipulation for the overall mix.
- Channel Controls (CH 1 & CH 2): Each channel features a PH/LINE input selector, HIGH and LOW EQ knobs, a CUE button for monitoring, and a large LEVEL rotary knob for volume control.
- Microphone Section: MIC input (XLR) with a LEVEL knob and an ON switch.
- Master Section: MASTER rotary knob for overall output volume, BOOTH rotary knob for monitor output volume, and dual LED VU meters for visual level monitoring.
- Cue Section: CUE MIX and CUE LEVEL knobs, along with a SPLIT switch, for headphone monitoring adjustments.
- Headphone Output: 6.3mm (1/4-inch) jack for connecting headphones.
4.2 Rear Panel Connections
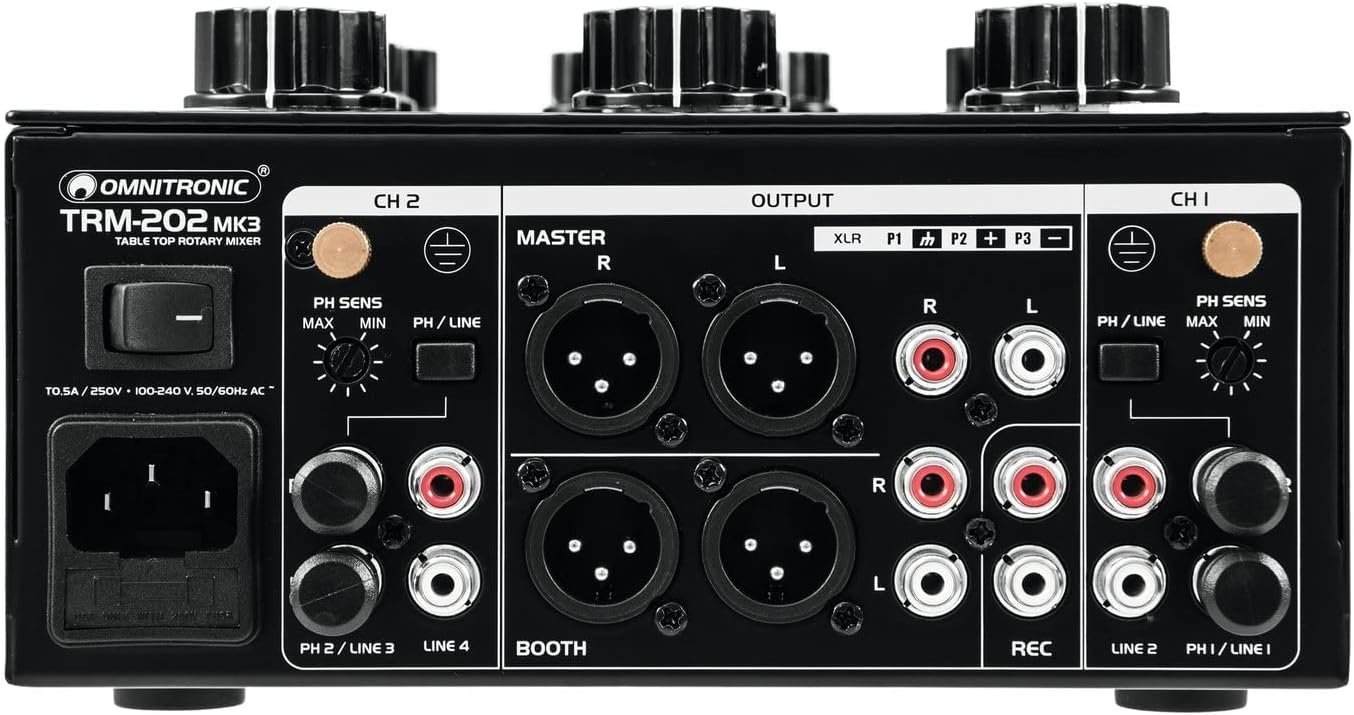
Image: Rear panel view of the Omnitronic TRM-202MK3 Rotary DJ Mixer, showing all input and output ports, power connection, and ground terminals.
The rear panel houses all audio input and output connections, as well as the power input:
- Power Input: IEC power connector with integrated fuse holder and main power switch.
- Channel Inputs (CH 1 & CH 2): RCA stereo inputs for PHONO (turntables) and LINE (CD players, media players). Each channel has a PH SENS (Phono Sensitivity) switch for adjusting input gain.
- Master Output: Balanced XLR and unbalanced RCA stereo outputs for connecting to a main sound system.
- Booth Output: Balanced XLR and unbalanced RCA stereo outputs for connecting to monitor speakers.
- Record Output: Unbalanced RCA stereo output for connecting to a recording device.
- Ground Terminals: Screw terminals for connecting ground wires from turntables.
5. Setup
- Power Connection: Connect the supplied power cable to the IEC inlet on the rear panel and then to a suitable grounded AC power outlet (240V AC). Ensure the power switch is in the OFF position before connecting.
- Audio Source Connection:
- For turntables, connect the RCA cables to the PHONO inputs of CH 1 or CH 2. Connect the turntable's ground wire to the corresponding ground terminal on the mixer. Set the PH/LINE switch on the front panel to 'PH'. Adjust the PH SENS switch on the rear panel if necessary.
- For CD players, media players, or other line-level devices, connect the RCA cables to the LINE inputs of CH 1 or CH 2. Set the PH/LINE switch on the front panel to 'LINE'.
- Output Connection:
- Main Sound System: Connect the MASTER XLR or RCA outputs to your amplifier or powered speakers.
- Monitor Speakers: Connect the BOOTH XLR or RCA outputs to your monitor speakers.
- Recording Device: Connect the REC RCA output to your recording interface or device.
- Microphone Connection: If using a microphone, connect it to the DJ MIC XLR input on the front panel.
- Headphone Connection: Plug your headphones into the PHONES jack on the front panel.
6. Operating Instructions

Image: Close-up view of hands adjusting the rotary knobs on the Omnitronic TRM-202MK3 mixer, demonstrating typical operation.
- Power On: After all connections are made, switch the main power switch on the rear panel to the ON position. The POWER LED on the front panel will illuminate.
- Input Selection: For each channel, ensure the PH/LINE switch is set correctly according to your connected audio source.
- Adjusting Channel Levels: Start playing audio from your source. Slowly turn up the LEVEL knob for the active channel. Observe the VU meters; aim for the signal to peak in the yellow segment, avoiding the red 'clip' segment.
- Using the 3-Band Isolator EQ: The BASS, MID, and HIGH knobs allow you to cut or boost frequencies for the overall mix. Use these to shape your sound.
- Master Output: Slowly turn up the MASTER knob to send the mixed audio to your main sound system. Adjust to a comfortable listening level.
- Booth Output: Adjust the BOOTH knob to control the volume of your monitor speakers. This allows you to hear your mix independently of the main output.
- Cueing and Monitoring: Press the CUE button for the channel you wish to monitor in your headphones. Use the CUE LEVEL knob to adjust headphone volume and the CUE MIX knob to blend between the cued channel and the master output. The SPLIT switch allows for split cue monitoring.
- Microphone Usage: Turn the MIC LEVEL knob to the minimum position before speaking. Press the MIC ON switch and slowly increase the MIC LEVEL to the desired volume.
- Power Off: Before powering off, turn down all LEVEL and MASTER knobs. Then, switch the main power switch to the OFF position.
7. Maintenance
- Cleaning: Use a soft, dry cloth to clean the exterior of the mixer. Do not use abrasive cleaners or solvents.
- Storage: When not in use, store the mixer in a clean, dry environment, away from direct sunlight and extreme temperatures.
- Ventilation: Regularly check that the ventilation openings are free from dust and debris.
8. Troubleshooting
- No Power: Check the power cable connection, the main power switch, and the fuse in the IEC inlet. Ensure the power outlet is functional.
- No Sound Output: Verify all audio cables are securely connected. Check channel LEVEL, MASTER, and BOOTH knobs are turned up. Ensure input sources are playing and their levels are adequate. Check amplifier/speaker connections and power.
- Distorted Sound: Reduce input levels to prevent clipping (indicated by red LEDs on VU meters). Check cable integrity. Ensure PH/LINE switches are set correctly for the input source.
- Hum or Noise: Ensure all ground wires from turntables are connected to the mixer's ground terminals. Check for faulty cables or interference from other electronic devices.
- Microphone Not Working: Ensure the MIC ON switch is engaged and the MIC LEVEL knob is turned up. Check microphone cable and microphone functionality.
9. Specifications
| Feature | Specification |
|---|---|
| Model Number | 10355922 (TRM-202MK3) |
| Brand | Omnitronic |
| Color | Black |
| Number of Channels | 2 |
| Connectivity Technology | Auxiliary, USB (as per product specifications, though USB port not visible in images) |
| Power Source | Wired Electric |
| Voltage | 240 Volts (AC) |
| Item Weight | 3.18 Kilograms (7.01 Pounds) |
| Manufacturer | Omnitronic |
10. Warranty and Support
For warranty information and technical support, please refer to the documentation provided at the time of purchase or contact your retailer or the manufacturer directly. Specific warranty terms may vary by region and retailer.


