
Woljay AD16-22D/S
Contents
Woljay 22mm LED Indicator Light User Manual
Model: AD16-22D/S
Brand: Woljay
Introduction
This user manual provides essential information for the safe and effective installation, operation, and maintenance of your Woljay 22mm LED Indicator Light. Please read this manual thoroughly before installation and keep it for future reference.
Product Overview

Figure 1: Front view of the Woljay 22mm Yellow LED Indicator Light. This image shows the yellow LED lens and the black mounting base.
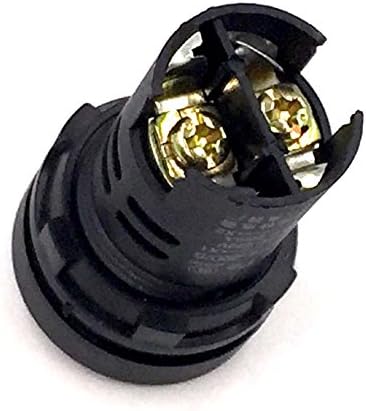
Figure 2: Rear view of the indicator light, highlighting the two screw terminals for electrical connections.

Figure 3: Technical drawing illustrating the dimensions of the indicator light, including the 22mm mounting hole diameter and overall length.
Specifications
| Feature | Detail |
|---|---|
| Mount Hole Diameter | 22mm / 0.87" |
| Voltage | AC/DC 12V |
| Current | 20mA |
| Pin Number | 2 screw terminals |
| Light Source Type | LED (Light Emitting Diode) |
| Color | Yellow |
| Material | Copper |
| Finish Type | Powder Coated |
| Safety Certification | CE Safety Approved |
| Durability | Shock & Vibration Resistant |
| Model Number | AD16-22D/S |
| UPC | 738920632154 |
Safety Information
Always observe basic safety precautions when installing or working with electrical components. Failure to do so may result in fire, electric shock, or personal injury.
- Ensure power is disconnected before installation or maintenance.
- Installation should be performed by qualified personnel if you are unsure.
- Verify correct voltage (12V AC/DC) before connecting.
- Do not exceed the specified current rating (20mA).
- Protect wiring from sharp edges or excessive heat.
Setup and Installation
- Prepare Mounting Hole: Ensure the panel has a 22mm (0.87 inch) diameter mounting hole. The panel thickness should not exceed 6mm (as per Figure 3).
- Insert Indicator Light: Insert the indicator light into the prepared mounting hole from the front of the panel.
- Secure with Nut: Thread the retaining nut onto the indicator light from the rear of the panel and tighten it securely to hold the light in place. Do not overtighten.
- Wire Connections: Connect the 12V AC/DC power supply to the two screw terminals located at the rear of the indicator light. Ensure connections are firm and secure. The indicator light is non-polarized for AC/DC 12V, meaning the positive and negative wires can be connected to either terminal.
- Verify Installation: Double-check all connections and ensure the light is securely mounted before restoring power.
Operating Instructions
The Woljay 22mm LED Indicator Light is designed for straightforward operation.
- Power On: Once correctly installed and wired, apply 12V AC or DC power to the connected terminals.
- Indicator Function: The yellow LED will illuminate when power is supplied, indicating the status of the circuit or system it is connected to.
- Power Off: Disconnect the 12V power supply to turn off the indicator light.
Maintenance
The Woljay LED Indicator Light requires minimal maintenance due to its durable design and LED technology.
- Cleaning: If necessary, gently wipe the lens and body with a soft, dry cloth. Do not use abrasive cleaners or solvents.
- Inspection: Periodically inspect the wiring connections to ensure they remain secure and free from corrosion.
- Replacement: LEDs have a long lifespan. If the light fails to illuminate, refer to the Troubleshooting section. If replacement is needed, ensure the power is off before removing the old unit and installing a new one.
Troubleshooting
| Problem | Possible Cause | Solution |
|---|---|---|
| Indicator light does not illuminate. | No power supply. Incorrect voltage. Loose wiring connection. Damaged LED. | Verify 12V AC/DC power is supplied. Ensure voltage matches specifications. Check and tighten screw terminal connections. Replace the indicator light if damaged. |
| Light flickers or is dim. | Unstable power supply. Poor connection. | Check power source for stability. Inspect and secure wiring connections. |
| Light is loose in panel. | Retaining nut not tightened. | Tighten the retaining nut from the rear of the panel. |
Limited Warranty and Returns
This product is manufactured to high-quality standards. In the event of a defect, please refer to the retailer's return policy.
- Return Policy: This product is typically eligible for a refund/replacement within 30 days of purchase, subject to the retailer's terms and conditions. Please consult your purchase receipt or the retailer's website for specific details.
- Contact Support: For technical assistance or inquiries, please contact your point of purchase or visit the official Woljay store page on Amazon: Woljay Store.
Ask a question about this manual
Ask about setup, troubleshooting, compatibility, parts, safety, or missing instructions. Manuals+ will review the question and use this page’s manual context to help answer it.