1. Introduction
This instruction manual provides comprehensive guidance for the installation, operation, and maintenance of your Geberit AP116 External Cistern. Please read this manual thoroughly before installation and use to ensure proper function and longevity of the product. Keep this manual for future reference.
Product Overview
The Geberit AP116 is a high-quality external cistern designed for low-position toilet installations. It features a dual-flush system for water efficiency, silent refilling, and insulation against condensation. Its versatile design allows for lateral or central rear water connection.

Figure 1: Front view of the Geberit AP116 External Cistern. This image shows the white, compact design of the cistern with its outlet pipe extending downwards.
2. Safety Instructions
Always adhere to the following safety guidelines to prevent injury and damage to the product:
- Installation should be performed by a qualified professional if you are unsure about any steps.
- Ensure the water supply is turned off before beginning any installation or maintenance work.
- Do not use abrasive cleaners or solvents on the cistern surface.
- Verify all connections are watertight before restoring water supply.
- This product is designed for low-position installation only. Do not attempt to install it in a high-level configuration.
3. Package Contents
Please check that all components are present before starting installation:
- Geberit AP116 External Cistern (Model 136.432.11.1)
- 3/8" Stopcock
- Curved copper pipe
- 90° flush bend in ABS (Ø 50/44 mm, 23 x 23 cm)
- EPDM clamp (Ø 44/55 mm)
- Fixing material (screws, wall plugs, etc.)
Note: The package weight is approximately 2.8 kg. Package dimensions are 14.0 L x 47.0 H x 36.5 W (centimeters).
4. Installation Instructions
This section outlines the general steps for installing the Geberit AP116 external cistern. Refer to the detailed technical drawings for precise measurements and connection points.
4.1. Preparation
- Turn off the main water supply to the toilet area.
- Drain any remaining water from the existing toilet system.
- Ensure the installation surface is clean, dry, and structurally sound.
4.2. Mounting the Cistern
- Position the cistern on the wall above the toilet bowl, ensuring it is level and at the correct height for low-position installation. Refer to Figure 3 and Figure 4 for recommended dimensions.
- Mark the drilling points for the fixing material.
- Drill holes and insert appropriate wall plugs.
- Secure the cistern to the wall using the provided fixing material.
4.3. Water Connection
- Connect the 3/8" stopcock to the water supply line. The cistern supports lateral (left/right) or central rear water connection.
- Connect the stopcock to the cistern's inlet using the curved copper pipe. Ensure all connections are sealed properly to prevent leaks.
4.4. Toilet Bowl Connection
- Attach the 90° flush bend (Ø 50/44 mm) to the cistern's outlet.
- Connect the flush bend to the toilet bowl's inlet, using the EPDM clamp (Ø 44/55 mm) to ensure a secure and watertight seal.
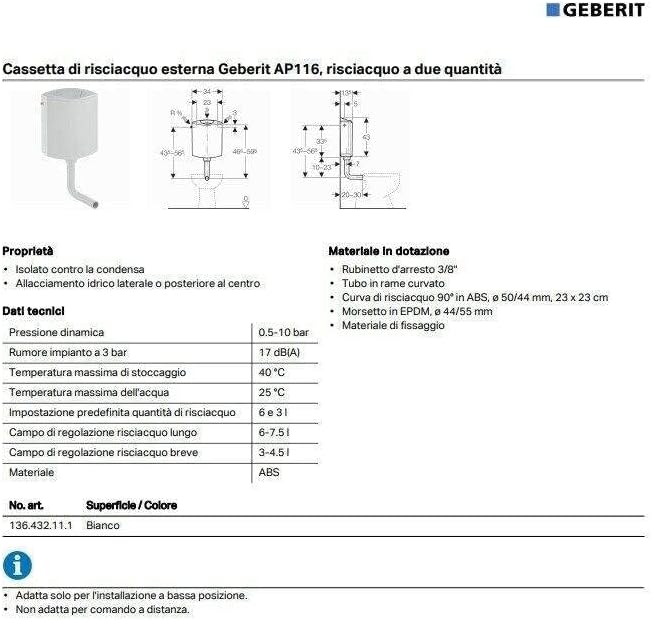
Figure 2: Technical drawing illustrating the properties, technical data, and supplied materials for the Geberit AP116 cistern. This includes details on dynamic pressure, noise levels, temperature limits, flush volumes, and material composition.

Figure 3: Side view technical drawing of the Geberit AP116 cistern, showing critical dimensions for installation, including height, depth, and connection points relative to the toilet bowl.

Figure 4: Front view technical drawing of the Geberit AP116 cistern, detailing width, water inlet position (R 3/8), and overall height dimensions for proper placement.
5. Operating Instructions
The Geberit AP116 cistern features a dual-flush mechanism for efficient water usage.
5.1. Initial Fill and Test
- Once installation is complete and all connections are secure, slowly turn on the main water supply.
- Allow the cistern to fill completely. The silent refilling mechanism will ensure a quiet operation.
- Check for any leaks around the connections. If leaks are detected, turn off the water supply and re-tighten connections.
5.2. Dual Flush Operation
The cistern offers two flush volumes:
- Full Flush: For larger waste, press and hold the flush button for a longer duration. This activates the 6-7.5 liter flush.
- Reduced Flush: For liquid waste, press and release the flush button quickly. This activates the 3-4 liter flush.
5.3. Adjusting Flush Volume
The flush volumes are pre-set to 6 liters (full) and 3-4 liters (reduced). If adjustment is required, consult a qualified plumber. Adjustments typically involve internal mechanisms and should be handled with care to maintain optimal performance and water efficiency.
6. Maintenance and Care
Regular maintenance ensures the longevity and efficient operation of your Geberit AP116 cistern.
6.1. Cleaning
- Clean the exterior of the cistern with a soft cloth and mild, non-abrasive cleaning agents.
- Do not use harsh chemicals, abrasive pads, or solvents, as these can damage the surface finish.
6.2. Internal Component Check
- Periodically inspect the internal components (fill valve, flush valve) for wear or mineral buildup.
- If excessive mineral buildup is observed, turn off the water supply and clean components as necessary. Replacement parts are available if components are worn beyond repair.
6.3. Condensation
The cistern is insulated against condensation. If condensation occurs, ensure proper ventilation in the bathroom and check for extreme temperature differences between the water supply and ambient air.
7. Troubleshooting
This section addresses common issues you might encounter with your Geberit AP116 cistern.
| Problem | Possible Cause | Solution |
|---|---|---|
| Cistern not filling or filling slowly. | Water supply turned off; clogged fill valve; low water pressure. | Check water supply valve; clean or replace fill valve; check household water pressure. |
| Cistern continuously running. | Faulty flush valve seal; fill valve not shutting off properly; float arm obstruction. | Inspect and clean/replace flush valve seal; adjust or replace fill valve; clear any obstructions around the float arm. |
| Weak flush. | Incorrect flush volume setting; partial obstruction in flush bend; low water level. | Adjust flush volume (consult professional); check and clear flush bend; ensure cistern fills to correct level. |
| Leaks from connections. | Loose connections; damaged seals. | Turn off water, tighten connections; replace damaged seals. |
If you are unable to resolve an issue using these troubleshooting steps, please contact a qualified plumber or Geberit customer support.
8. Technical Specifications
| Feature | Detail |
|---|---|
| Brand | Geberit |
| Model Number | 136.432.11.1 (AP116) |
| Installation Type | Low-position external cistern |
| Flush System | Dual flush |
| Pre-set Flush Volume | 6 liters |
| Adjustable Full Flush Volume | 6 - 7.5 liters |
| Adjustable Reduced Flush Volume | 3 - 4 liters |
| Water Connection | Lateral (left/right) or central rear |
| Dynamic Pressure | 0.5 - 10 bar |
| Noise Level (at 3 bar) | 17 dB(A) |
| Max. Storage Temperature | 40°C |
| Max. Water Temperature | 25°C |
| Material | ABS |
| Insulation | Against condensation |
| Package Dimensions | 47 x 36.5 x 14 cm |
| Package Weight | 3 kg (approx. 6.61 lbs) |
| ASIN | B06XW33PFF |
| Date First Available | April 21, 2022 |
9. Warranty and Support
9.1. Warranty Information
Geberit products are manufactured to high-quality standards. For specific warranty terms and conditions applicable to your region, please refer to the official Geberit website or contact your local distributor. Keep your proof of purchase for warranty claims.
9.2. Customer Support
For technical assistance, spare parts, or further inquiries, please visit the official Geberit website or contact their customer service department. Contact details can typically be found on the Geberit website under the "Support" or "Contact Us" sections.
Note: Information regarding spare parts availability for this specific model is currently unavailable through general product listings. Please contact Geberit directly for spare parts inquiries.


