Introduction
The American Lifetime 8-inch Digital Day Clock is designed to provide clear and easy-to-read time, day, and date information. Its large display and customizable features make it a valuable tool for maintaining daily routines and orientation. This manual will guide you through the setup, operation, and maintenance of your new clock.
Key Features:
- Durable Construction: Built with robust materials for long-lasting use.
- Easy-to-Read Display: Features a large, clear, high-contrast 8-inch display for optimal visibility, even in low light.
- Simple Setup: User-friendly interface with an easy-to-follow manual for quick operation.
- Customizable Alarms: Set up to 5 daily alarms for reminders such as medication times or appointments.
- Automatic Dimming: Adjusts display brightness automatically based on ambient room light.
- Multi-Language Support: Offers various language and time format options.
- Battery Backup: Internal battery ensures time and date are maintained during power outages, automatically resetting when power returns.
- Clear Display: Spells out the time, period of the day, full day of the week, month, and date without confusing abbreviations.
Setup
Setting up your American Lifetime Digital Day Clock is straightforward. Follow these steps to get started:
- Unpack the Clock: Carefully remove the clock and all accessories from the packaging.
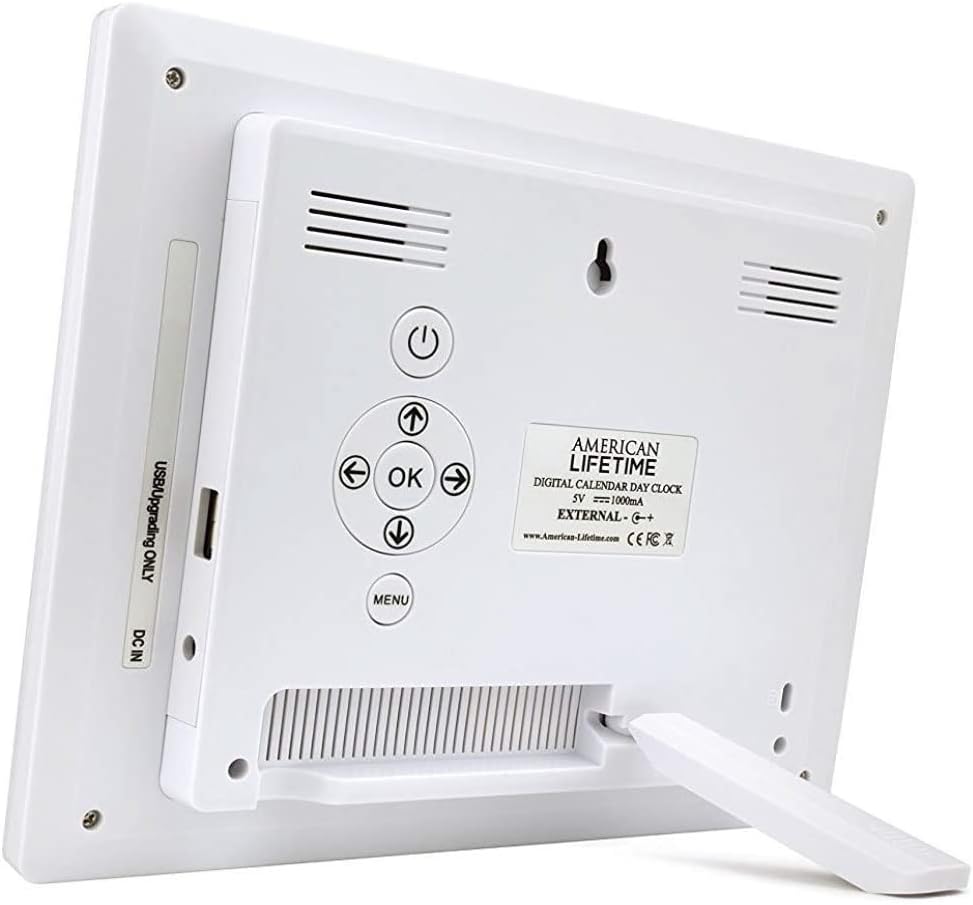
- Attach the Stand: The clock includes a removable stand that can be inserted into the back for tabletop display. It supports both horizontal and vertical orientations.
- Connect Power: Plug the provided power adapter into the DC IN port on the back of the clock and then into a standard electrical outlet. The clock will automatically power on and display the current time and date.
- Initial Settings: Use the control buttons on the back of the clock to navigate the menu and set the correct time, date, time mode (12/24 hour), date mode (Month-Day-Year, Day-Month-Year), and language.

Operating Instructions
Your Digital Day Clock offers several customizable settings to enhance its utility. All adjustments are made using the buttons located on the back of the unit.
Control Buttons:
- Power Button: Turns the display on or off.
- OK Button: Confirms selections in the menu.
- Arrow Buttons (Up/Down/Left/Right): Navigate through menu options and adjust values.
- Menu Button: Accesses the main settings menu.
Setting Time and Date:
- Press the Menu button to enter the settings.
- Use the Up/Down arrows to select "Set Time" or "Set Date".
- Press OK to enter the setting. Use Left/Right arrows to move between digits/fields and Up/Down arrows to change values.
- Press OK to confirm each change.
Customizing Alarms:
The clock supports up to 5 customizable alarms with messages.
- From the main menu, navigate to "Alarm Time 1" through "Alarm Time 5".
- Press OK to select an alarm.
- Set the alarm time and frequency (e.g., daily, weekdays).
- Choose a pre-set message (e.g., "Time to take medication", "Appointment Reminder") or set a custom message if available.
- Ensure the alarm is set to "On" and press OK to save.
Other Settings:
- Time Mode: Switch between 12-hour and 24-hour formats.
- Date Mode: Select your preferred date display format (e.g., Month-Day-Year).
- Language: Choose from multiple language options.
- Show Period Of The Day: Enable or disable the display of "Morning," "Afternoon," "Evening," or "Night."
- Auto Dimming: Turn this feature on to allow the clock to automatically adjust its brightness.
Maintenance
To ensure the longevity and optimal performance of your Digital Day Clock, follow these simple maintenance guidelines:
- Cleaning: Use a soft, dry cloth to gently wipe the screen and frame. Avoid abrasive cleaners or sprays that could damage the display or finish.
- Placement: Place the clock on a stable, flat surface or mount it securely on a wall. Avoid direct sunlight or extreme temperatures, which can affect performance and display life.
- Power: Always use the original power adapter provided with the clock.
Troubleshooting
If you encounter any issues with your American Lifetime Digital Day Clock, refer to the following common problems and solutions:
| Problem | Solution |
|---|---|
| Clock does not power on. | Ensure the power adapter is securely plugged into both the clock and a working electrical outlet. Try a different outlet. |
| Display is too dim or too bright. | Check the "Auto Dimming" setting in the menu. You can turn it off to manually adjust brightness if needed. |
| Time or date is incorrect. | Access the "Set Time" and "Set Date" options in the menu to manually correct the settings. |
| Alarms are not sounding. | Verify that the alarm time is correctly set, the alarm is enabled ("On"), and the volume is not muted. |
Specifications
- Brand: American Lifetime
- Model Number: H1-HO1A--JB6HDWLAO4
- Color: Brown
- Display Type: Digital
- Product Dimensions: 8.5"W x 6.75"H
- Power Source: Corded Electric
- Material: Plastic
- Mounting Type: Wall Mount, Tabletop
- Special Features: Alarm, Calendar Display, Auto-Dimming, Multi-Language Support, Battery Backup
- Item Weight: 15.8 ounces
- UPC: 728044490976
Warranty and Support
American Lifetime stands behind its products. Your Digital Day Clock comes with a 1-year manufacturer's limited warranty. Additionally, you can return the product for free within the first 30 days of purchase, no questions asked.
For any questions, troubleshooting assistance, or warranty claims, please contact American Lifetime customer service. Our team is dedicated to providing support and ensuring your satisfaction.
Visit the American Lifetime Store for more information and support resources.


