Introduction
This manual provides detailed instructions for the operation and maintenance of your Naxa NRC-182 Dual Radio Alarm Clock. Please read this manual thoroughly before using the device to ensure proper functionality and to prevent damage.
The Naxa NRC-182 is a versatile dual alarm clock radio featuring two high-powered USB charge ports, Bluetooth connectivity for wireless audio streaming, and an FM radio. It is designed to provide convenient timekeeping, alarm functions, and audio entertainment.
Safety Information
To ensure safe operation and prolong the life of your device, please observe the following safety precautions:
- Do not expose the unit to rain, moisture, or extreme temperatures.
- Do not place the unit near heat sources such as radiators, heat registers, stoves, or other apparatus (including amplifiers) that produce heat.
- Use only attachments/accessories specified by the manufacturer.
- Unplug this apparatus during lightning storms or when unused for long periods of time.
- Refer all servicing to qualified service personnel. Servicing is required when the apparatus has been damaged in any way, such as power-supply cord or plug is damaged, liquid has been spilled or objects have fallen into the apparatus, the apparatus has been exposed to rain or moisture, does not operate normally, or has been dropped.
- Keep the unit away from strong magnetic fields.
- Ensure proper ventilation around the unit.
Product Overview
Key Features:
- Large 1.2" high-contrast LED display with hi/lo dimmer.
- Play music wirelessly from smartphones, tablets, or other Bluetooth enabled devices.
- FM radio with digital preset tuning.
- Two independent alarm timers with daily/weekday/weekend repeat, Snooze, sleep, and wake to radio or buzzer functions.
- 3.5 mm AUX input connector.
- Two high-powered USB charge ports (DC 5V, 2A).
Component Identification:

Figure 1: Front View with USB Charging
This image shows the Naxa NRC-182 alarm clock from the front, displaying the large red LED time display. Two smartphones are connected to the USB charging ports on the side, illustrating the charging capability. The Naxa logo and Bluetooth symbol are visible on the front panel.

Figure 2: Top Panel Controls
This image provides a clear view of the top panel of the alarm clock, highlighting the various control buttons and the central speaker grille. Buttons for functions like MEM/PAIR, HOUR/MONTH, MIN/DAY, TIME, DIMMER, AL1/VOL-, AL2/VOL+, SOURCE/AL.OFF, and POWER are visible, along with the large SNOOZE/SLEEP button.

Figure 3: Rear Panel Connections
This image displays the back of the alarm clock, showing the DC 5V power input jack and the 3.5mm AUX IN port. A thin wire antenna for the FM radio is also visible extending from the back.
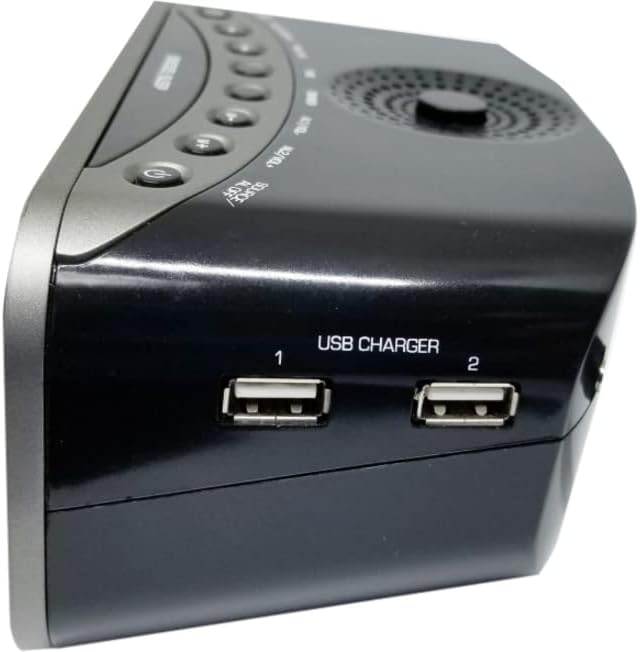
Figure 4: Side Panel USB Ports
This image focuses on the side of the alarm clock, clearly showing the two USB charger ports labeled "USB CHARGER 1" and "USB CHARGER 2". These ports are used for charging external devices.
Setup
1. Unpacking:
Carefully remove the alarm clock from its packaging. Ensure all components are present: the NRC-182 unit and its power adapter.
2. Power Connection:
- Insert the DC plug of the power adapter into the DC 5V input jack on the back of the unit (refer to Figure 3).
- Plug the power adapter into a standard AC wall outlet.
- The LED display will light up, indicating the unit is powered on.
3. Initial Time Setting:
- Press and hold the TIME button on the top panel until the hour digits begin to flash.
- Press the HOUR/MONTH button to adjust the hour. Press the MIN/DAY button to adjust the minute.
- Press the TIME button again to confirm the time setting. The display will stop flashing.
Operating Instructions
Power On/Off:
Press the POWER button () on the top panel to turn the unit on or off.
Setting Alarms:
The NRC-182 has two independent alarms (Alarm 1 and Alarm 2).
- Press the AL1/VOL- button once to select Alarm 1, or the AL2/VOL+ button once to select Alarm 2. The alarm time will flash.
- While the alarm time is flashing, press HOUR/MONTH to set the hour and MIN/DAY to set the minute.
- Press the respective alarm button (AL1/VOL- or AL2/VOL+) again to confirm the alarm time.
- After setting the time, press the alarm button again to cycle through alarm modes: Daily, Weekday, Weekend. Select your desired mode.
- Press the alarm button one more time to select the wake source: Buzzer or FM Radio.
- The alarm icon (AL1 or AL2) will appear on the display, indicating the alarm is active.
Snooze Function:
When an alarm sounds, press the large SNOOZE/SLEEP button to temporarily silence the alarm for approximately 9 minutes. The alarm will sound again after the snooze period.
Sleep Function:
While the unit is on, press the SNOOZE/SLEEP button repeatedly to set a sleep timer (e.g., 90, 60, 30, 15 minutes, or OFF). The unit will automatically turn off after the selected time.
FM Radio Operation:
- Press the SOURCE/AL.OFF button to switch to FM radio mode.
- Press the HOUR/MONTH or MIN/DAY buttons to manually tune the frequency.
- To auto-scan and save stations: Press and hold the MEM/PAIR button. The radio will scan and store available FM stations automatically.
- To recall saved stations: Press the MEM/PAIR button briefly to cycle through preset stations.
- Adjust volume using the AL1/VOL- and AL2/VOL+ buttons.
Bluetooth Pairing:
- Press the SOURCE/AL.OFF button to switch to Bluetooth mode. The "BT" indicator will flash on the display.
- Enable Bluetooth on your smartphone, tablet, or other audio device.
- Search for "NRC-182" in your device's Bluetooth settings and select it to pair.
- Once paired, the "BT" indicator will stop flashing and remain solid. You can now stream audio wirelessly to the alarm clock.
- Adjust volume using the AL1/VOL- and AL2/VOL+ buttons on the unit, or directly from your connected device.
USB Charging:
The NRC-182 features two USB charging ports (DC 5V, 2A) on the side of the unit (refer to Figure 4).
- Connect your smartphone, tablet, or other USB-powered device to either USB port using a compatible USB charging cable.
- The device will begin charging automatically.
- Note: These ports are for charging only and do not support data transfer.
AUX Input:
Connect external audio devices (e.g., MP3 players, CD players) to the 3.5mm AUX IN port on the back of the unit (refer to Figure 3) using a 3.5mm audio cable (not included).
- Press the SOURCE/AL.OFF button repeatedly until "AUX" appears on the display.
- Play audio from your connected device.
- Adjust volume using the AL1/VOL- and AL2/VOL+ buttons on the unit, or directly from your connected device.
Display Dimmer:
Press the DIMMER button on the top panel to adjust the brightness of the LED display (Hi/Lo settings).
Maintenance
Cleaning:
- Before cleaning, unplug the unit from the power outlet.
- Use a soft, dry cloth to wipe the exterior surfaces of the alarm clock.
- Do not use abrasive cleaners, waxes, or solvents as they may damage the finish.
Care and Storage:
- Store the unit in a cool, dry place when not in use for extended periods.
- Avoid placing heavy objects on top of the unit.
- Keep the unit away from direct sunlight and extreme temperatures.
Troubleshooting
| Problem | Possible Cause | Solution |
|---|---|---|
| No power/Display off | Power adapter not connected or outlet not working. | Ensure the power adapter is securely plugged into the unit and a working wall outlet. |
| Cannot set time/alarm | Buttons not pressed correctly or in sequence. | Refer to the "Setup" and "Operating Instructions" sections for correct button sequences. Ensure the correct mode is selected. |
| Poor FM reception | Antenna not extended or poor signal area. | Fully extend the FM wire antenna. Try repositioning the unit for better reception. |
| Bluetooth not pairing | Unit not in Bluetooth mode; device too far; device already paired with another unit. | Ensure the unit is in Bluetooth mode ("BT" flashing). Move your device closer. Disconnect from other Bluetooth devices. Try restarting both devices. |
| USB charging not working | Cable faulty; device not compatible; unit not powered. | Try a different USB cable. Ensure the unit is powered on. Some devices may require specific charging protocols not supported. |
Specifications
- Model: NRC-182
- Display Type: 1.2" High-Contrast LED
- Power Source: Corded Electric (DC 5V)
- USB Charge Ports: 2 x DC 5V, 2A
- Connectivity: Bluetooth, 3.5mm AUX Input
- Radio Bands: FM
- Product Dimensions: 11" (W) x 3.9" (H) (approximate)
- Item Weight: 1 Pound (approximate)
- Frame Material: Acrylonitrile Butadiene Styrene
Warranty and Support
Naxa Electronics products are designed and manufactured to the highest quality standards. In the unlikely event of any problems with your product, please refer to the warranty information provided with your purchase or visit the official Naxa Electronics website for support resources, FAQs, and contact information.
For technical assistance or customer service, please contact Naxa Electronics customer support. Keep your purchase receipt as proof of purchase for warranty claims.
You can find more information and support at the Naxa Store on Amazon.


