
Important Safety Instructions
Please read all instructions carefully before operating your television and retain this manual for future reference. Following these safety guidelines will help prevent electric shock, fire, or damage to the unit.
- Power Source: Ensure the television is connected to a power supply that matches the voltage specified on the rating label (12V DC or 220V AC via adapter).
- Ventilation: Do not block ventilation openings. Allow adequate space around the television for proper airflow to prevent overheating.
- Water and Moisture: Do not expose the television to rain or moisture. Do not place objects filled with liquids, such as vases, on the television.
- Cleaning: Unplug the television from the power outlet before cleaning. Use a soft, dry cloth. Do not use liquid cleaners or aerosol cleaners.
- Placement: Place the television on a stable, flat surface. Avoid placing it in direct sunlight or near heat sources.
- Servicing: Do not attempt to service this product yourself. Refer all servicing to qualified service personnel.
Product Overview
The Nevir NVR741820HDN is a compact 20-inch LED television designed for versatile use, including 12V applications. It features a high-definition display and multiple connectivity options.
Key Features:
- 20-inch LED screen with 1366 x 768 pixel resolution.
- Brightness of 140 cd/m2.
- Automatic and manual tuning.
- Digital noise reduction and zoom function.
- Multiple connectivity options: USB, SCART, HDMI, CI+, AV (mini), YUV (mini), Coaxial, Antenna, VGA.
- Includes a multi-function remote control.
- Designed for both 12V and 220V operation.
Television Components:
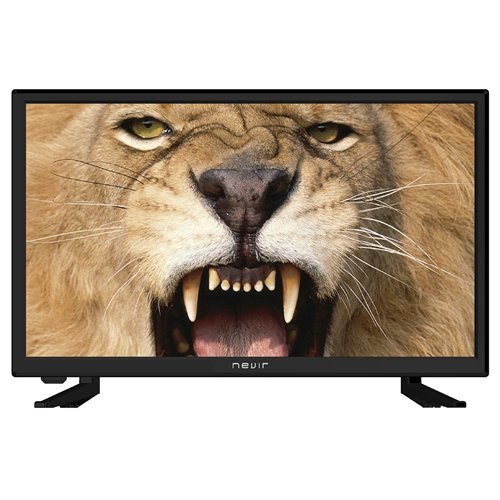
Figure 1: Front view of the Nevir NVR741820HDN television, showing the screen and bezel.
The television unit includes the main display, integrated speakers, control buttons (usually on the side or bottom), and various input/output ports located on the rear or side panel. A detachable stand is also provided for tabletop placement.
Setup
1. Unpacking and Assembly:
- Carefully remove the television and all accessories from the packaging.
- Attach the stand to the base of the television using the provided screws, if desired. Ensure it is securely fastened. For VESA mounting, refer to the VESA mount instructions (mount not included).
2. Connecting Peripherals:
Connect your external devices to the appropriate ports on the television.
- Antenna/Cable: Connect an antenna or cable TV signal to the "Antenna" input.
- HDMI Devices: Use an HDMI cable to connect devices like DVD/Blu-ray players, game consoles, or streaming sticks to the "HDMI" port(s).
- USB Devices: Insert a USB flash drive into the "USB" port for media playback.
- SCART Devices: Connect older devices using a SCART cable to the "SCART" port.
- VGA Devices: Connect a computer to the "VGA" port for use as a monitor.
- CI+ Module: Insert a CI+ module (if required by your service provider) into the CI+ slot.
3. Power Connection:
- For 220V AC: Connect the provided AC power adapter to the television's DC input, then plug the adapter into a standard wall outlet.
- For 12V DC: Connect the 12V power cable (often with a car cigarette lighter adapter, if included) directly to the television's DC input and then to a 12V power source.
Ensure the power connection is secure before proceeding.
Operating Instructions
1. Initial Power On and Channel Scan:
- Press the POWER button on the remote control or the television unit.
- Upon first use, the television will guide you through an initial setup wizard. Follow the on-screen prompts to select your language, country, and perform an automatic channel scan. This process will detect available digital and analog channels.
- If you skip the automatic scan, you can perform it later via the MENU -> Channel -> Auto Tuning option.
2. Basic Functions:
- Power On/Off: Use the POWER button.
- Volume Control: Use the VOL +/- buttons.
- Channel Change: Use the CH +/- buttons or number buttons.
- Mute: Press the MUTE button to silence the audio.
- Input Source: Press the SOURCE or INPUT button to switch between connected devices (HDMI, AV, USB, TV).
3. Menu Navigation:
Press the MENU button on the remote control to access the main menu. Use the arrow keys (UP/DOWN/LEFT/RIGHT) to navigate through options and OK/ENTER to confirm selections. Press EXIT or MENU again to close the menu.
- Picture Settings: Adjust brightness, contrast, color, sharpness, and picture mode.
- Sound Settings: Adjust volume, bass, treble, balance, and sound mode.
- Channel Settings: Perform channel scans, edit channels, or set parental controls.
- Time Settings: Set the current time, sleep timer, or auto power off.
- System Settings: Access language settings, software updates, or factory reset options.
4. USB Media Playback:
- Insert a USB flash drive containing compatible media files (photos, music, videos) into the USB port.
- Press the SOURCE button and select "USB".
- Navigate through the folders and files using the arrow keys and press OK/ENTER to play.
Maintenance
Cleaning the Television:
- Always unplug the television from the power outlet before cleaning.
- Screen: Gently wipe the screen with a soft, lint-free cloth. For stubborn marks, slightly dampen the cloth with water or a specialized screen cleaner (do not spray directly onto the screen).
- Cabinet: Use a soft, dry cloth to wipe the cabinet and stand. Avoid using abrasive cleaners, waxes, or solvents as they can damage the finish.
- Do not allow water or cleaning solutions to enter the television's interior.
General Care:
- Avoid placing heavy objects on top of the television.
- Protect the television from extreme temperatures and humidity.
- When moving the television, ensure it is unplugged and handled carefully to prevent damage.
Troubleshooting
Before contacting customer support, please refer to the following table for common issues and their solutions.
| Problem | Possible Cause | Solution |
|---|---|---|
| No power | Power cable not connected; power outlet not working; remote control batteries depleted. | Check power cable connection. Test the outlet with another device. Replace remote control batteries. |
| No picture, but sound is present | Incorrect input source selected; backlight issue. | Press the SOURCE button to cycle through inputs. If problem persists, contact service. |
| No sound, but picture is present | Volume is muted or too low; external audio system issue. | Press the MUTE button or increase volume. Check external audio connections if applicable. |
| Poor picture quality (fuzzy, distorted) | Weak antenna signal; incorrect picture settings; faulty cable. | Check antenna connection and position. Adjust picture settings in the menu. Try a different HDMI/AV cable. |
| Remote control not working | Batteries depleted or inserted incorrectly; obstruction between remote and TV. | Replace batteries, ensuring correct polarity. Remove any obstructions. Point remote directly at the TV's IR sensor. |
| USB playback issues (low volume) | Audio encoding of the media file; TV's volume setting. | Increase TV volume to maximum. Some media files may have inherently low audio levels. Try converting the file or using a different file. |
Specifications
| Feature | Detail |
|---|---|
| Model Number | NVR741820HDN |
| Screen Size | 20 Inches |
| Display Technology | LED |
| Resolution | 1366 x 768 (768p) |
| Brightness | 140 cd/m2 |
| Aspect Ratio | 1.33:1 |
| Connectivity Technology | USB |
| Hardware Interface | HDMI, USB, VGA |
| Analog RGB Inputs | Coaxial, SCART |
| Tuner Type | CI+ |
| Control Method | Remote Control |
| Mounting Type | Tabletop Stand (VESA compatible) |
| Product Dimensions (W x D x H) | 51 x 13 x 32 cm |
| Product Weight | 2.3 kg (5.07 Pounds) |
| Annual Energy Consumption | 25 Kilowatt-hours per year |
| Color | Black |
| Model Year | 2017 |
Warranty and Support
Nevir products are manufactured to high-quality standards. This product is covered by a standard manufacturer's warranty, subject to the terms and conditions applicable in your region of purchase. Please retain your proof of purchase for warranty claims.
For technical support, service, or warranty inquiries, please contact your local Nevir authorized dealer or visit the official Nevir website for contact information.
Note: Product specifications and appearance are subject to change without prior notice.


