1. Introduction
Thank you for choosing the BH Fitness i.SPADA 2 H9355I Indoor Cycling Bike. This manual provides essential information for the safe assembly, operation, and maintenance of your new fitness equipment. Please read all instructions carefully before use and retain this manual for future reference.
The i.SPADA 2 H9355I is designed for intensive home training, suitable for 7 to 20 hours of use per week, offering a robust and versatile workout experience.
2. Safety Information
- Consult a physician before starting any exercise program.
- Ensure all parts are securely tightened before each use.
- Keep children and pets away from the equipment during operation.
- Place the bike on a stable, level surface.
- Wear appropriate athletic footwear and clothing.
- Stop exercising immediately if you feel faint, dizzy, or experience pain.
3. Setup and Assembly
While the BH Fitness i.SPADA 2 H9355I is designed for straightforward assembly, it is recommended to follow the detailed instructions provided in the separate assembly guide that accompanies your product. Ensure all components are present before beginning assembly.
3.1 Component Overview
Familiarize yourself with the main components of your indoor cycling bike.

Image 1: The main console of the BH Fitness i.SPADA 2 H9355I, displaying workout data and control buttons.

Image 2: A closer view of the i.SPADA 2 H9355I console, showing the LCD screen and button layout for 'down', 'up', 'start/stop', 'enter', and 'reset'.
3.2 Adjusting the Saddle
The saddle can be adjusted both vertically and horizontally to ensure a comfortable and ergonomically correct riding position for all users.
- Vertical Adjustment: Loosen the adjustment knob located on the vertical post. Slide the saddle post up or down to your desired height. Ensure your leg has a slight bend at the knee when the pedal is at its lowest point. Tighten the knob securely.
- Horizontal Adjustment: Loosen the adjustment knob under the saddle. Slide the saddle forward or backward to achieve optimal positioning relative to the handlebars. Tighten the knob securely.

Image 3: Illustration of the saddle adjustment mechanism, showing vertical and horizontal adjustment points with red arrows indicating movement directions.
3.3 Adjusting the Handlebar
The ergonomically designed handlebar is adjustable vertically and horizontally for maximum comfort and to accommodate different user heights and riding styles.
- Vertical Adjustment: Loosen the adjustment knob on the handlebar post. Raise or lower the handlebar to a comfortable height. Ensure your back is straight and arms are slightly bent. Tighten the knob securely.
- Horizontal Adjustment: Loosen the adjustment knob at the base of the handlebar post. Slide the handlebar assembly forward or backward. Tighten the knob securely.

Image 4: Diagram showing the adjustment points for the handlebar, including vertical and horizontal movement, indicated by red arrows.
3.4 Pedal Installation and Adjustment
The i.SPADA 2 H9355I features mixed SPD-trekking pedals, adaptable to various shoe types.
- Ensure pedals are correctly threaded and tightened to prevent loosening during use.
- Adjust the pedal straps to secure your feet firmly.
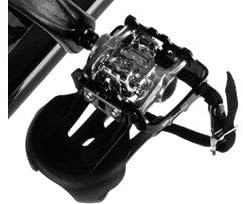
Image 5: Close-up of the mixed SPD-trekking pedals, designed for compatibility with various cycling shoes.

Image 6: Another view of the pedals, highlighting the strap mechanism for securing feet during intense workouts.
3.5 Placement and Transport
Place the bike on a flat, stable surface. The integrated transport wheels allow for easy relocation within your home.
4. Operating Instructions
4.1 Console Functions
The LCD screen provides various workout data and program options. Use the 'up', 'down', 'start/stop', 'enter', and 'reset' buttons to navigate and control your workout.
- Start/Stop: Begins or pauses your workout.
- Up/Down: Adjusts intensity levels or navigates menu options.
- Enter: Confirms selections.
- Reset: Clears current workout data or returns to the main menu.
4.2 Training Programs
The console offers a variety of pre-defined programs and customization options:
- 12 Pre-defined Programs: Each with 24 intensity levels.
- 4 Heart Rate Control (HRC) Programs: Automatically adjust training intensity to maintain your heart rate within a selected target zone.
- 5 User Programs (uPrg): Create and save your personalized training profiles.
- Random Program: The display generates a new, random program for varied workouts.
- Recovery Test (RT): Helps assess your physical condition through a controlled recovery process.
- Fitness Test: Evaluates your fitness level.
4.3 3-Way Braking System
The i.SPADA 2 H9355I features a versatile 3-way braking system, allowing you to choose your preferred resistance method:
- Magnetic Braking System: Provides quiet operation and smooth resistance changes.
- Friction System: Offers 100% accuracy and a direct feel, similar to outdoor cycling.
- Combination System: Utilizes both magnetic and friction systems for a comprehensive and challenging workout without limits.
4.4 Connectivity
The bike is Apple/Android compatible and features Bluetooth connectivity, allowing integration with fitness apps and devices for enhanced training tracking and control.
5. Maintenance
Regular maintenance ensures the longevity and optimal performance of your BH Fitness i.SPADA 2 H9355I.
- Cleaning: Wipe down the bike with a damp cloth after each use to remove sweat and dust. Avoid abrasive cleaners.
- PolyV-Belt: The PolyV-belt drive system is designed to be powerful, quiet, and maintenance-free. No lubrication or tension adjustments are typically required.
- Inspections: Periodically check all nuts, bolts, and moving parts for tightness and wear. Tighten any loose fasteners.
- Pedals: Ensure pedals are securely attached and straps are in good condition.
6. Troubleshooting
If you encounter issues with your i.SPADA 2 H9355I, refer to the following common problems and solutions:
-
Issue: The bike makes unusual noises (e.g., squeaking, grinding).
Solution: Check all assembly points for tightness. Ensure the bike is on a level surface. If the noise persists, contact customer support as internal components may require inspection. -
Issue: The console display is difficult to read or has no backlight.
Solution: The console may not feature a backlight. Ensure you are exercising in a well-lit area. Check battery levels if the display is completely off or dim. Some consoles are designed without internal illumination. -
Issue: Resistance feels inconsistent or too high/low.
Solution: For magnetic systems, ensure the resistance knob/buttons are functioning correctly. For friction systems, check the brake pad for wear. If using the combination system, verify both mechanisms are engaging properly. -
Issue: Parts feel loose or have broken (e.g., saddle screw, crank arm).
Solution: Immediately cease use of the bike. Do not attempt to use the equipment with broken or damaged parts. Contact BH Fitness customer support for replacement parts and professional assistance. Attempting repairs with incorrect parts or methods can void your warranty and pose a safety risk.
7. Specifications
| Feature | Specification |
|---|---|
| Model Number | H9355I |
| Dimensions (L x W x H) | 130 cm x 59 cm x 116 cm |
| Product Weight | 57 kg |
| Maximum User Weight | 150 kg (Note: Some specifications indicate 130 kg. Refer to your product's specific documentation for the exact limit.) |
| Drive System | PolyV-Belt |
| Resistance Mechanism | 3-Way (Magnetic, Friction, Combination) |
| Material | Alloy Steel |
| Power Source | Battery-driven (for console) |
| Special Features | Adjustable Saddle & Handlebar, Mixed SPD-Trekking Pedals, Bottle Holder, Transport Wheels, Bluetooth Connectivity |
8. Warranty and Support
For warranty information, please refer to the documentation included with your purchase or visit the official BH Fitness website. Warranty terms typically cover manufacturing defects for a specified period.
If you require technical assistance, replacement parts, or have questions not covered in this manual, please contact BH Fitness customer support. Have your model number (H9355I) and proof of purchase ready when contacting support.
You can usually find contact details for customer support on the manufacturer's website or in your product packaging.


