
Important Safety Instructions
Please read and understand all instructions before assembling and using this product. Failure to follow these instructions may result in electric shock, fire, or serious injury.
- Electrical Safety: Ensure the power outlet voltage matches the lamp's requirements (110 Volts). Do not operate with a damaged cord or plug. Do not immerse the lamp in water.
- Placement: Place the lamp on a stable, level surface. Avoid placing near heat sources or in direct sunlight for prolonged periods.
- Lens Care: The magnifying lens can concentrate sunlight, creating a fire hazard. Always close the protective cover when the lamp is not in use.
- Cleaning: Disconnect from power before cleaning. Use a soft, dry cloth. Avoid abrasive cleaners.
Package Contents
Verify that all components are present before beginning assembly:
- Magnifying Lamp Head with LED Light
- Adjustable Arm Assembly
- Floor Stand Pole
- Rolling Base with 6 Wheels
- Power Adapter
- Assembly Hardware (Wave Washer, Spring Washer, Bolt, Spanner)
Setup Guide
Follow these steps to assemble your Brightech LightView Pro XL Magnifying Floor Lamp:
- Attach the Floor Stand Pole to the Rolling Base: Carefully align the bottom of the floor stand pole with the opening in the center of the rolling base. Secure it using the provided bolt, wave washer, and spring washer. Tighten with the spanner.
- Connect the Adjustable Arm Assembly: Insert the bottom end of the adjustable arm assembly into the top of the floor stand pole. Ensure it clicks securely into place.
- Mount the Magnifying Lamp Head: Attach the magnifying lamp head to the top of the adjustable arm. Tighten the tension nut to secure the head while allowing for future adjustments.
- Plug in the Power Adapter: Connect the power adapter to the lamp's power input and then plug it into a standard 110V electrical outlet.

Operating Instructions
Learn how to use your magnifying floor lamp effectively:
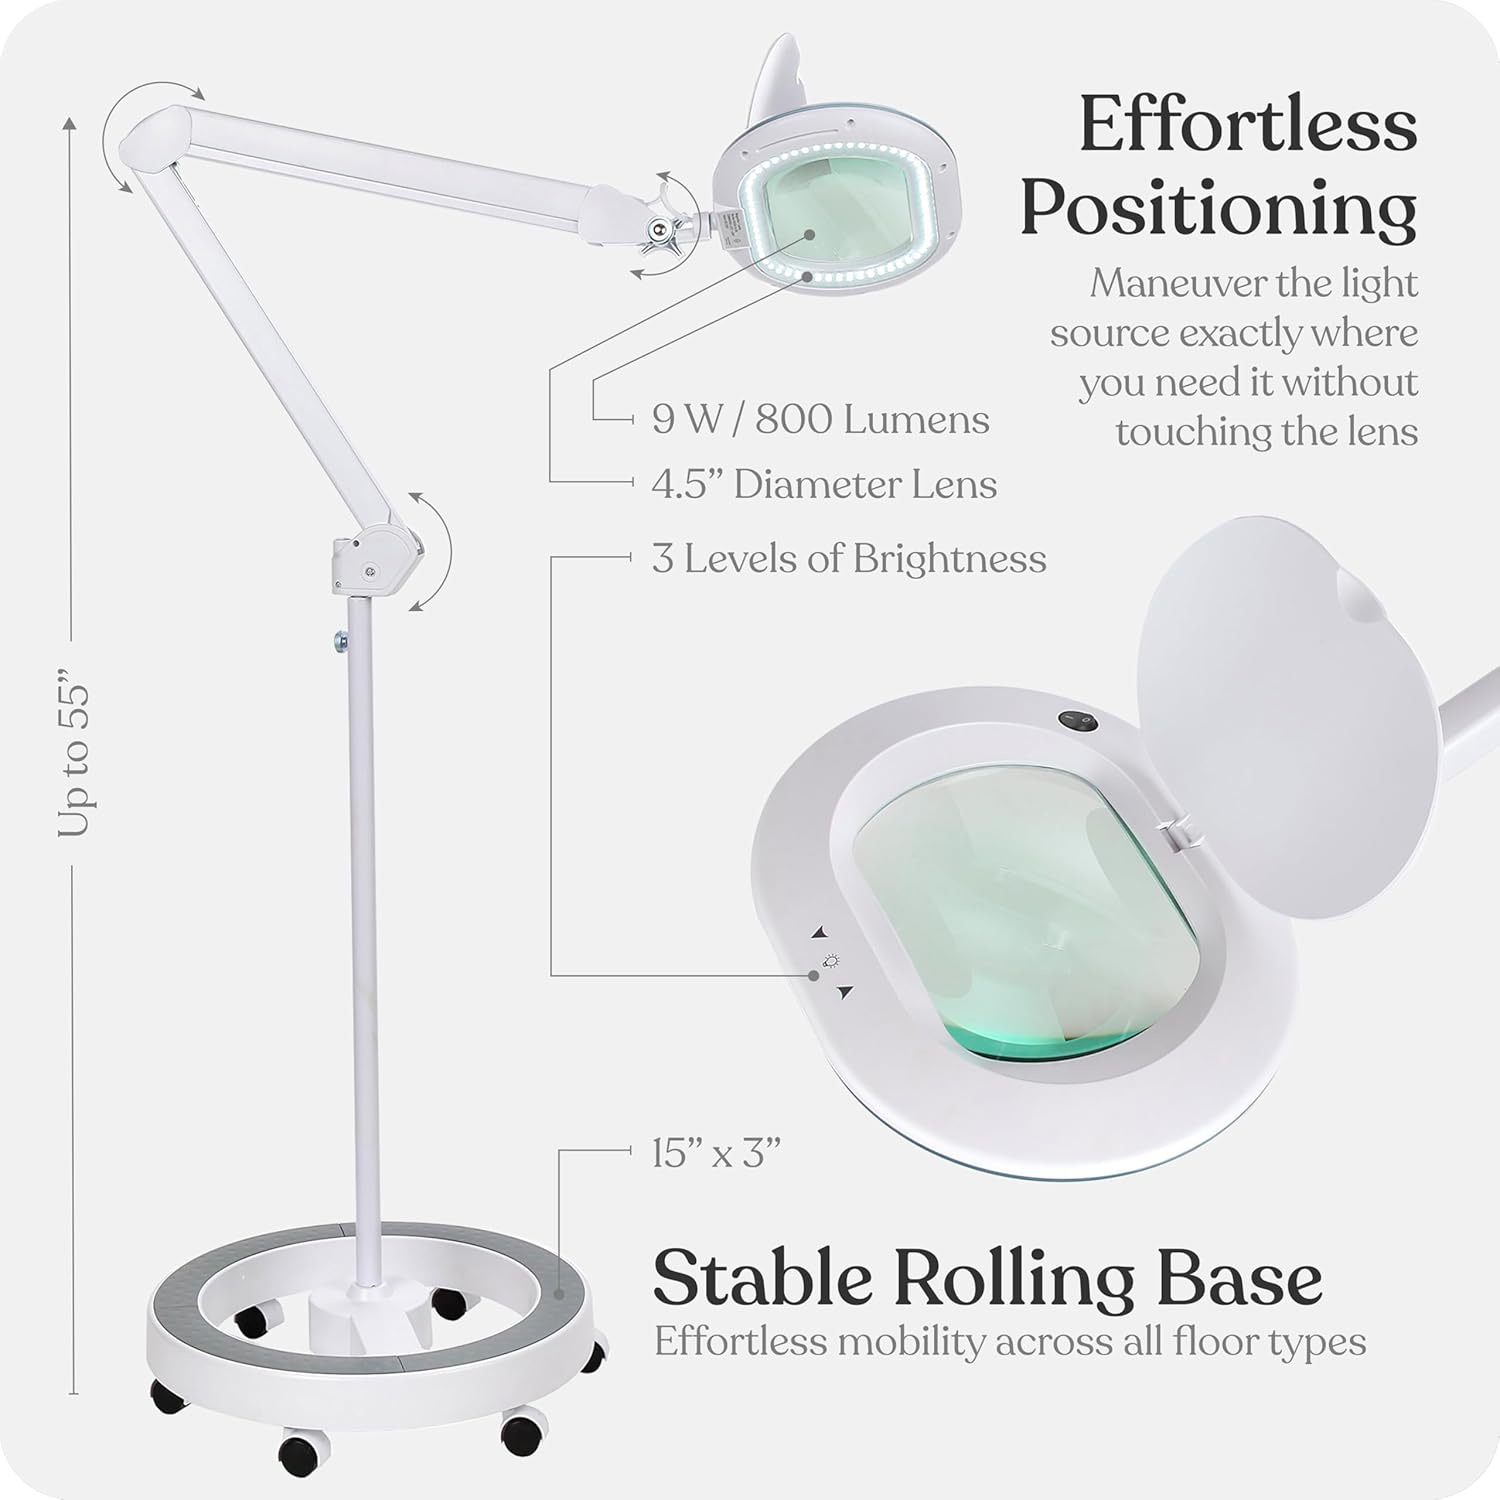
- Power On/Off: Locate the power button on the top of the lamp head. Press once to turn the LED light on or off.
- Adjusting Brightness: Use the '+' and '-' buttons next to the power button to cycle through the three available brightness levels.
- Positioning the Lamp: The lamp features an industrial-strength adjustable arm. Loosen the tension knobs at the joints to adjust the arm's angle and height. Once in the desired position, tighten the knobs to secure it. The lamp head can also be swiveled and tilted for precise focus.
- Using the Magnifier: Open the protective flip cover on the lamp head to expose the 2.25x magnifying lens. Position the lens directly over your work area for enhanced visibility.


Maintenance
Proper care ensures the longevity of your lamp:
- Cleaning the Lens: Use a soft, lint-free cloth specifically designed for optical lenses. For stubborn smudges, a small amount of lens cleaning solution can be applied to the cloth (not directly to the lens).
- Cleaning the Body: Wipe the lamp's body and arm with a soft, damp cloth. Avoid harsh chemicals or abrasive materials.
- Storage: When not in use, especially in sunny environments, always close the protective flip cover over the magnifying lens to prevent dust accumulation and potential fire hazards.
Troubleshooting
Common issues and their solutions:
| Problem | Possible Cause | Solution |
|---|---|---|
| Lamp does not turn on | No power, loose connection, faulty adapter | Check power outlet, ensure all connections are secure, try a different outlet. |
| Light is dim or flickers | Low brightness setting, power fluctuation | Increase brightness using the '+' button. Ensure stable power supply. |
| Magnification is blurry | Dirty lens, incorrect focal distance | Clean the lens. Adjust the lamp head's height and angle to find the optimal focal distance (approx. 15 inches). |
| Arm does not stay in position | Tension knobs are loose | Tighten the tension knobs at the arm joints until the arm holds its position. |
Specifications
| Feature | Detail |
|---|---|
| Model Number | LTVPRB-W-XL |
| Magnification | 2.25x |
| Lens Diameter | 4.5 inches |
| Light Source | Integrated LED |
| Wattage | 9 watts |
| Voltage | 110 Volts |
| Switch Type | Touch (with dimmable settings) |
| Product Dimensions | 15"D x 15"W x 60"H (fully extended) |
| Item Weight | 26.8 Pounds |
| Base Material | Metal or Plastic |
| Color | White |
| Indoor/Outdoor Usage | Indoor |
Warranty Information
Brightech offers an industry-leading 3-year limited warranty that covers any defects, malfunctions, or sudden failures to your floor lamp. For warranty claims or support, please contact Brightech customer service.
Contact Information
For further assistance, technical support, or customer service inquiries, please visit the official Brightech website or refer to the contact details provided with your purchase.
