Introduction
This manual provides instructions for the setup and operation of your Anderic RR7096TR thermostatic remote control. This remote is designed as a replacement for specific Hampton Bay and Harbor Breeze ceiling fan remotes, offering control over fan speeds, light functions (including dimming), reverse, light delay, fan auto, and light timer features, along with thermostatic temperature settings.
Please read this manual thoroughly before use to ensure proper installation and functionality.
Important Safety Information
- Always ensure the power to the ceiling fan is turned off at the circuit breaker before performing any installation or maintenance.
- Do not expose the remote control to water or excessive moisture.
- Keep batteries out of reach of children.
- Dispose of used batteries responsibly according to local regulations.
- Use only the specified battery type (4 AAA batteries).
Package Contents
Your Anderic RR7096TR package includes:
- Anderic RR7096TR Thermostatic Remote Control
- Wall Mount Bracket (with two screws for mounting)
- Instruction Manual (this document)
Note: 4 AAA batteries are required for operation and are not included.

Image: Front and back view of the Anderic RR7096TR remote control, showing the display and button layout on the front, and the battery compartment on the back.

Image: The Anderic RR7096TR remote control securely placed in its clear wall mount bracket, demonstrating how it can be stored for easy access.
Setup and Pairing
The Anderic RR7096TR remote control requires aligning dip switches to match your ceiling fan receiver for proper operation. This unit has 16 different code combinations.
1. Battery Installation
- Remove the battery cover on the back of the remote control.
- Insert 4 AAA batteries, ensuring correct polarity (+/-).
- Replace the battery cover.
2. Setting the Dip Switches (Code Matching)
To ensure the remote communicates with your ceiling fan, the dip switches inside the remote must match the dip switches on your fan's receiver unit.
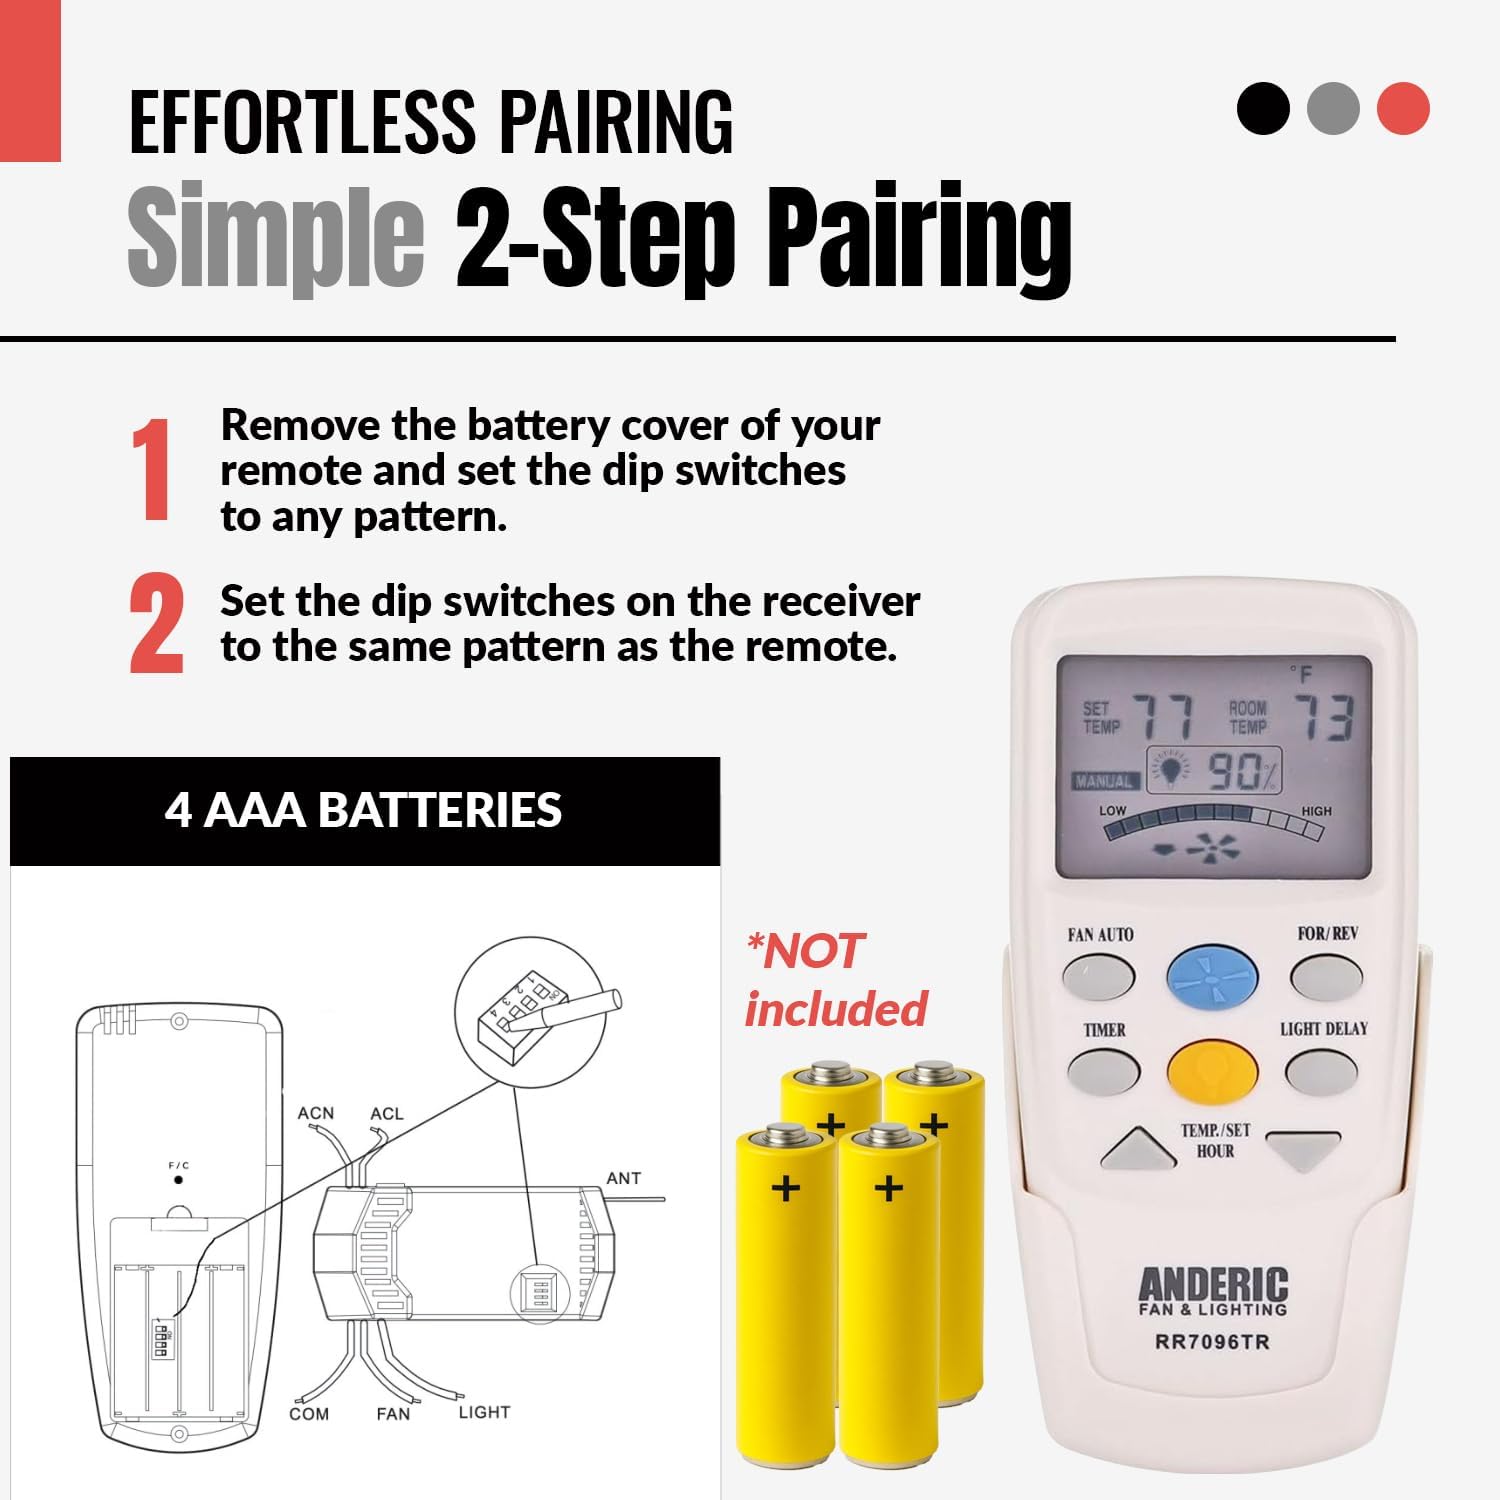
Image: A visual guide illustrating the two-step pairing process. Step 1 shows removing the battery cover and setting dip switches on the remote. Step 2 shows setting the dip switches on the fan receiver to match the remote's pattern. A diagram of the remote's battery compartment and a separate diagram of the receiver's wiring and dip switches are included.
- On the Remote:
- Remove the battery cover.
- Locate the dip switches inside the battery compartment.
- Using a small screwdriver or ballpoint pen, slide the switches to your desired "up" or "down" position. Note: The factory setting is typically all "up". Avoid using this position if possible to prevent interference.
- Replace the battery cover.
- On the Receiver:
- Ensure power to the ceiling fan is OFF at the circuit breaker.
- Access the receiver unit, typically located in the fan's canopy.
- Locate the dip switches on the receiver.
- Slide these switches to the exact same positions (up or down) as you set them on your remote control.
- Reassemble the fan canopy and restore power at the circuit breaker.

Image: A technical diagram showing the internal layout of the remote control (Transmitter, Fig. A) and the fan receiver (Receiver, Fig. B), highlighting the location of the code switches (dip switches) in both units. This visual aid is crucial for correctly matching the settings.
Important: When installing the remote control, ensure your fan is operated in "HIGH SPEED" and the light is in the "ON" condition at the switch knob (if applicable) before setting the dip switches on the receiver.
Operating Instructions
The Anderic RR7096TR remote provides comprehensive control over your ceiling fan and light functions.
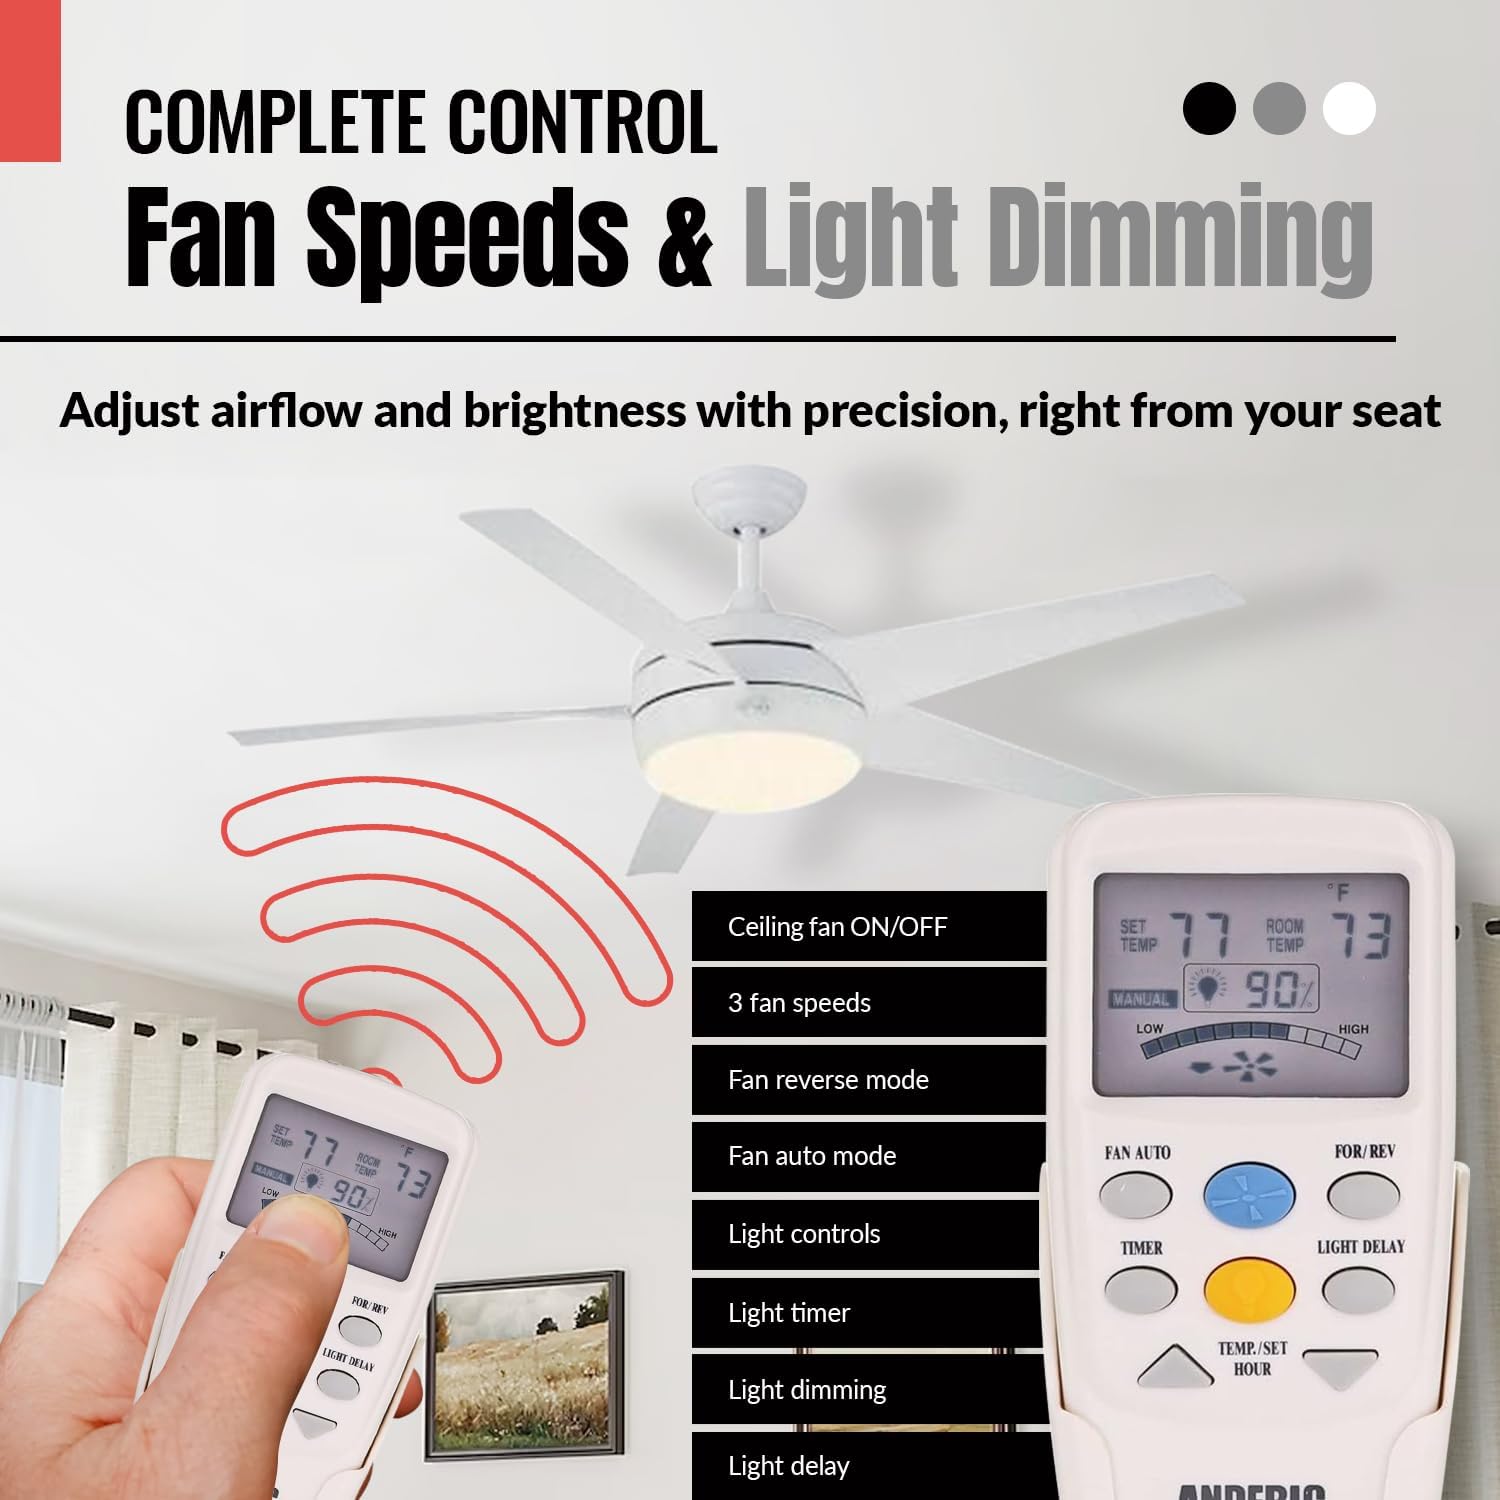
Image: The Anderic RR7096TR remote control in use, with a ceiling fan visible in the background. The remote's display shows temperature and light percentage, and a list of features like 3 fan speeds, fan reverse mode, fan auto mode, light controls, light timer, light dimming, and light delay are highlighted.
Fan Control
- Fan Speed Buttons: Typically labeled Low, Medium, High, or represented by fan blade icons, these buttons adjust the fan's rotation speed.
- Fan Off Button: Turns the fan off.
- FOR/REV (Forward/Reverse) Button: Changes the direction of the fan blades. This is useful for seasonal comfort (downward airflow for cooling in summer, upward airflow for circulating warm air in winter).
- FAN AUTO Button: Activates the automatic fan mode, which adjusts fan speed based on the room temperature detected by the remote's thermostatic sensor.
Light Control
- Light Button: Turns the fan light on or off.
- Dimming: Press and hold the light button to dim or brighten the light. Release when the desired brightness is reached. Note: Dimming functionality requires incandescent bulbs. LED or CFL bulbs may not dim properly.
- LIGHT DELAY Button: Activates a delay feature for the light to turn off after a set period.
- LIGHT TIMER Button: Sets a timer for the light to remain on for a specific duration.
Thermostatic Features
- The remote displays both the SET TEMP (desired temperature) and ROOM TEMP (current room temperature).
- Use the TEMP/SET HOUR up/down arrow buttons to adjust the desired set temperature.
- In FAN AUTO mode, the fan will adjust its speed to help maintain the set temperature.
Compatibility
The Anderic RR7096TR is designed to replace original Hampton Bay and Harbor Breeze ceiling fan remotes with specific FCC IDs and model numbers. It replaces remotes such as CHQ8BF7096T, CHQ8BT7096T, CHQ7096T, and UC7096T that include a "Reverse" button.
Compatible with (but not limited to) the following Hampton Bay ceiling fan models:
- 523 127 Windward II 54 in Ceiling Fan
- 523 342 Windward II 54 in Ceiling Fan
- 523127 Windward II 54 in Ceiling Fan
- 523342 Windward II 54 in Ceiling Fan
- 54WWD
- 55295 Windward II 54 in Ceiling Fan
- 7658GM01
- CHQ8BT7096T
- TRC100L
- Windward II 54 in Ceiling Fan

Image: The Anderic RR7096TR remote control displayed alongside a list of compatible Hampton Bay ceiling fan models, emphasizing its broad compatibility.
Important Compatibility Notes:
- This remote does not work with up lights. If your original remote controls both down lights and up lights, this replacement will only control the down lights.
- This remote does NOT replace FAN-9T models. Always check the model number on the back of your original remote.
- If your original Hampton Bay remote model CHQ8BT7096T has a RED light button, this replacement remote will not control the lights.
Troubleshooting
| Problem | Possible Cause | Solution |
|---|---|---|
| Remote not controlling fan/light. | Incorrect dip switch settings. | Verify that the dip switches on the remote and receiver match exactly. Refer to "Setting the Dip Switches" section. |
| Remote not controlling fan/light. | Dead or incorrectly installed batteries. | Replace batteries with fresh 4 AAA batteries, ensuring correct polarity. |
| Light not dimming properly. | Non-incandescent bulbs (LED/CFL). | Ensure incandescent bulbs are used for proper dimming functionality. |
| Remote not working for Windward III Fans. | Known compatibility limitation. | This remote will not fully work for Windward III Fans, especially if they have up lights. |
| Remote not controlling lights for CHQ8BT7096T with RED light button. | Specific compatibility limitation. | This remote is not compatible with the light function of CHQ8BT7096T remotes that have a red light button. |
Specifications
- Model: RR7096TR
- Brand: Anderic
- Power Source: 4 x AAA Batteries (not included)
- Product Dimensions: 7 x 3 x 1.25 inches
- Item Weight: 3.2 ounces
- Special Feature: Ergonomic design, Thermostatic control
- Color: Ivory
- Max Number of Supported Devices: 1 (Ceiling Fan)

Image: The Anderic RR7096TR remote control with overlaid measurements indicating its approximate dimensions (e.g., 6 inches in length, 2 inches in width, 1 inch in depth), illustrating its compact and comfortable size.
Warranty and Support
The Anderic RR7096TR remote control comes with a 1-Year Replacement Warranty.
For technical support, warranty claims, or further assistance, please contact Anderic customer service through their official website or the retailer where the product was purchased.
You can visit the Anderic Store on Amazon for more information.


