1. Introduction
This manual provides essential information for the safe and effective use of your Telwin Maxima 160 Synergic Inverter Welding Machine. The Maxima 160 is a microprocessor-controlled inverter wire welding machine designed for MIG-MAG, FLUX, and BRAZING processes. Its versatility allows for welding various materials including steel, stainless steel, and aluminum, making it suitable for a wide range of applications from maintenance to installation.
The synergic adjustment feature simplifies parameter setting, ensuring excellent welding results even for less experienced operators. The machine operates on a 230V - 16A power supply and offers a maximum output of 150A.

Image 1.1: Front view of the Telwin Maxima 160 Synergic Inverter Welding Machine with torch and ground clamp.
2. Safety Information
Always prioritize safety when operating welding equipment. Failure to follow safety guidelines can result in serious injury or death.
- Electric Shock: Welding current can cause fatal electric shock. Ensure proper grounding, inspect cables for damage, and never operate in wet conditions.
- Fumes and Gases: Welding produces fumes and gases that can be hazardous to health. Work in a well-ventilated area or use local exhaust ventilation.
- Arc Rays: Arc rays can burn eyes and skin. Always use an approved welding helmet with appropriate shade filter and wear protective clothing, including gloves.
- Fire and Explosion: Welding sparks and hot metal can cause fires. Keep flammable materials away from the welding area. Have a fire extinguisher readily available.
- Burns: Hot metal and sparks can cause severe burns. Wear protective gloves and clothing.
Consult local safety regulations and standards for comprehensive safety practices.
3. Setup
3.1 Unpacking and Inspection
Carefully remove the welding machine and all accessories from its packaging. Inspect all components for any signs of shipping damage. If any damage is found, contact your supplier immediately.
3.2 Power Connection
Connect the machine to a suitable 230V, 16A single-phase power supply. Ensure the power outlet is properly grounded and capable of handling the machine's electrical requirements. The machine is compatible with generator use (230V +/- 15%).
3.3 Ground Clamp and Torch Connection
Connect the ground clamp to the workpiece, ensuring a clean, secure electrical contact. The machine comes complete with a TW160 MIG-MAG torch with a direct connection. Securely attach the torch to the designated port on the machine.

Image 3.1: Side view of the Telwin Maxima 160 showing torch and ground clamp connections.
3.4 Wire Spool Installation
The Maxima 160 supports wire spools of 100mm and 200mm diameter. To install the wire spool:
- Open the side panel of the machine to access the wire feed compartment.
- Place the wire spool onto the spool holder.
- Thread the welding wire through the wire feed mechanism, ensuring it passes through the drive rollers and into the torch liner.
- Adjust the tension of the wire spool. It is crucial that the nut pressing the spring is not overtightened, as this can impede smooth wire feeding and cause issues during welding. Adjust it to allow the spool to rotate freely but without excessive slack.
- Close the side panel.

Image 3.2: Internal view showing the wire spool and feed mechanism.
3.5 Gas Connection (for MIG-MAG with Gas)
The machine is ready for NO GAS (Flux) welding out of the box. For MIG-MAG welding with gas, an optional kit is required. If using gas:
- Connect the gas cylinder to a suitable pressure regulator.
- Connect the gas hose from the regulator to the gas inlet on the rear of the welding machine.
- Ensure all connections are secure and leak-free.
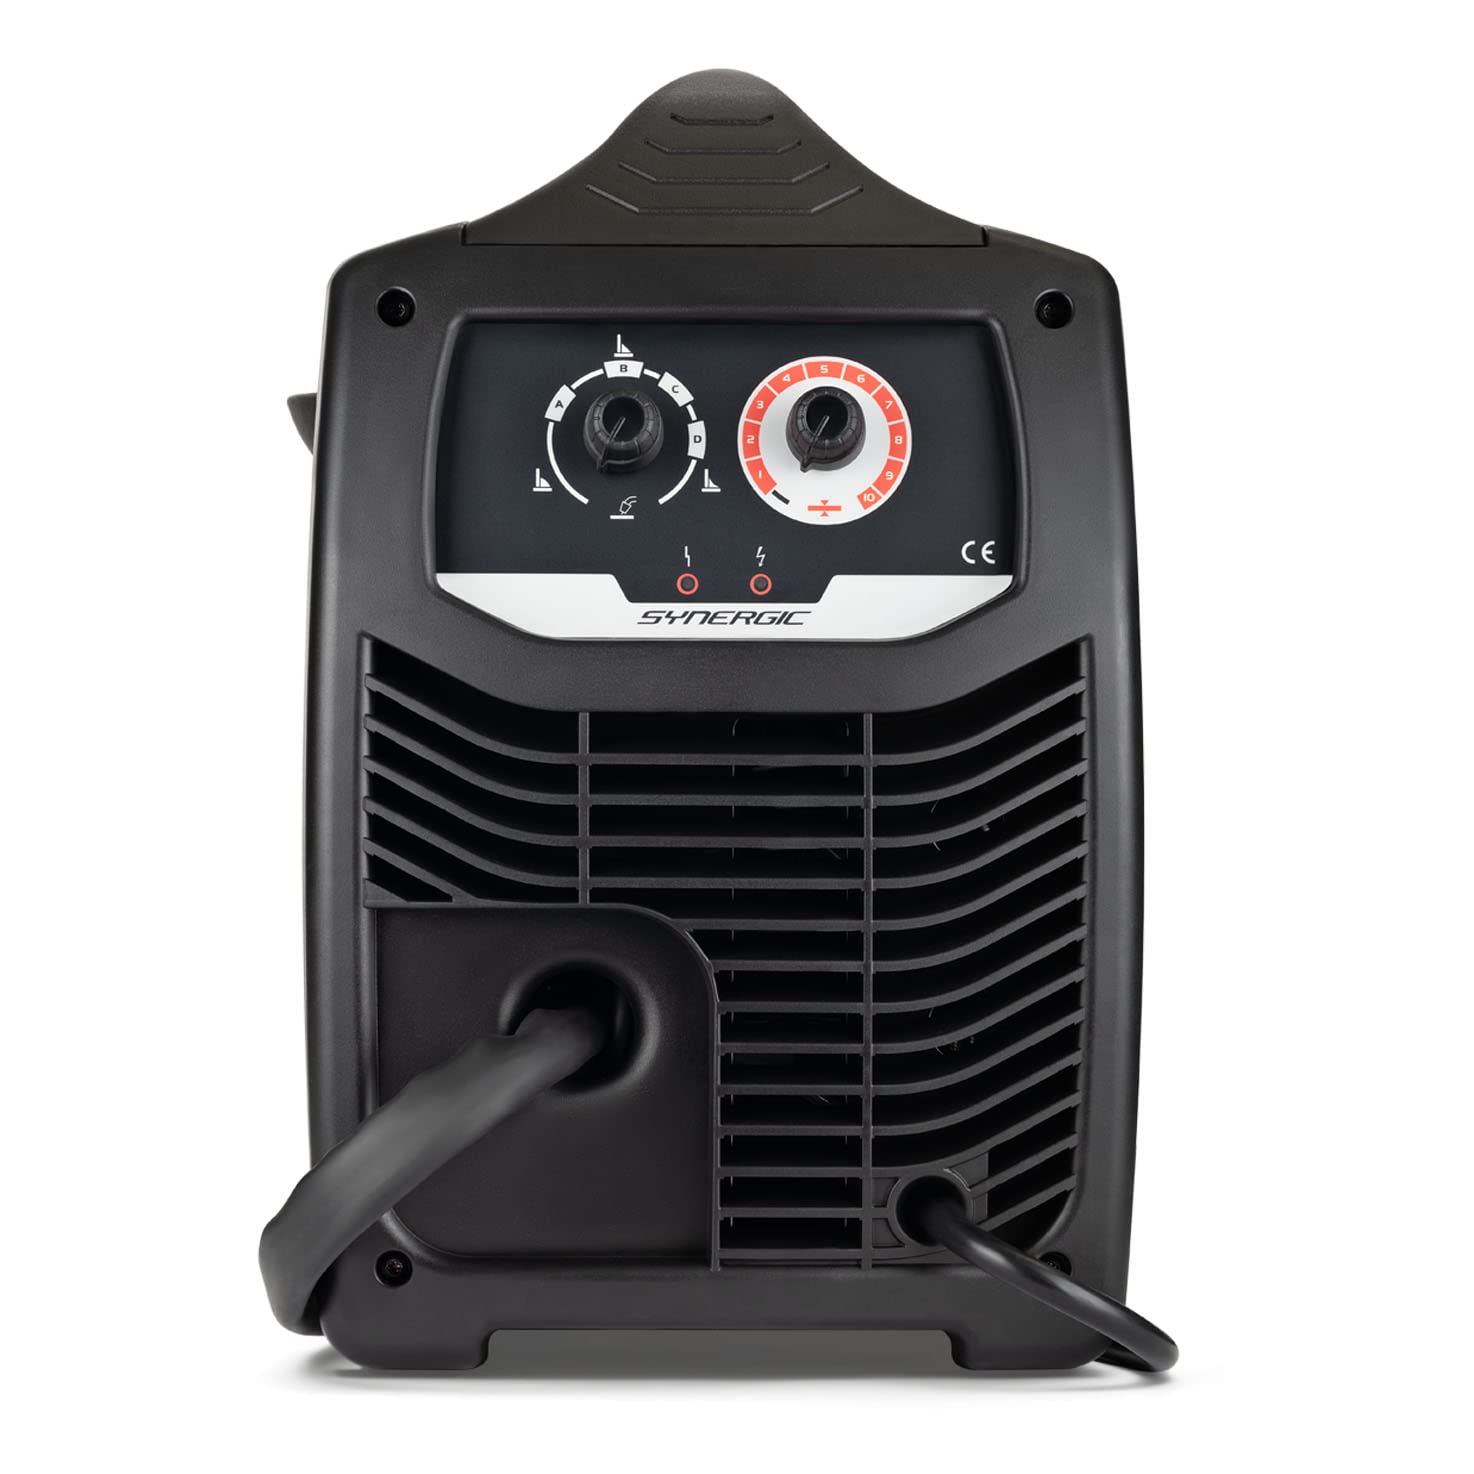
Image 3.3: Rear view of the Telwin Maxima 160, indicating power input and gas connection point.
4. Operation
4.1 Control Panel Overview
The control panel features intuitive synergic adjustments. There are typically two main rotary controls:
- One control for selecting the cord shape (arc characteristics).
- Another control for setting the material thickness.
Indicator lights typically show power status and potential overload conditions.

Image 4.1: Close-up of the Telwin Maxima 160 control panel.
4.2 Synergic Adjustment
The synergic system simplifies welding parameter setup. To begin welding:
- Turn on the machine.
- Select the appropriate material type (steel, stainless steel, aluminum) and its thickness using the dedicated controls.
- The machine will automatically adjust the optimal wire speed and voltage for the selected parameters. Fine-tuning can be done if necessary.
The electronic inverter control ensures a stable welding arc, contributing to consistent and high-quality welds.
4.3 Welding Processes
- MIG-MAG (with Gas): Requires an optional gas kit and appropriate shielding gas for welding.
- FLUX (No Gas): Uses flux-cored wire, eliminating the need for external shielding gas. The machine is ready for this process out of the box.
- BRAZING: A joining process using a filler metal that melts at a lower temperature than the base metals.
5. Maintenance
Regular maintenance ensures the longevity and optimal performance of your welding machine.
- Cleaning: Periodically clean the exterior of the machine with a dry cloth. Ensure ventilation openings are free from dust and debris.
- Torch and Cables: Inspect the welding torch, ground clamp, and all cables for wear, cuts, or damage. Replace damaged components immediately.
- Wire Feed Mechanism: Regularly check the wire feed rollers and liner for accumulated dust or metal particles. Clean as necessary to ensure smooth wire feeding.
- Storage: Store the machine in a dry, dust-free environment when not in use.
6. Troubleshooting
This section addresses common issues you might encounter during operation.
- No Power:
- Check if the machine is properly plugged into a live power outlet.
- Verify the power switch on the machine is in the 'ON' position.
- Check the circuit breaker or fuse in your electrical panel.
- No Arc / Poor Arc:
- Ensure the ground clamp has a clean and secure connection to the workpiece.
- Check the contact tip for blockages or wear; replace if necessary.
- Verify that the welding wire is feeding correctly.
- If using gas, check gas flow and ensure the gas cylinder is not empty.
- Irregular Wire Feed:
- Wire Spool Tension: Ensure the wire spool tension nut is not overtightened. It should allow the spool to turn smoothly without excessive resistance.
- Wire Liner: Inspect the torch liner for kinks, blockages, or excessive wear. A damaged liner can cause inconsistent feeding.
- Drive Rollers: Check the drive roller tension and ensure the correct groove size is selected for your wire diameter. Clean any debris from the rollers.
- Wire Quality: Ensure the welding wire is not rusty or tangled on the spool.
- Overload Protection Activated:
- If the overload indicator lights up, the machine has overheated. Allow it to cool down.
- Reduce the welding current or duty cycle to prevent frequent overheating.
7. Specifications
| Feature | Specification |
|---|---|
| Model Number | 816085 |
| Dimensions (L x W x H) | 52 x 25 x 40 cm |
| Weight | 9.3 kg |
| Power Supply | 230V - 16A |
| Output Current | Up to 150A |
| Welding Processes | MIG-MAG, FLUX, BRAZING |
| Wire Spool Diameter | 100mm and 200mm |
| Protections | Thermostatic, Overvoltage, Undervoltage, Overcurrent |
| Generator Compatibility | Yes (230V +/- 15%) |
| Country of Origin | Italy |
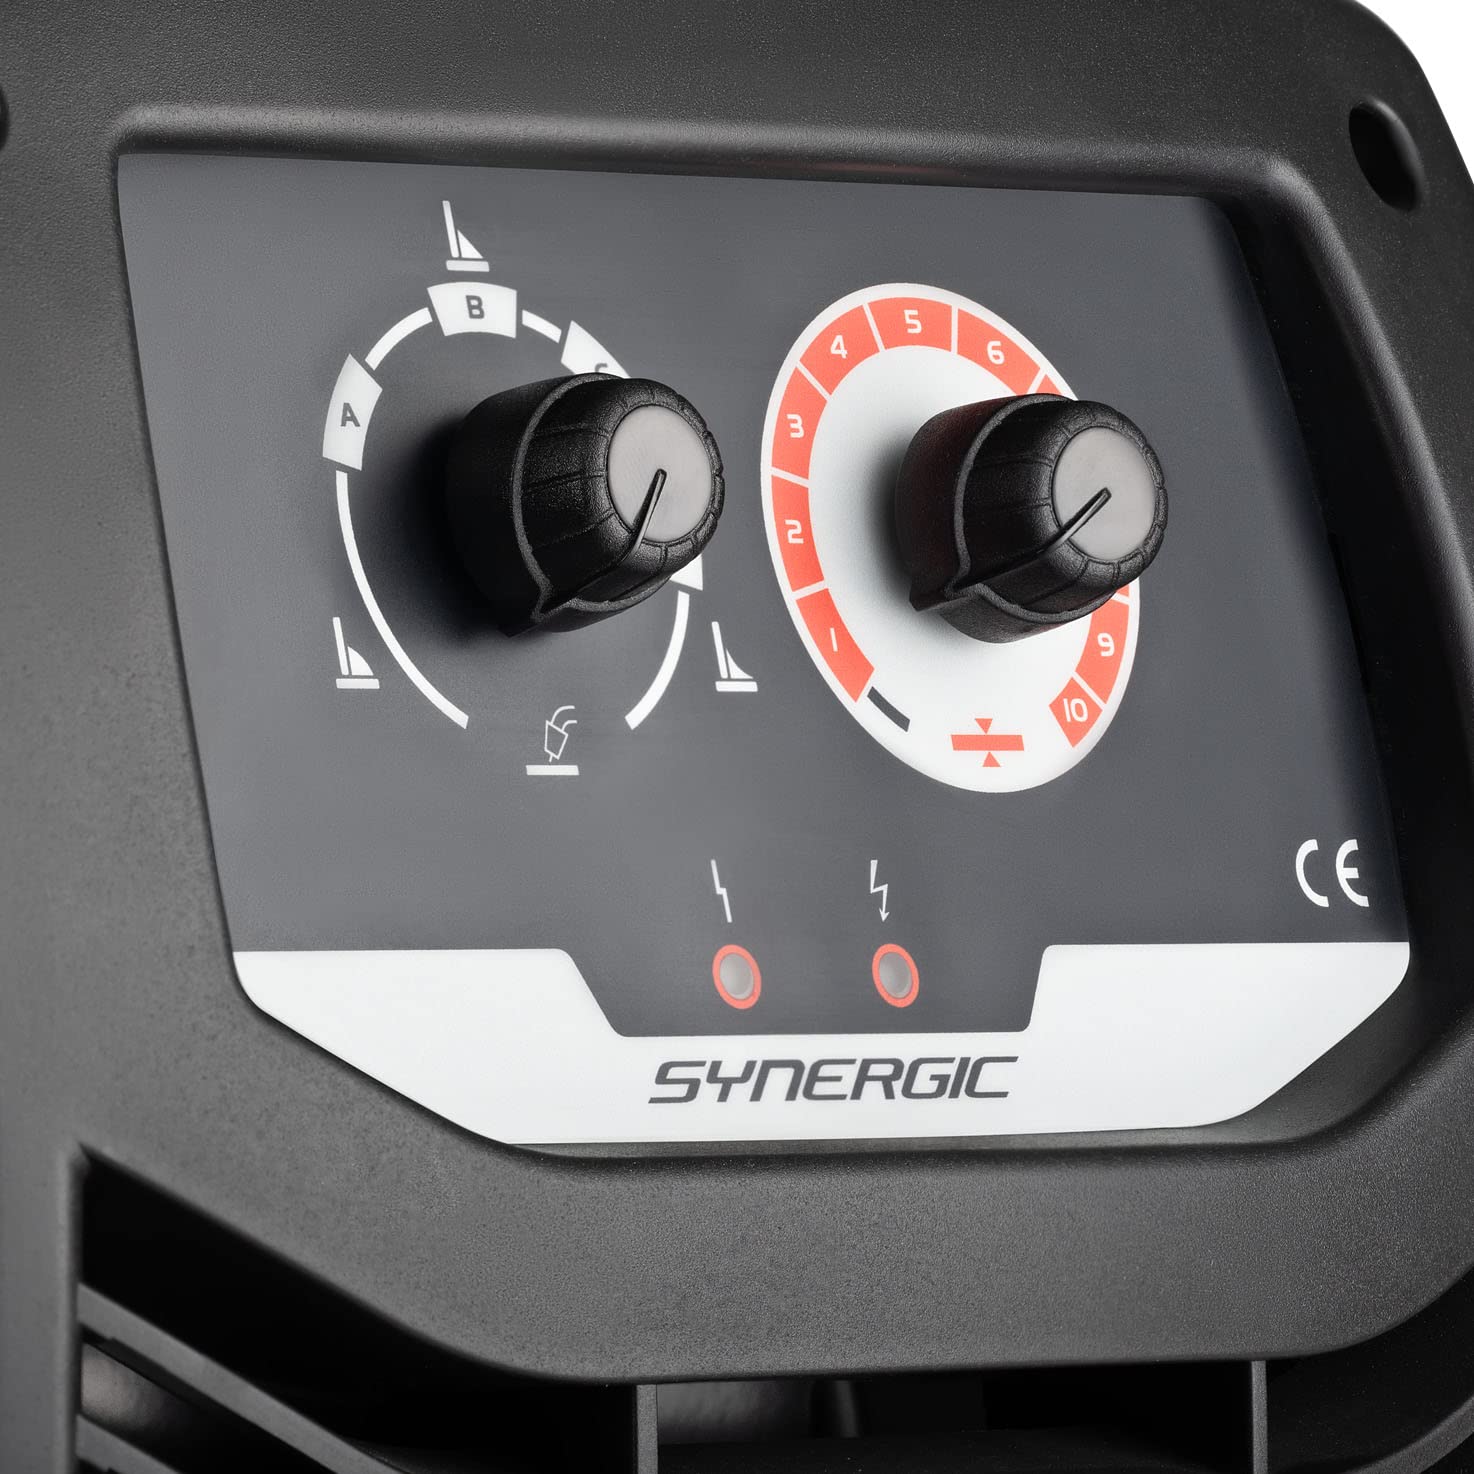
Image 7.1: Rear panel of the Telwin Maxima 160 displaying technical specifications.
8. Warranty and Support
For warranty information, please refer to the documentation provided at the time of purchase or contact your retailer. For technical support, spare parts, or service, please contact Telwin customer service or an authorized service center. Contact details can typically be found on the manufacturer's website or in your product packaging.


