1. Introduction
Thank you for choosing the WEYMIC F7 Professional Mixer. This 7-channel, 2-bus mixer with a built-in USB audio interface is designed for a wide range of audio applications, including recording, DJ performances, stage events, and karaoke. Its compact design and versatile features make it an ideal tool for both beginners and experienced audio enthusiasts. This manual provides detailed instructions for setup, operation, and maintenance to ensure optimal performance and longevity of your device.
2. Safety Information
Please read and understand all safety instructions before operating this device. Retain this manual for future reference.
- Power Supply: Use only the specified power adapter. Ensure the voltage matches your local power supply.
- Water and Moisture: Do not expose the unit to rain, moisture, or any liquids. Do not place objects filled with liquids on the unit.
- Ventilation: Ensure adequate ventilation. Do not block ventilation openings.
- Heat: Keep the unit away from heat sources such as radiators, heat registers, stoves, or other heat-producing appliances.
- Cleaning: Clean only with a dry cloth. Disconnect power before cleaning.
- Servicing: Do not attempt to service this unit yourself. Refer all servicing to qualified service personnel.
- Phantom Power: When using condenser microphones, ensure 48V phantom power is activated only when necessary and after connecting the microphone.
3. Product Overview
The WEYMIC F7 mixer is a compact yet powerful audio mixing console. It features multiple input channels, comprehensive equalization, built-in effects, and a USB audio interface for seamless integration with computers and other devices.

Image 1: Top view of the WEYMIC F7 Professional Mixer, showing all controls and input/output jacks.
Key Features:
- 7-channel mixer with high headroom design.
- 5 microphone/line inputs with studio-level audio quality and inserts.
- Built-in 48V Phantom Power for condenser microphones.
- Integrated USB Audio Interface for recording and playback.
- Bluetooth wireless connectivity for audio streaming.
- 3-band EQ (High, Mid, Low) on each channel for precise tone shaping.
- Auxiliary and Effect sends for external processing or monitoring.
- Built-in digital effects (DSP) for enhanced sound.
- Ultra-thin and durable body design.

Image 2: Visual representation of key features including Bluetooth, USB, 3-band EQ, DSP, Damping Fader, 48V Phantom Power, Real-time Monitoring, and Smart Chip.
4. Controls and Connections
This section details the various controls and connection points on your WEYMIC F7 mixer.
4.1 Input Channels (Channels 1-5)

Image 3: Detailed view of input channels 1 and 2, highlighting Microphone Input, Instrument Interface, Line Interface, Gain Adjustment, Pan Adjustment, High/Mid/Low EQ, and Volume Fader Adjustment.
- MIC INPUT (XLR): Balanced input for microphones.
- LINE INPUT (1/4" TRS/TS): Balanced/unbalanced input for line-level signals (keyboards, drum machines, etc.).
- INSERT (1/4" TRS): Send/return point for connecting external effects processors to individual channels.
- GAIN: Adjusts the input sensitivity for the channel. Use to set the signal level before it reaches the mixer's internal processing.
- HIGH, MID, LOW (EQ): 3-band equalizer to adjust the treble, midrange, and bass frequencies of the channel's signal.
- AUX: Sends a portion of the channel's signal to the AUX SEND output, typically used for monitor mixes or external effects.
- EFF: Sends a portion of the channel's signal to the internal effects processor or EFF SEND output.
- PAN: Adjusts the stereo position of the channel's signal (left to right).
- VOLUME FADER: Controls the output level of the channel to the main mix.
- PEAK LED: Illuminates when the channel's signal is too high, indicating potential clipping. Adjust GAIN to prevent this.
4.2 Stereo Input Channel (Channels 6/7 / USB)
This channel typically handles stereo line-level inputs or the USB/Bluetooth audio stream.
- LINE IN (1/4" TS): Stereo inputs for line-level devices.
- USB/MP3 Controls: Play/Pause, Skip Tracks, Mode selection for USB/Bluetooth playback.
- GAIN, EQ, AUX, EFF, PAN, VOLUME FADER, PEAK LED: Similar controls as channels 1-5, but for the stereo input.
4.3 Master Section and Outputs

Image 4: Detailed view of the master section, highlighting Monitor Headphone Jack, Left and Right Channel Main Output, Effects Output, Auxiliary Output, Stereo Output, Phantom Power Switch, Delay Time, Effects Feedback Level Adjustment, Monitor Volume Adjustment, USB Socket, Auxiliary Output Volume Adjustment, and Effect Output Volume Adjustment.
- MAIN OUTPUT (RCA): Stereo output for connecting to an amplifier, powered speakers, or recording device.
- PHONE (1/4" TRS): Headphone output for monitoring the main mix.
- AUX SEND (1/4" TS): Output for the auxiliary mix, typically sent to stage monitors or external effects.
- EFF SEND (1/4" TS): Output for the effects mix, typically sent to external effects processors.
- POWER (+48V) Switch: Activates phantom power for condenser microphones connected to XLR inputs.
- LEVEL METERS: LED indicators showing the overall output level of the main mix. Aim for levels in the green/yellow range, avoiding red (clipping).
- DELAY/REP (Effects Controls): Adjusts the parameters of the built-in digital effects.
- MAIN VOLUME FADER: Controls the overall output level of the main mix.
- PHONE VOLUME: Adjusts the volume of the headphone output.
- AUX VOLUME: Controls the overall level of the AUX SEND output.
- EFF VOLUME: Controls the overall level of the EFF SEND output.
- USB Socket: Connects the mixer to a computer for audio interface functions or for USB drive playback.
4.4 Rear Panel Connections
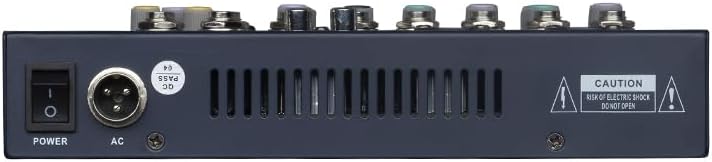
Image 5: Rear panel of the WEYMIC F7 Mixer, showing the Power switch and AC power input.
- POWER Switch: Turns the mixer on or off.
- AC Input: Connects the power adapter to the mixer.
5. Setup
Follow these steps for initial setup of your WEYMIC F7 mixer.
- Unpacking: Carefully remove the mixer and all accessories from the packaging. Inspect for any damage.
- Power Connection: Ensure the mixer's POWER switch is in the OFF position. Connect the provided power adapter to the AC input on the rear panel of the mixer, then plug the adapter into a suitable power outlet.
- Connecting Output Devices: Connect the MAIN OUTPUT (RCA) of the mixer to your amplifier, powered speakers, or recording interface using appropriate cables.
- Connecting Input Devices:
- Microphones: Connect dynamic microphones to the XLR MIC INPUTs. For condenser microphones, connect them first, then activate the +48V PHANTOM POWER switch.
- Instruments/Line Devices: Connect instruments (e.g., keyboards, guitars with a DI box) or line-level devices to the 1/4" LINE INPUTs.
- Headphones: Connect your headphones to the PHONE (1/4" TRS) jack for monitoring.
- USB Connection (Optional): To use the mixer as an audio interface with a computer, connect a USB cable from the mixer's USB socket to an available USB port on your computer.
- Power On: Once all connections are made, turn on your amplifier/powered speakers first, then turn on the WEYMIC F7 mixer using its POWER switch.
6. Operating Instructions
This section covers the basic operation of your mixer for various audio tasks.
6.1 Basic Mixing
- Set Initial Levels: Before playing any audio, set all channel VOLUME FADERs and the MAIN VOLUME FADER to their lowest positions. Set all GAIN knobs to minimum and EQ knobs to the center (flat) position.
- Connect Sources: Plug in your microphones and instruments as described in the Setup section.
- Adjust Input Gain: For each active channel, gradually increase the GAIN knob while the source is playing (e.g., speaking into the microphone, playing an instrument). Watch the PEAK LED; it should flash only occasionally on the loudest peaks. If it stays lit, reduce the GAIN.
- Set Channel Volume: Slowly raise the channel's VOLUME FADER to bring the sound into the mix.
- Adjust Main Volume: Gradually increase the MAIN VOLUME FADER until the desired overall listening level is achieved. Monitor the main LEVEL METERS, keeping them in the green/yellow range.
- Use EQ: Adjust the HIGH, MID, and LOW EQ knobs on each channel to shape the tone of the individual sound source.
- Pan: Use the PAN knob to position the sound source in the stereo field.
6.2 Using Built-in Effects

Image 6: Graphic illustrating the built-in multiple reverb effects and DSP chip for realistic sound calculation.
The WEYMIC F7 includes built-in digital effects (DSP) to enhance your sound.
- Send to Effects: On the desired channel, increase the EFF knob to send a portion of that channel's signal to the internal effects processor.
- Adjust Effect Parameters: Use the DELAY and REP (Repeat) knobs in the master section to adjust the characteristics of the chosen effect (e.g., delay time, feedback).
- Control Effect Return: The overall level of the returned effect is controlled by the EFF VOLUME knob in the master section.
6.3 Bluetooth Playback

Image 7: The WEYMIC F7 Mixer shown with a smartphone, illustrating built-in Bluetooth for wireless playback and stable transmission.
- Activate Bluetooth: Press the MODE button in the USB/MP3 section until 'BT' or 'Bluetooth' is displayed. The mixer will enter pairing mode.
- Pair Device: On your smartphone or Bluetooth-enabled device, search for available Bluetooth devices and select 'WEYMIC Mixer' (or similar).
- Play Audio: Once paired, play audio from your device. The sound will be routed through the stereo input channel (6/7 / USB).
- Control Playback: Use the Play/Pause and Skip Track buttons on the mixer, or control playback directly from your paired device.
6.4 USB Playback and Recording
The mixer supports playback from USB flash drives and functions as a USB audio interface for computers.
- USB Flash Drive Playback: Insert a USB flash drive containing MP3 files into the USB socket. Press the MODE button to select USB mode. Use the Play/Pause and Skip Track buttons to control playback.
- USB Audio Interface (Computer):
- Connect the mixer to your computer via a USB cable. The computer should recognize the mixer as an audio device.
- For Playback: Select the mixer as your computer's audio output device. Audio from your computer will play through the stereo input channel (6/7 / USB).
- For Recording: Select the mixer as your computer's audio input device in your Digital Audio Workstation (DAW) software. The main mix of the mixer will be sent to the computer for recording. Note: Some users have reported that the USB functionality is primarily for playback. Ensure your DAW settings are correctly configured for input if experiencing issues with recording.
7. Maintenance
Proper maintenance ensures the longevity and optimal performance of your mixer.
- Cleaning: Use a soft, dry cloth to clean the exterior of the mixer. Do not use abrasive cleaners, solvents, or waxes.
- Storage: When not in use, store the mixer in a clean, dry environment, away from extreme temperatures and direct sunlight.
- Faders and Knobs: Avoid excessive force when operating faders and knobs. Periodically check for smooth operation.
- Cables: Always use high-quality cables and ensure they are properly connected and disconnected to prevent damage to the jacks.
8. Troubleshooting
If you encounter issues with your mixer, refer to the following common problems and solutions.
- No Sound Output:
- Check if the mixer is powered on and connected to an active power outlet.
- Ensure all channel VOLUME FADERs and the MAIN VOLUME FADER are raised.
- Verify that your amplifier/powered speakers are on and their volume is up.
- Check all cable connections (inputs and outputs).
- Ensure the GAIN knob for the active channel is sufficiently turned up.
- Distorted Sound:
- Reduce the GAIN knob for the input channel if the PEAK LED is constantly lit.
- Lower the channel VOLUME FADER or MAIN VOLUME FADER if the main LEVEL METERS are consistently in the red.
- Check for damaged cables or faulty input devices.
- Hum or Noise:
- Ensure all cables are properly shielded and connected.
- Check for ground loops by trying different power outlets or using a ground loop isolator.
- Keep audio cables away from power cables.
- Phantom Power Not Working:
- Ensure the +48V PHANTOM POWER switch is engaged.
- Verify that your condenser microphone requires 48V phantom power.
- Check the XLR cable for damage.
- USB/Bluetooth Playback Issues:
- Ensure the correct MODE (USB or BT) is selected.
- For Bluetooth, ensure the device is paired and within range.
- For USB, ensure the flash drive is formatted correctly (FAT32) and contains compatible audio files (MP3).
- Check the volume level of the stereo input channel (6/7 / USB).
9. Specifications
Technical specifications for the WEYMIC F7 Professional Mixer.
| Feature | Specification |
|---|---|
| Brand | WEYMIC |
| Model Number | F7 |
| Number of Channels | 7 |
| Hardware Interface | USB |
| Connectivity Technology | USB, Bluetooth |
| Power Source | Corded Electric |
| Voltage | 220 Volts |
| Product Dimensions (WxHxD) | 13.4" x 1.96" x 7.68" (340mm x 50mm x 240mm) |
| Item Weight | 4.10 lbs (1.86 kg) |
| Phantom Power | Yes, 48V |
| Built-in Effects | DSP (Digital Signal Processor) with Reverb/Delay |
10. Warranty and Support
WEYMIC products are designed for reliability and performance. For warranty information, please refer to the documentation provided at the time of purchase or contact your retailer. For technical support or service inquiries, please contact WEYMIC customer service through their official channels.