
PIX-LINK 4334969589
PIX-LINK AC1200 WiFi Range Extender User Manual
Model: 4334969589
Brand: PIX-LINK
1. Product Overview
The PIX-LINK AC1200 WiFi Range Extender is a versatile networking device designed to expand and strengthen your wireless signal, eliminating dead zones in your home or office. It supports dual-band WiFi (2.4GHz and 5GHz) with speeds up to 1200Mbps, ensuring fast and stable connections for HD video streaming, online gaming, and other bandwidth-intensive tasks.
This device functions as a Repeater, Wireless Access Point (AP), and Router, offering flexible solutions for various networking needs. Its four external antennas enhance signal coverage and stability. The design incorporates a detachable plug for convenience and an airflow design for efficient heat dissipation, contributing to a longer lifespan.
Key Features:
- Incredible Coverage and Speed: Dual-band 2.4GHz / 5GHz WiFi with speeds up to 1200Mbps, extending wireless signal and eliminating dead zones.
- Broad Compatibility: Ethernet port allows connection of wired devices like Xbox, PC, or Mac, supporting multiple simultaneous HD streaming and online gaming.
- Safe Encryption: WPS function for easy wireless encryption setup, ensuring network security.
- Multi-Function: Supports Router, Client, Repeater, AP, and WISP operation modes to meet diverse demands.
- Better Stability: Heat dissipation design on both sides ensures quick cooling, improving lifespan and WiFi stability.

Figure 1.1: Front and side view of the PIX-LINK AC1200 Extender, highlighting its four external antennas, LED indicators (Power, WPS, WAN, LAN, WiFi), WPS button, Reset button, Power Off/On switch, Ethernet ports, and air flow design.
2. Setup Guide
The PIX-LINK AC1200 WiFi Range Extender is designed for easy installation with its plug-and-play functionality. Follow these steps to set up your device.
2.1 Initial Placement and Power On
- Choose a suitable location: Select a location between your router and the area with weak Wi-Fi signal. Ensure it is within the range of your existing Wi-Fi network.
- Attach the detachable plug: If not already attached, connect the appropriate power plug to the extender.
- Plug in the extender: Insert the extender into a standard electrical outlet. The Power LED should illuminate.
- Power On: Ensure the Power Off/On switch (refer to Figure 1.1) is in the 'On' position.
2.2 Connecting to the Extender (AP Mode Example)
This section provides an example of setting up the device in AP (Access Point) mode. Other modes follow similar configuration principles via the web interface.
- Cable Connection: Connect the LAN port of your existing router to the WAN port of the PIX-LINK extender using an Ethernet cable.
- Connect to Extender's Wi-Fi: On your computer or mobile device, search for available Wi-Fi networks. Select the extender's default SSID (e.g., "Wireless-AC" or "PIX-LINK_XXXX"). No password is required for the initial connection.
- Access Web Interface: Open a web browser and enter the default IP address "192.168.10.1" into the address bar. Press Enter.
- Login: Enter the default username and password (usually "admin" for both, or as indicated on the device label).
- Configuration Wizard: Follow the on-screen wizard to configure the extender. For AP mode, you will typically select "AP Mode" and then configure the new Wi-Fi network name (SSID) and password.
- Apply Settings: Save the settings. The extender will restart, and your new Wi-Fi network will be available.

Figure 2.1: Illustration of AP Mode setup, showing the physical connection between the router and the extender, and screenshots of the web configuration interface for selecting SSID and entering network details.
2.3 WPS (Wi-Fi Protected Setup) Configuration
For a quick and secure connection to your existing router, you can use the WPS function.
- Power on the extender: Ensure the extender is plugged in and powered on.
- Press WPS button on router: Within two minutes, press the WPS button on your main Wi-Fi router.
- Press WPS button on extender: Immediately after, press the WPS button on the PIX-LINK extender (refer to Figure 1.1). The WPS LED on the extender should blink, indicating a connection attempt.
- Connection established: Once connected, the WPS LED will become solid, and the extender will automatically adopt the network name and password of your main router.
3. Operating Modes and Functions
The PIX-LINK AC1200 offers multiple operating modes to suit various networking scenarios. You can switch between these modes via the web management interface.
3.1 Repeater Mode
In Repeater mode, the device extends the coverage of an existing wireless network. It receives the wireless signal from your main router and re-transmits it, effectively boosting the signal strength and range to areas with weak or no coverage.
- Ideal for extending Wi-Fi coverage in large homes or offices.
- Connects wirelessly to the main router.
3.2 Access Point (AP) Mode
In AP mode, the device transforms a wired network connection into a wireless one. It connects to your router via an Ethernet cable and broadcasts a new Wi-Fi signal, acting as a central hub for wireless devices.
- Useful for adding Wi-Fi capability to a wired-only network.
- Provides a new Wi-Fi network name (SSID).
3.3 Router Mode
In Router mode, the device acts as a primary router, creating a new private network. It connects to a modem via an Ethernet cable and provides internet access to all connected devices, both wired and wireless. This mode is suitable for small offices or homes without an existing router.
- Creates a new network with its own IP address range.
- Includes DHCP server functionality.
3.4 Client Mode
In Client mode, the device connects to an existing wireless network and provides internet access to a wired device (e.g., a smart TV, gaming console, or desktop PC) that does not have its own Wi-Fi capability. It acts as a wireless adapter for wired devices.
- Enables wired devices to connect to a wireless network.
- Connects to the extender via an Ethernet cable.
3.5 WISP Mode
WISP (Wireless Internet Service Provider) mode allows the device to connect wirelessly to an ISP's access point and share that internet connection with multiple devices, both wired and wireless, within your local network. It's often used in areas where wired internet access is not available.
- Connects wirelessly to an external WISP network.
- Provides internet access to local devices.
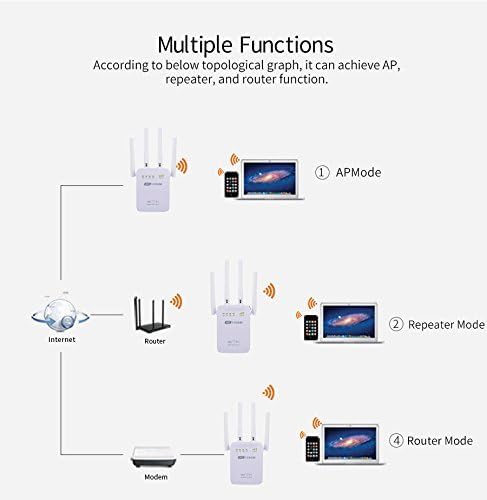
Figure 3.1: Visual representation of the different operational modes: AP Mode, Repeater Mode, and Router Mode, showing how the device integrates into various network setups.
4. Maintenance
Proper maintenance ensures the longevity and optimal performance of your PIX-LINK AC1200 WiFi Range Extender.
- Cleaning: Gently wipe the exterior of the device with a soft, dry cloth. Do not use liquid cleaners or aerosols.
- Ventilation: Ensure that the air vents on the device (refer to Figure 1.1 for "Air Flow Design") are not obstructed. Good airflow is crucial for heat dissipation and stable operation.
- Firmware Updates: Periodically check the manufacturer's official website for firmware updates. Updating the firmware can improve performance, add new features, and enhance security.
- Power Cycle: If you experience connectivity issues, try power cycling the device by unplugging it from the power outlet for 10-15 seconds and then plugging it back in.
- Reset to Factory Defaults: In case of persistent issues or if you forget your login credentials, you can perform a factory reset using the Reset button (refer to Figure 1.1). Note that this will erase all custom settings.
5. Troubleshooting
If you encounter issues with your PIX-LINK AC1200 WiFi Range Extender, refer to the following common troubleshooting steps.
5.1 No Power / LEDs Off
- Ensure the extender is securely plugged into a working electrical outlet.
- Check if the power switch on the side of the device is in the 'On' position.
- Try a different power outlet.
5.2 Cannot Access Web Management Page
- Verify that your device (computer/phone) is connected to the extender's Wi-Fi network or via an Ethernet cable.
- Ensure you are typing the correct IP address (e.g., "192.168.10.1") into your browser's address bar.
- Clear your browser's cache and cookies, or try a different browser.
- Temporarily disable any firewall or antivirus software on your computer.
- Perform a factory reset if you have forgotten the login credentials or if the device is unresponsive.
5.3 Weak or Unstable Signal After Setup
- Relocate the extender: Move the extender closer to your main router, ensuring it is still within the router's strong signal range.
- Avoid interference: Place the extender away from large metal objects, concrete walls, microwaves, cordless phones, and other devices that may cause interference.
- Adjust antennas: Orient the four external antennas for optimal signal reception and transmission.
- Check router settings: Ensure your main router's Wi-Fi channel is not congested. Try changing the channel on your router.
- Firmware update: Ensure the extender's firmware is up to date.
5.4 Internet Connectivity Issues
- Verify that your main router has a working internet connection.
- Ensure the extender is correctly configured for the chosen operating mode (Repeater, AP, Router, etc.).
- If in Repeater mode, ensure the extender is successfully connected to your main router's Wi-Fi network.
- If in Router mode, ensure the Ethernet cable from your modem is correctly connected to the WAN port.
- Perform a power cycle on both your modem/router and the extender.
6. Specifications
| Feature | Detail |
|---|---|
| Model Number | 4334969589 |
| Brand | PIX-LINK |
| Wireless Standard | 802.11a/b/g/n, 802.11ac |
| Data Transfer Rate | 1200 Mbps (300Mbps for 2.4GHz, 867Mbps for 5GHz) |
| Frequency Band | Dual-Band (2.4GHz & 5GHz) |
| Antennas | 4 External Antennas |
| Operating Modes | Router, Client, Repeater, AP, WISP |
| Special Features | Dual Band, Access Point Mode, LED Indicator, WPS Function, Detachable Plug |
| Item Weight | 249 Grams |
| Dimensions (Package) | 20.1 x 10.2 x 7.6 cm |
| Color | White |
7. Warranty and Support
For warranty information and technical support, please refer to the documentation included with your purchase or visit the official PIX-LINK website. Specific warranty terms may vary by region and retailer.
It is recommended to register your product on the manufacturer's website to receive updates and support notifications.
Related documents4334969589


Ask a question about this manual
Ask about setup, troubleshooting, compatibility, parts, safety, or missing instructions. Manuals+ will review the question and use this page’s manual context to help answer it.