Introduction
The MOOER PE100 is a compact, portable multi-effects processor designed for guitarists. It integrates a wide range of effects, amp models, a tuner, and a drum machine into a single unit, offering a versatile tool for practice and performance. This manual provides detailed instructions for setting up, operating, and maintaining your PE100 unit.
Setup
1. Unpacking and Initial Inspection
Carefully remove the PE100 from its packaging. Inspect the unit for any signs of damage. Ensure all components are present.
2. Powering the Device
The PE100 can be powered by either a DC 9V power adapter (not included) or two AAA batteries.
- DC 9V Adapter: Connect a compatible DC 9V, 300mA (center negative) power adapter to the DC IN jack on the side of the unit.
- AAA Batteries: Open the battery compartment on the bottom of the unit and insert two AAA batteries, observing correct polarity. Note that battery life can be limited, especially with headphones and high volume.
Important: To conserve battery power, always disconnect the input cable when the unit is not in use, as the input jack acts as a power switch for battery operation.
3. Connecting Your Equipment
Refer to the image below for connection points.

Image: Side view of the MOOER PE100, illustrating the various input and output jacks including Guitar Input, Output, AUX IN, Phones, and DC 9V power input.
- Guitar Input: Connect your guitar to the 'INPUT' jack.
- Output: Connect the 'OUTPUT' jack to your amplifier, mixer, or audio interface.
- AUX IN: Connect an external audio player (e.g., smartphone, MP3 player) to the 'AUX IN' jack to play along with backing tracks.
- PHONES: Connect headphones to the 'PHONES' jack for silent practice.
Operating the PE100
1. Controls Overview
The PE100 features a clear LCD display, two rotary knobs (MODE and VALUE), and several touch-sensitive buttons for navigation and effect control.
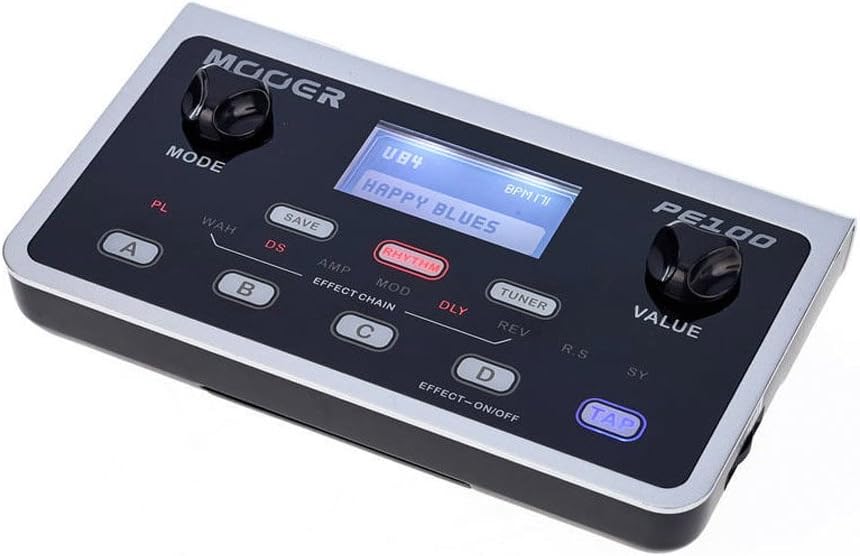
Image: Front view of the MOOER PE100, highlighting the MODE and VALUE control knobs, the central LCD display, and the touch-sensitive buttons for preset selection (A, B, C, D), saving, rhythm, tuner, and tap tempo.
- MODE Knob: Used to navigate through different menus and effect categories.
- VALUE Knob: Used to adjust parameters and values within selected menus.
- A, B, C, D Buttons: These are touch-sensitive buttons used to select presets or turn individual effects on/off within a preset.
- SAVE Button: Used to store your customized presets.
- RHYTHM Button: Activates the drum machine.
- TUNER Button: Activates the built-in tuner.
- TAP Button: Used for tap tempo functions, primarily for delay and rhythm.
2. Display Information
The LCD display provides visual feedback on the current preset, effect parameters, and other settings.

Image: Close-up view of the MOOER PE100's LCD screen, displaying a preset name such as 'U84 HAPPY BLUES' and BPM information, indicating the unit's operational status.
3. Preset Selection and Editing
- Selecting Presets: Use the A, B, C, D buttons to quickly switch between four user-defined presets. Rotate the MODE knob to browse through the 99 available presets (factory and user).
- Editing Effects: Rotate the MODE knob to select an effect category (e.g., WAH, DS, AMP, MOD, DLY, REV). Once a category is selected, use the VALUE knob to adjust its parameters.
- Turning Effects On/Off: While an effect category is highlighted, press the D button (EFFECT-ON/OFF) to toggle that specific effect on or off within the current preset.
- Saving Presets: After adjusting parameters, press the SAVE button. Use the MODE knob to select a user preset slot (U01-U99) and the VALUE knob to confirm. Press SAVE again to store.
4. Tuner Function
Press the TUNER button to activate the built-in chromatic tuner. Play a single note on your guitar, and the display will show the note and indicate if it is sharp, flat, or in tune. Press the TUNER button again to exit.
5. Drum Machine and Metronome
Press the RHYTHM button to activate the drum machine. Use the MODE knob to select from over 40 drum patterns. The VALUE knob adjusts the tempo (BPM). Press the TAP button to set the tempo by tapping. Press RHYTHM again to stop.
Maintenance
1. Cleaning
Wipe the unit with a soft, dry cloth. Do not use liquid cleaners or solvents, as they may damage the finish or internal components.
2. Battery Replacement
When using batteries, replace them promptly when the low battery indicator appears or when the unit's performance degrades. Ensure correct polarity when inserting new AAA batteries.
3. Storage
If storing the unit for an extended period, remove the batteries to prevent leakage and potential damage.
Troubleshooting
- No Sound:
- Check all cable connections (guitar, output, power).
- Ensure the amplifier or headphones are turned on and volume is up.
- Verify the PE100 is powered on. If using batteries, ensure they are fresh and the input cable is connected.
- Check the master output volume on the PE100.
- Display Not Working / No Backlight:
- This can indicate a power issue. Try a different power source (adapter or fresh batteries).
- Perform a factory reset (refer to the official MOOER support for specific instructions if needed, as this is not detailed in the product description).
- Poor Sound Quality / Unwanted Noise:
- Ensure all cables are in good condition and properly shielded.
- Check for ground loops if using multiple powered devices.
- Adjust gain staging within the PE100's effects chain.
- Short Battery Life:
- The PE100 uses two AAA batteries, which have limited capacity. Consider using a DC 9V power adapter for extended use.
- Always disconnect the input cable when not in use to prevent battery drain.
Specifications
| Item Model Number | PE100 |
| Dimensions | 1.75 x 4.25 x 2.25 inches |
| Item Weight | 10.6 ounces (0.3 Kilograms) |
| Power Source | Battery Powered (2x AAA), Corded Electric (DC 9V) |
| Voltage | 9 Volts |
| Hardware Interface | USB |
| Signal Format | Analog |
| Amp Models | 7 |
| Overdrive/Distortion Effects | 10 |
| Auto Wah Effects | 2 |
| Modulation Effects | 11 |
| Delay Effects | 5 |
| Reverb Effects | 4 |
| Tuner | Yes |
| Drum Machine | Yes (40+ patterns) |
Warranty and Support
For warranty information, technical support, or service inquiries, please refer to the official MOOER website or contact your authorized MOOER dealer. Keep your purchase receipt as proof of purchase.


