1. Product Overview
This manual provides essential information for the installation, operation, and maintenance of your new FixRightPro Right Brake Lever Handle. Designed for durability and ease of use, this component is a direct replacement part for various ATV models.

Figure 1: Top-down view of the Right Brake Lever Handle. This image shows the overall shape and primary components of the lever, including the handle, pivot point, and mounting bracket.
2. Compatibility
The FixRightPro Right Brake Lever Handle is compatible with a wide range of ATVs and quads. It is designed to fit:
- 50cc, 70cc, 90cc, 110cc, 125cc, and 135cc ATV models.
- Most Chinese ATV brands, including but not limited to TaoTao, Buyang, Coolsport, NST, BMX, Kazuma, Sunl, ROKETA, and AIM-EX.
Note: Always verify compatibility with your specific ATV model and manufacturer specifications before installation.
3. Product Features
- Material: Constructed from durable aluminum for long-lasting performance.
- Color: Black finish.
- Hand Orientation: Specifically designed for the right-hand side.
- Installation: Engineered for easy installation, often requiring basic tools.
- Included Components: Comes with necessary installation hardware.

Figure 2: Side view of the Right Brake Lever Handle. This perspective highlights the lever's ergonomic curve and the mounting points for attachment to the handlebar.
4. Setup and Installation
Installation of the right brake lever handle typically involves removing the old lever and securing the new one. Professional installation is recommended if you are unfamiliar with ATV maintenance.
Required Tools (Not Included):
- Wrench set (metric, typically 10mm, 12mm, 13mm)
- Screwdriver set (Phillips and flathead)
- Pliers
- Brake fluid (if bleeding is required)
Installation Steps:
- Safety First: Ensure the ATV is turned off and stable. Disconnect the battery if necessary.
- Remove Old Lever: Carefully loosen and remove the bolts securing the old brake lever assembly to the handlebar. Disconnect the brake cable or hydraulic line.
- Prepare New Lever: Inspect the new FixRightPro lever and its included hardware.
- Mount New Lever: Position the new lever on the right handlebar. Secure it using the provided installation hardware. Ensure all bolts are tightened to the manufacturer's specifications (refer to your ATV's service manual for torque values).
- Connect Brake System: Reconnect the brake cable or hydraulic line to the new lever. Ensure a secure connection.
- Test Functionality: Before riding, thoroughly test the brake lever's operation. Ensure the brake engages smoothly and fully, and that there is no excessive play. If hydraulic, bleed the brake system as needed to remove air.
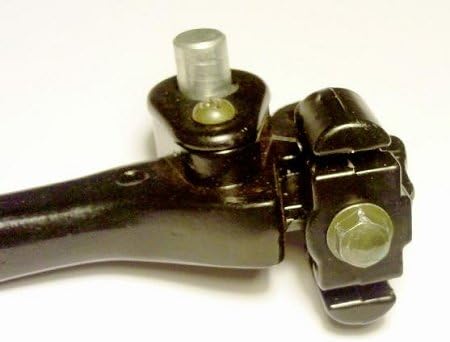
Figure 3: Close-up view of the brake lever's mounting point and pivot. This image details the bolt and pin mechanism used for securing the lever and its pivot action.
5. Operating the Brake Lever
The right brake lever controls the front brake system of your ATV. To operate:
- Engage Brake: Gently squeeze the lever towards the handlebar to activate the front brake. The harder you squeeze, the more braking force is applied.
- Release Brake: Release pressure on the lever to disengage the brake. The lever should return to its original position smoothly.
Always apply brakes smoothly and progressively to maintain control, especially during turns or on uneven terrain.
6. Maintenance
Regular maintenance ensures the longevity and safe operation of your brake lever.
- Inspection: Periodically inspect the lever for any signs of damage, bending, or excessive wear. Check for loose bolts or connections.
- Cleaning: Keep the lever and surrounding area clean from dirt, mud, and debris. Use a damp cloth and mild detergent if necessary.
- Lubrication: Apply a small amount of appropriate lubricant (e.g., silicone grease) to the pivot point of the lever annually or as needed to ensure smooth operation and prevent corrosion.
- Brake Fluid/Cable Check: If your ATV uses a hydraulic brake system, check the brake fluid level and condition regularly. For cable-actuated brakes, ensure the cable is free of frays and moves smoothly.
7. Troubleshooting
| Problem | Possible Cause | Solution |
|---|---|---|
| Brake lever feels spongy or soft. | Air in hydraulic line; low brake fluid. | Bleed the brake system; check and refill brake fluid. |
| Brake lever is stiff or sticky. | Lack of lubrication; dirt/debris in pivot. | Clean and lubricate the pivot point. |
| Brake not engaging fully. | Improper adjustment; worn brake pads/shoes. | Adjust brake cable tension or hydraulic system; inspect and replace brake pads/shoes. |
| Lever is loose after installation. | Mounting bolts not tightened sufficiently. | Tighten mounting bolts to specified torque. |
If issues persist after attempting these solutions, consult a qualified ATV mechanic.
8. Specifications
- Product Name: Right Brake Lever Handle
- Brand: FixRightPro
- Model Number: HNDL-0012-M
- Material: Aluminum
- Color: Black
- Hand Orientation: Right
- Compatibility: 50cc, 70cc, 90cc, 110cc, 125cc, 135cc ATVs and Chinese brands (TaoTao, Sunl, etc.)
- Included: Brake lever, installation hardware
9. Warranty and Support
For information regarding product warranty, returns, or technical support, please refer to the seller's policies or contact FixRightPro customer service directly. Keep your purchase receipt as proof of purchase.
For additional assistance, you may visit the product page on Amazon: https://www.amazon.com/dp/B06XCHL2YN


