1. Introduction and Overview
The Godox AD200 is a compact yet powerful 200Ws portable flash strobe designed for professional photographers. It features a built-in 2.4G wireless X system, offering TTL, Manual, and Multi flash modes. Its interchangeable flash heads provide versatile lighting options, making it suitable for various photography scenarios. The high-capacity lithium battery ensures extended shooting sessions with fast recycling times.

Figure 1: Godox AD200 Flash Strobe with included accessories.
2. Product Features
- Interchangeable Flash Heads: Easily switch between Speedlight-styled Fresnel Head (GN52, direct-focused beam) and Bare-Bulb Head (GN60, omni-directional beam) for diverse lighting effects.
- Built-in 2.4G Wireless Control: Control triggering power level and alert beep with an optional wireless transmitter, offering a working range of approximately 100m in an open area.
- Large Capacity Lithium Battery: The 14.4V 2900mAh battery provides up to 500 full power flashes with a rapid 0.01 to 2.1 second recycling time.
- Power Output: 200Ws of power adjustable in 8 steps from 1/128 to 1/1, with flash durations as short as 1/11,300 seconds.
- TTL Autoflash Compatibility: Features Master & Slave functions, allowing combination with Godox TTL camera flashes and outdoor flashes.
- Versatile Flash Modes: Supports Flash Exposure Compensation, 1/8000s High-Speed Sync (HSS), Manual mode (user-selected power, modeling light, first/second curtain sync), and Multi mode (stroboscopic rate up to 90 times).
3. Setup
3.1 Battery Installation
To install the battery, slide the battery pack into the designated slot on the flash body until it clicks securely into place. To remove, press the battery release button and slide the pack out.
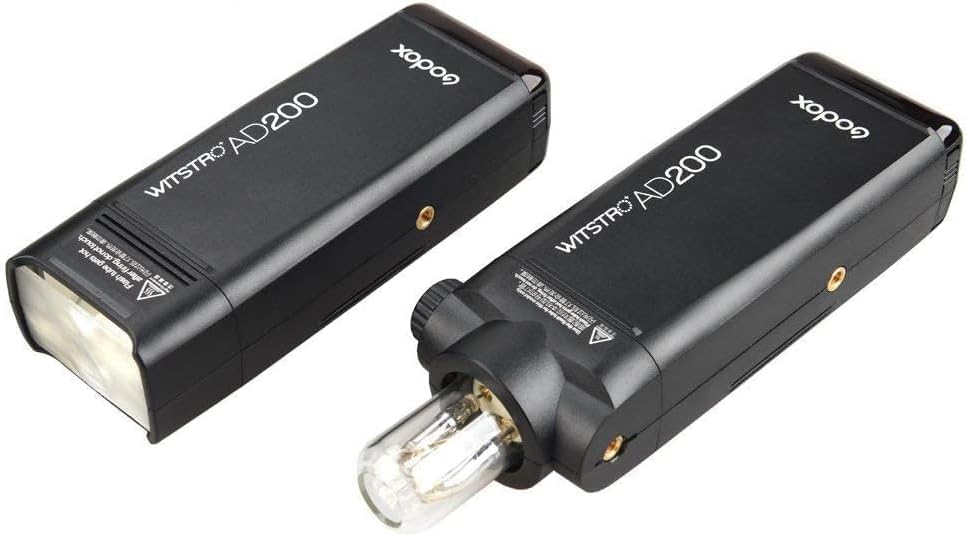
Figure 2: The 14.4V 2900mAh lithium battery pack and its dedicated charger.
3.2 Flash Head Attachment
The AD200 features interchangeable flash heads. Align the desired flash head (Fresnel or Bare-Bulb) with the port on the flash body and push it in until it locks. To remove, press the release button on the side of the flash body and pull the head out.

Figure 3: Godox AD200 body with detached Fresnel and Bare-Bulb flash heads.
3.3 Mounting the Flash
The AD200 includes multiple 1/4"-20 threaded mounting points on its body, allowing for flexible attachment to light stands, tripods, or other accessories. An included mounting bracket provides additional versatility for positioning and attaching modifiers.

Figure 4: Godox AD200 with the bare bulb flash head mounted on a bracket.
4. Operating Instructions
4.1 Power On/Off
To power on the AD200, slide the power switch located on the side of the unit to the 'ON' position. The LCD screen will illuminate. To power off, slide the switch to the 'OFF' position.
4.2 Mode Selection
Press the MODE button on the control panel to cycle through the available flash modes: TTL (Through-The-Lens), Manual (M), and Multi (Stroboscopic).
4.3 Power Adjustment
In Manual mode, rotate the select dial to adjust the flash power output from 1/128 to 1/1. Fine adjustments can be made in 1/3 stop increments.

Figure 5: The intuitive control panel and LCD screen for adjusting settings.
4.4 Wireless Control (Channels and Groups)
The AD200 integrates with the Godox 2.4G wireless X system. To set the channel (CH) and group (GR), press the GR/CH button and use the select dial. Ensure your wireless transmitter (e.g., Godox X2T, XPro) is set to the same channel and group as the AD200 for proper communication.
Video 1: Demonstration of Godox AD200Pro II flash strobe features, including wireless control. Note: Functionality is similar to AD200.
4.5 Modeling Light
The modeling light function is available with specific flash heads (e.g., Fresnel head). Press the dedicated modeling light button on the control panel to activate or deactivate it. The modeling light helps visualize the light spread before firing the flash.
5. Maintenance
5.1 Battery Charging
Use the provided charger to recharge the lithium battery pack. Connect the battery to the charger and plug the charger into a power outlet. The indicator lights on the charger will show the charging status. Ensure the battery is fully charged before important shoots.
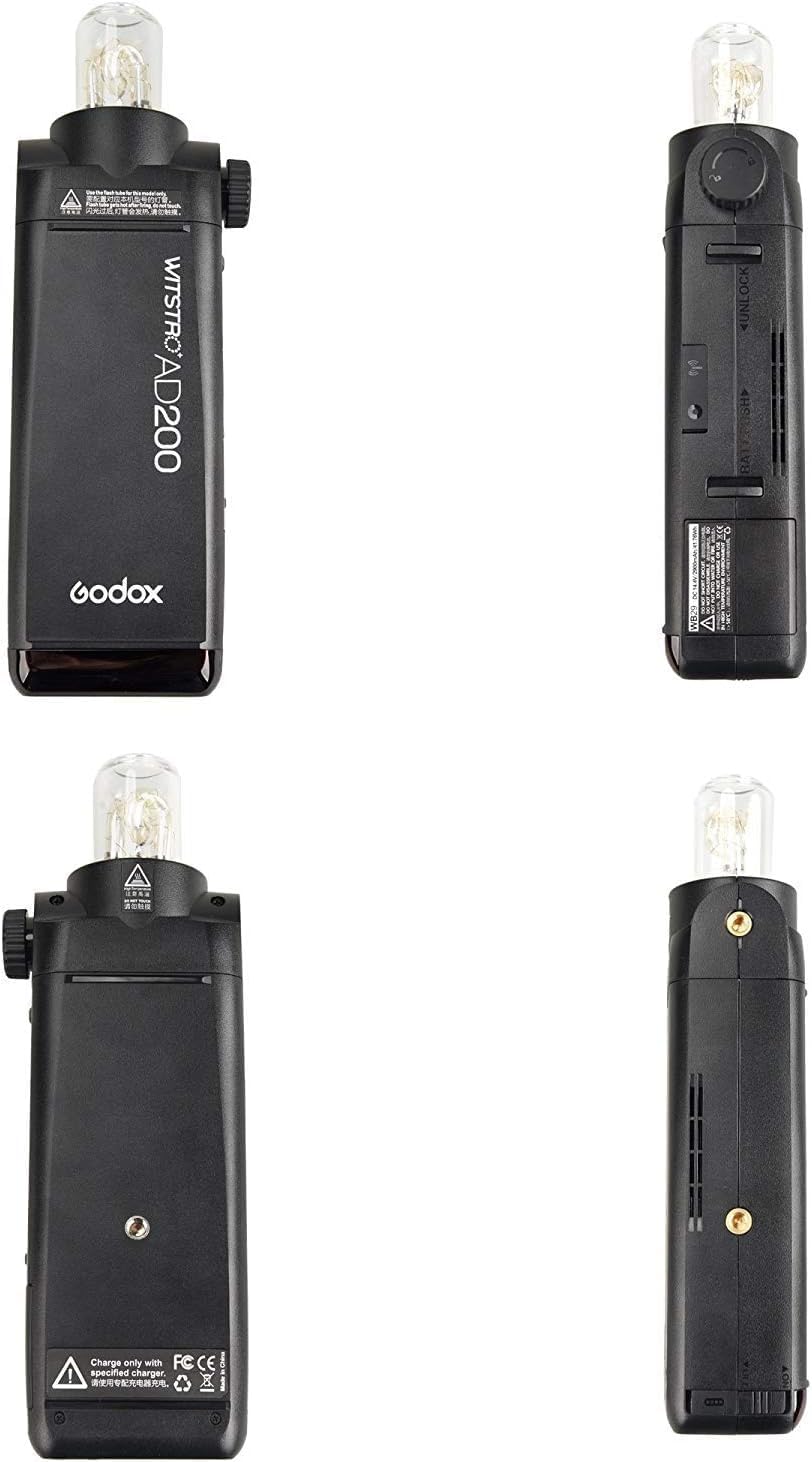
Figure 6: The battery charger with the lithium battery inserted, showing charging indicators.
5.2 Firmware Updates
The AD200 features a USB port for firmware updates. Periodically check the official Godox website for the latest firmware versions to ensure optimal performance and compatibility. Follow the instructions provided with the firmware update package carefully.
6. Troubleshooting
- Flash not firing: Check battery level, ensure flash head is securely attached, verify wireless channel/group settings match the transmitter, and confirm the camera's hot shoe connection.
- Overheating: Prolonged high-power use may cause overheating. Allow the unit to cool down. The flash has built-in thermal protection.
- Inconsistent exposure: Ensure TTL mode is appropriate for the scene or adjust manual power settings. Check for obstructions between the flash and subject.
- Wireless connection issues: Confirm both flash and transmitter are on the same channel and group. Check for interference from other 2.4G devices.
7. Specifications
| Feature | Value |
|---|---|
| Product Dimensions | 3.94 x 5.91 x 9.84 inches |
| Item Weight | 0.01 ounces |
| Item Model Number | AD200 200Ws 2.4G TTL Flash Strobe 1/8000 |
| Batteries | 1 A batteries required (14.4V 2900mAh Lithium) |
| Compatible Mountings | Fujifilm, Nikon, Olympus, Panasonic |
| Flash Sync Speed | 1/8000s |
| Included Components | Camera Kit (Flash body, 2 flash heads, battery, charger, cable, holder, carry bag) |
8. Warranty and Support
The Godox AD200 comes with a standard manufacturer's warranty. For detailed warranty information, product support, or service inquiries, please refer to the official GODOX website or contact your authorized dealer. Keep your proof of purchase for warranty claims.


