
1. Introduction
This manual provides essential information for the proper installation, operation, and maintenance of the ATL Y-Axis Stepper Motor Assembly, model ATL 6210510-01-ATL. This genuine ATL component is designed for precision motion control applications, typically found in computer numerical control (CNC) machines, 3D printers, and other automated systems requiring accurate positioning along the Y-axis.
Understanding the contents of this manual is crucial for ensuring the longevity and optimal performance of the stepper motor assembly.
2. Safety Information
Important Safety Notice: Installation and servicing of this ATL Y-Axis Stepper Motor Assembly should only be performed by experienced and qualified technicians. Improper installation or handling can lead to equipment damage, personal injury, or system malfunction.
- Always disconnect power to the system before installing, removing, or servicing the stepper motor.
- Ensure proper grounding to prevent electrical shock.
- Handle the motor with care to avoid dropping or impacting it, which can damage internal components.
- Verify correct wiring polarity and connections according to your system's specifications. Incorrect wiring can damage the motor or the control electronics.
- Avoid exposing the motor to excessive moisture, dust, or extreme temperatures.
3. Setup and Installation
The ATL Y-Axis Stepper Motor Assembly is designed for integration into existing motion control systems. Due to the specialized nature of this component, professional installation is highly recommended.
3.1 Pre-Installation Checklist
- Confirm the motor's specifications (voltage, current, steps per revolution) match your system's requirements.
- Ensure the mounting surface is clean, flat, and free of debris.
- Gather necessary tools: screwdrivers, wrenches, multimeter, wire strippers, crimping tool (if applicable).
- Verify the power supply is adequate for the motor's power consumption.
3.2 Installation Steps
- Mounting: Securely attach the stepper motor to the designated Y-axis mounting bracket using appropriate fasteners. Ensure the motor is aligned correctly with the mechanical drive system (e.g., lead screw, belt).
- Wiring: Connect the motor's wire harness to the stepper motor driver or control board. Refer to your system's wiring diagram for correct pin assignments. The multi-colored wires on the motor's harness correspond to specific coil phases.
- Power Connection: Connect the stepper motor driver to the system's power supply. Double-check all connections before applying power.
- Initial Test: After installation, perform a low-power test to verify motor movement and direction. Adjust driver settings as needed.
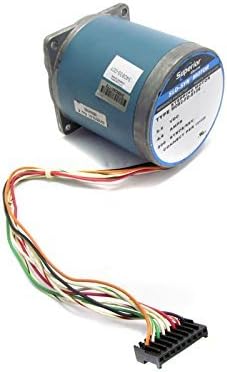
Figure 3.2.1: The ATL Y-Axis Stepper Motor Assembly. This image shows the blue cylindrical motor body with a multi-colored wire harness extending from one end, terminating in a black connector.
4. Operating Principles
The ATL Y-Axis Stepper Motor operates by converting digital pulses from a motor driver into precise mechanical rotational movements. Each pulse causes the motor to rotate a specific angular increment (step). By controlling the sequence and rate of these pulses, the motor's speed and position can be accurately controlled.
4.1 Stepper Motor Control
- Step Mode: Stepper motors can operate in full-step, half-step, or micro-step modes. Micro-stepping provides smoother motion and higher resolution by energizing coils with varying current levels.
- Driver Compatibility: Ensure your stepper motor driver is compatible with the motor's voltage and current ratings.
- Software Configuration: The motor's steps per unit (e.g., steps per millimeter) must be correctly configured in your control software (e.g., CNC firmware) to ensure accurate motion.
5. Maintenance
The ATL Y-Axis Stepper Motor Assembly is designed for durability and typically requires minimal maintenance. However, regular checks can help ensure its long-term performance.
- Cleaning: Periodically clean the exterior of the motor to remove dust and debris. Use a soft, dry cloth. Avoid using solvents or abrasive cleaners.
- Connections: Regularly inspect all electrical connections for tightness and signs of corrosion. Loose connections can lead to intermittent operation or damage.
- Temperature: Monitor the motor's operating temperature. Excessive heat can indicate an issue with the motor, driver, or power supply. Ensure adequate ventilation around the motor.
- Vibration: Check for unusual vibrations during operation, which could indicate loose mounting, worn bearings (less common for new motors), or an unbalanced load.
6. Troubleshooting
This section provides guidance for common issues encountered with stepper motors. Always ensure power is disconnected before inspecting or servicing components.
| Problem | Possible Cause | Solution |
|---|---|---|
| Motor does not move or hums |
|
|
| Motor moves erratically or loses steps |
|
|
| Motor overheats |
|
|
7. Specifications
The following are key specifications for the ATL Y-Axis Stepper Motor Assembly (Model: ATL 6210510-01-ATL).
| Attribute | Value |
|---|---|
| Model Number | ATL 6210510-01-ATL |
| ASIN | B01NCJSFNN |
| Manufacturer | ATL Co |
| Date First Available | December 8, 2016 |
| Type | Y-Axis Stepper Motor Assembly |
8. Warranty and Support
For specific warranty information regarding your ATL Y-Axis Stepper Motor Assembly, please refer to the documentation provided at the time of purchase or contact the original seller. Warranty terms can vary based on region and seller policies.
For technical support or inquiries not covered in this manual, please contact ATL Co directly or the authorized distributor from whom the product was purchased. When contacting support, please have your model number (ATL 6210510-01-ATL) and ASIN (B01NCJSFNN) readily available.