Introduction
This manual provides instructions for the setup, operation, and maintenance of your Sami LD-1105N Wireless Weather Station. This device features a touch screen with an LED backlight, displaying indoor and outdoor temperature, humidity, comfort levels, weather forecasts, time, date, and moon phases. Please read this manual thoroughly before use to ensure proper functionality and longevity of the product.
Safety Information
- Do not expose the main unit or remote sensor to extreme temperatures, direct sunlight, or excessive moisture.
- Avoid dropping the device or subjecting it to strong impacts.
- Do not attempt to disassemble or repair the unit yourself. Refer all servicing to qualified personnel.
- Dispose of used batteries responsibly according to local regulations.
- Keep the device out of reach of children.
Package Contents
The package typically includes:
- Sami LD-1105N Main Weather Station Unit
- Wireless Remote Sensor
- User Manual (this document)
Note: Batteries are not included and must be purchased separately.
Product Overview
Main Unit

Figure 1: Front view of the Sami LD-1105N Wireless Weather Station main unit. The large LCD screen displays various weather data and time. Control buttons are located at the bottom edge.
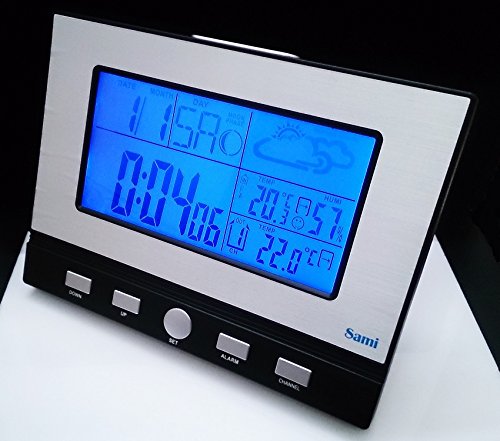
Figure 2: Angled view of the main unit, highlighting the sleek design and button layout. The touch screen allows for easy interaction.
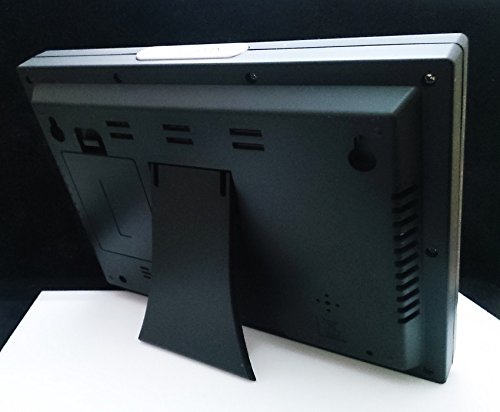
Figure 3: Rear view of the main unit, showing the battery compartment cover and the integrated kickstand for tabletop use. Wall mounting options are also visible.
The main unit features a large LCD display with a blue LED backlight. It shows:
- Current Time and Date
- Moon Phase
- Weather Forecast Icons
- Indoor Temperature and Humidity
- Outdoor Temperature (from remote sensor)
- Comfort Level Indicator
- Alarm Status
Buttons on the front include: DOWN, UP, SET, ALARM, and CHANNEL.
Wireless Remote Sensor

Figure 4: Front view of the wireless remote sensor. It has a small display showing its current channel and temperature.

Figure 5: Rear view of the wireless remote sensor, indicating the battery compartment and mounting options.
The remote sensor transmits outdoor temperature and humidity data wirelessly to the main unit. It features a small LCD display to show its current temperature and channel.
Setup
1. Battery Installation
- Main Unit: Open the battery compartment on the back of the main unit (refer to Figure 3). Insert the required batteries (e.g., 3 x AAA, not included) according to the polarity markings. Close the compartment.
- Remote Sensor: Open the battery compartment on the back of the remote sensor (refer to Figure 5). Insert the required batteries (e.g., 2 x AAA, not included) according to the polarity markings. Close the compartment.
Note: It is recommended to insert batteries into the remote sensor first, then the main unit, to ensure proper synchronization.
2. Sensor Synchronization
- After inserting batteries, the main unit will automatically search for the remote sensor. This process may take a few minutes.
- Ensure the remote sensor is within range (typically up to 30 meters in open air) and not obstructed by large metal objects or thick walls.
- If the outdoor temperature does not appear after a few minutes, press and hold the CHANNEL button on the main unit to initiate a manual search. You may also need to press the 'TX' button inside the remote sensor's battery compartment to force a signal transmission.
3. Initial Settings (Time, Date, Units)
- Press and hold the SET button for 3 seconds to enter time setting mode. The hour digit will flash.
- Use the UP or DOWN buttons to adjust the value.
- Press SET again to confirm and move to the next setting (e.g., minutes, 12/24 hour format, year, month, day, temperature unit °C/°F).
- Repeat steps 2 and 3 until all desired settings are configured.
- Press SET one last time to exit the setting mode.
Operating Instructions
Display Information
The LCD display provides a comprehensive overview:
- Time/Date: Displays current time, day, month, and date.
- Moon Phase: An icon indicates the current moon phase.
- Weather Forecast: Icons (e.g., sunny, cloudy, rainy) predict the weather for the next 12-24 hours. This is based on atmospheric pressure changes.
- Indoor Temperature/Humidity: Current readings inside the room where the main unit is placed.
- Outdoor Temperature: Current reading from the remote sensor.
- Comfort Level: An indicator (e.g., DRY, COMFORT, WET) based on indoor temperature and humidity.
Setting the Alarm
- Press the ALARM button once to display the alarm time.
- Press and hold the ALARM button for 3 seconds. The alarm hour will flash.
- Use UP or DOWN to adjust the hour. Press ALARM to confirm and move to minutes.
- Adjust minutes using UP or DOWN. Press ALARM to confirm and exit.
- To activate/deactivate the alarm, press the ALARM button repeatedly until the alarm icon appears/disappears on the display.
Temperature Unit Selection (°C/°F)
During normal display mode, briefly press the DOWN button to switch between Celsius (°C) and Fahrenheit (°F).
Backlight Operation
The touch screen features an LED backlight. Briefly touch the screen or press any button to activate the backlight for a few seconds.
Channel Selection (Multiple Sensors)
If you have multiple remote sensors (up to 3 supported), press the CHANNEL button to cycle through the sensor channels (CH1, CH2, CH3) or to display all channels in rotation.
Maintenance
- Cleaning: Wipe the main unit and remote sensor with a soft, damp cloth. Do not use abrasive cleaners or solvents.
- Battery Replacement: Replace batteries in both units when the low battery indicator appears on the display. Always replace all batteries at the same time.
- Placement:
- Place the main unit indoors, away from direct sunlight, heat sources, and vents.
- Position the remote sensor outdoors in a shaded, dry location, protected from direct rain and sunlight, to ensure accurate readings. Avoid placing it near metal objects that could interfere with the wireless signal.
Troubleshooting
| Problem | Possible Cause | Solution |
|---|---|---|
| No display on main unit. | Batteries are dead or incorrectly inserted. | Check battery polarity and replace with fresh batteries. |
| Outdoor temperature not displayed or flashing. | No signal from remote sensor; sensor out of range or batteries low. |
|
| Inaccurate temperature/humidity readings. | Sensor/unit exposed to direct sunlight, heat sources, or moisture. | Relocate the unit/sensor to a more appropriate, protected location. Allow time for readings to stabilize. |
| Weather forecast icon does not match actual weather. | Forecast is based on atmospheric pressure changes and is an estimation. | The forecast is a general indication for the next 12-24 hours and may not always be perfectly accurate for immediate conditions. |
Specifications
| Model Number | LD_1105N |
| Brand | Sami |
| Display Type | LCD with LED Backlight |
| Power Source (Main Unit) | Battery (e.g., 3 x AAA, not included) |
| Power Source (Remote Sensor) | Battery (e.g., 2 x AAA, not included) |
| Special Feature | Wireless connectivity for outdoor sensor |
| Wireless Frequency | 433 MHz (indicated on sensor) |
Warranty and Support
Specific warranty information and customer support contact details are not provided in the product data. Please refer to the packaging or the retailer's website for warranty terms and contact information for technical support.


