
1. Introduction
The PHOLSY P6 Timer Remote Control Cable with Intervalometer provides photographers with advanced exposure control for compatible Panasonic cameras. This device offers specialized functionality including self-timer, interval shooting, long exposure, and continuous shooting, allowing for precise control over photographic sequences.
This manual provides detailed instructions for the setup, operation, and maintenance of your PHOLSY P6 Timer Remote Control.
2. Package Contents
- 1 x PHOLSY P6 Timer Remote Control
- 1 x Instruction Manual (English)
- Note: AAA batteries are not included and must be purchased separately.
3. Key Features
- Multi-function Remote Control: Offers self-timer, interval timer, long exposure timer, and exposure count settings.
- Digital Timer Control: Set timer delays, exposure times, and intervals up to 99 hours, 59 minutes, 59 seconds in one-second increments.
- Exposure Count: Configure from 1 to 399 continuous shots or set for an unlimited number of photos.
- Shutter Release: Functions as a simple manual remote shutter release even without batteries.
- Reduced Vibration: Allows shutter release without direct contact with the camera body, minimizing camera shake for clearer images.
- LCD Display: Features a backlit LCD display for clear visibility of settings and status.
- Audible Feedback: Includes an electric sound speaker and status LED with alarm.
- Locking Shutter Button: A two-stage shutter button with a lock mechanism for bulb mode.
4. Compatibility
The PHOLSY P6 Timer Remote Control is compatible with a wide range of Panasonic cameras, including models that replace Panasonic DMW-RSL1 and DMW-RS2. Compatible models include:
- Panasonic S5, S5C, S5M2, S5M2X, S5M2N, S5M2XN, S5DN, S5DH, S1H, S1RM, S1R, S1M, S1K, S1
- Panasonic G95, G91, G91H, G91M, G90M, G90H, G90, FZ10002, G9, G9L, G9M, G9M2M, G9M2L, G9M2, GH5, GH5L, GH5S, GH5M, GH5M2, GH5M2L, GH5M2M, GH6, GH6L, GH6M
- Panasonic G85, G81M, G81H, G81, G80M, G80, G70H, G70M, G70KA, G70W, GX8M, GX8A, GX8H, GX8, GX7, GX1, GH4RH, GH4R, GH4, GH3, GH2, GH1, GF1, G10, G7H, G7K, G7M, G7, GH7, GH7L, GH7M, G6H, G6K, G6M, G6, G5, G3, G2, G1
- Panasonic FZ2500, FZ2000, FZ1000, FZ1000 II, FZ330, FZ300, FZ200, FZ150, FZ100, FZ50S, FZ50K, FZ50, FZ30K, FZ30, FZ20S, FZ20K, FZ20
- Leica DigiLux 2, DigiLux 3, V-Lux 4
5. Product Overview
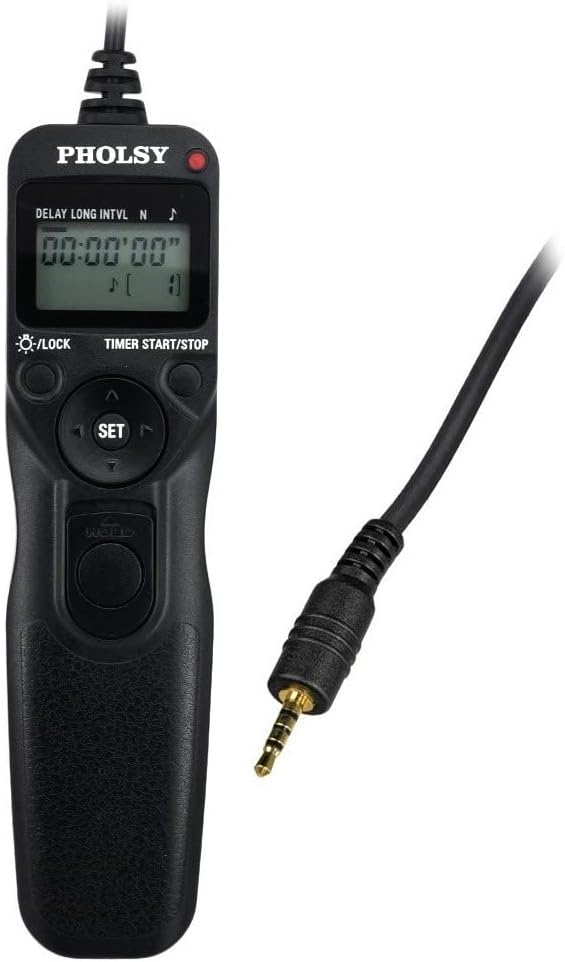


6. Setup
6.1. Battery Installation
The PHOLSY P6 requires 2 AAA batteries (not included). To install:
- Open the battery compartment cover on the back of the remote control.
- Insert two AAA batteries, ensuring correct polarity (+/-).
- Close the battery compartment cover securely.
6.2. Connecting to Camera
Connect the remote control to your camera using the provided cable:
- Locate the remote control terminal on your Panasonic camera.
- Plug one end of the connecting cable into the remote control terminal on your camera.
- Plug the other end of the connecting cable into the PHOLSY P6 remote control unit.
7. Operating Instructions
The PHOLSY P6 offers various shooting modes. Ensure your camera is set to the appropriate mode (e.g., Single Shot, Continuous, Bulb) before configuring the remote control.
7.1. Basic Shutter Release
The remote control can be used as a simple wired shutter release:
- Half-press: Press the shutter release button halfway down to activate autofocus.
- Full-press: Press the shutter release button fully down to trigger the shutter.
Note: The shutter release button can function even without batteries. The display panel will remain off, and no beep will sound in this mode.

7.2. Timer Functions (Intervalometer)
To access and configure timer functions, use the SET button and arrow buttons.

- Power On: Press the TIMER START/STOP button to turn on the remote.
- Navigate Modes: Use the left/right arrow buttons to cycle through the timer settings: DELAY (self-timer), LONG (long exposure), INTVL (interval), and N (number of shots).
- Adjust Settings:
- Press SET to enter the adjustment mode for the currently selected parameter. The digits will flash.
- Use the up/down arrow buttons to change the value.
- Use the left/right arrow buttons to move between hours, minutes, and seconds.
- Press SET again to confirm the value and exit adjustment mode.
- Start Timer: Once all desired settings are configured, press the TIMER START/STOP button to begin the timed sequence. The "TIMER ACTIVE" indicator will light up.
- Stop Timer: Press the TIMER START/STOP button again to stop the sequence.
7.2.1. DELAY (Self-Timer)
Sets the delay before the first shot is taken. Useful for self-portraits or group photos where you want to be in the frame.
- Set the desired delay time (e.g., 5 seconds).
- Press TIMER START/STOP. The remote will count down before triggering the camera.
7.2.2. LONG (Long Exposure)
Controls the duration of the shutter opening. This requires your camera to be set to Bulb mode.
- Set your camera to BULB mode.
- Set the desired exposure time on the remote (e.g., 30 seconds).
- Press TIMER START/STOP. The remote will hold the shutter open for the set duration.
7.2.3. INTVL (Interval Timer)
Sets the time between consecutive shots. Ideal for time-lapse photography.
- Set the desired interval time (e.g., 10 seconds).
- Combine with N (number of shots) for a complete time-lapse sequence.
7.2.4. N (Number of Shots)
Determines how many photos will be taken in a sequence. Can be set from 1 to 399, or to "--" for unlimited shots.
- Set the desired number of shots.
- For continuous shooting until manually stopped, set to "--".
These timer functions can be used individually or in combination to create complex shooting sequences.
8. Maintenance
- Keep the remote control dry. Do not expose it to water or high humidity.
- Clean the remote control with a soft, dry cloth. Avoid using harsh chemicals or abrasive cleaners.
- Remove batteries if the remote control will not be used for an extended period to prevent leakage.
- Store the remote control in a cool, dry place away from direct sunlight and extreme temperatures.
9. Troubleshooting
9.1. Remote Control Not Turning On
- Check if the batteries are correctly installed with the proper polarity.
- Replace the batteries with fresh AAA batteries.
9.2. Camera Not Responding to Remote
- Ensure the connecting cable is securely plugged into both the remote control and the camera's remote terminal.
- Verify that your camera is compatible with the PHOLSY P6 remote control.
- Check your camera's settings to ensure it is configured to accept remote shutter input.
- If using timer functions, ensure the remote is powered on and the timer sequence has been initiated.
9.3. Display Not Visible
- Press the illumination/lock button to activate the backlight.
- Check battery levels; a low battery can affect display visibility.
10. Specifications
- Dimensions: Approximately 155 x 40 x 18 mm (6.1 x 1.6 x 0.7 inches), excluding projections.
- Weight: Approximately 105 g (3.7 oz).
- Cord Length: Approximately 850 mm (33.5 inches).
- Power Source: 2 x AAA batteries (not included).
- Special Feature: Digital Display.
- Color: Black.
- Max Number of Supported Devices: 1.
11. Warranty and Support
For warranty information or technical support, please refer to the contact details provided with your purchase or visit the official PHOLSY website. Keep your proof of purchase for warranty claims.