Introduction
This user manual provides essential information for the safe and effective operation of your APA 16623 Digital Workshop Battery Charger. This microprocessor-controlled battery charger is designed for various types of lead-acid batteries, including AGM, Gel, Wet, and Maintenance-Free batteries, and aims to extend battery life. It features advanced automatic protection mechanisms against overheating, short circuits, and reverse polarity. The integrated multi-function indicator provides real-time feedback on charging progress and overall battery health. Please read this manual thoroughly before first use and keep it for future reference.
Safety Instructions
Always observe the following safety precautions to prevent injury or damage to the device:
- Read all instructions before using the charger.
- Do not expose the charger to rain or wet conditions.
- Use only in well-ventilated areas.
- Ensure the charger is disconnected from the power supply before making or breaking connections to the battery.
- Avoid sparks or flames near the battery during charging, as batteries can produce explosive gases.
- Wear eye protection and protective clothing when working with batteries.
- Keep out of reach of children.
- Do not charge frozen batteries.
- If the power cord is damaged, it must be replaced by the manufacturer, its service agent, or similarly qualified persons to avoid a hazard.
Product Overview
The APA 16623 charger features a robust design with intuitive controls and a clear digital display.

Figure 1: Front view of the APA 16623 Digital Workshop Battery Charger with its red and black housing and attached battery clamps.

Figure 2: Close-up view of the charger's control panel, showing the digital display, various indicator lights for charging status, battery type selection, and current settings.

Figure 3: Rear view of the charger demonstrating the integrated storage for the power cable and battery clamps, ensuring neat and compact storage.
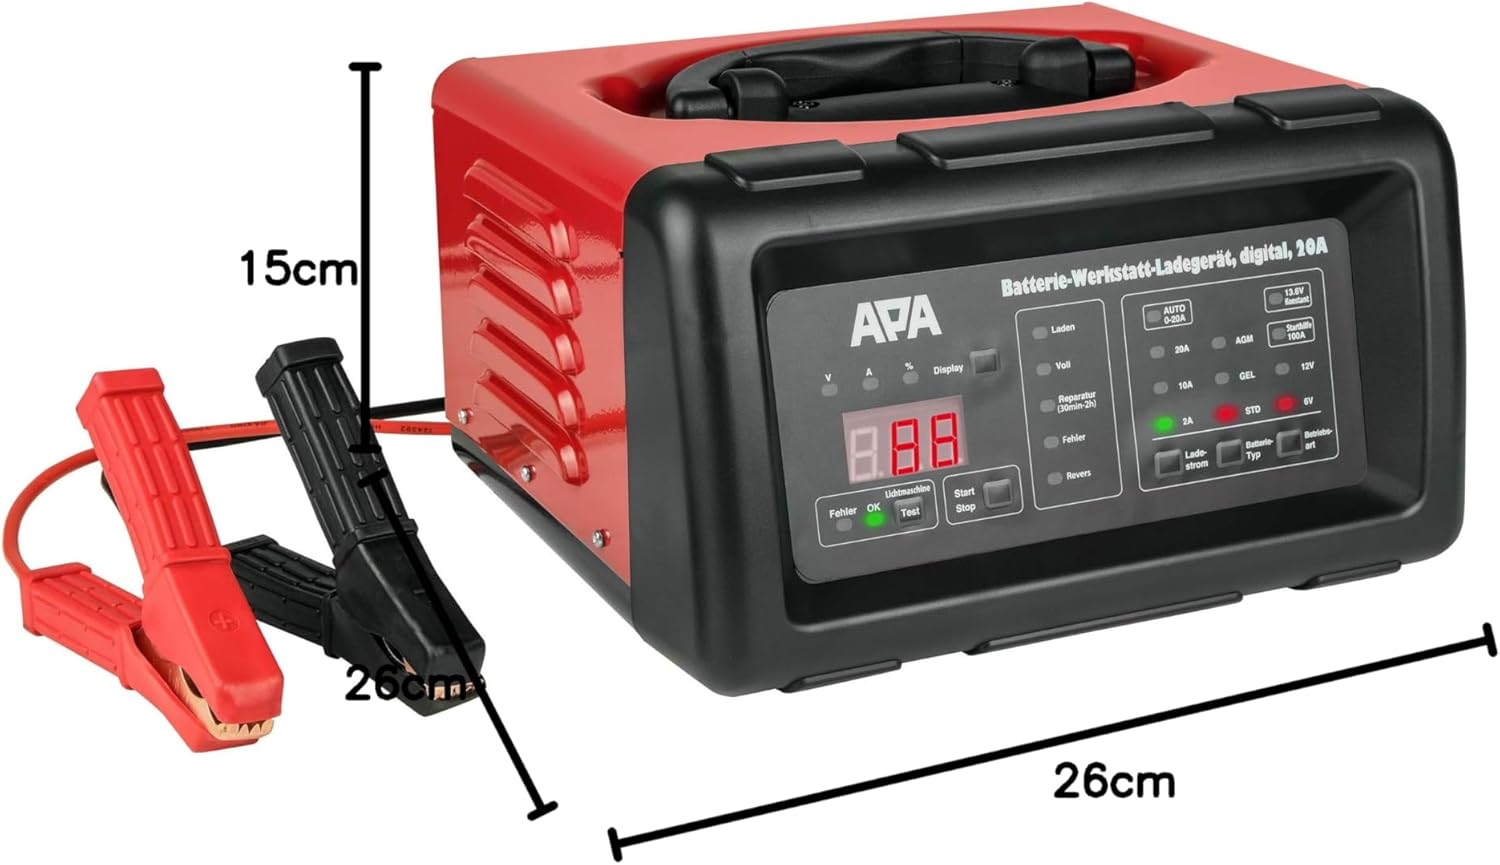
Figure 4: The battery charger shown with its approximate dimensions: 26 cm width, 26 cm depth, and 15 cm height, providing a clear idea of its compact size.
Setup
- Unpack: Carefully remove the charger and all accessories from the packaging.
- Inspect: Check the charger and cables for any signs of damage. Do not use if damaged.
- Placement: Place the charger on a stable, flat surface in a well-ventilated area, away from direct sunlight, heat sources, and moisture.
- Battery Preparation: Ensure the battery terminals are clean and free of corrosion. If necessary, clean them with a wire brush.
Operating Instructions
1. Connecting the Charger to the Battery
- Ensure the charger is unplugged from the AC power outlet.
- Connect the RED (+) positive clamp to the positive (+) battery terminal.
- Connect the BLACK (-) negative clamp to the negative (-) battery terminal. For vehicles, connect the black clamp to the vehicle chassis away from the battery and fuel line if the battery is still in the vehicle.
- Ensure connections are secure.
2. Connecting to Power and Selecting Mode
- Plug the charger's power cord into a standard 240V AC power outlet.
- The digital display will illuminate.
- Use the "Battery Type" button to select the appropriate battery type (AGM, GEL, STD) and voltage (6V or 12V). The charger automatically detects the voltage for 12V batteries.
- Use the "Charge Current" button to select the desired charging current (2A, 10A, or 20A). For most applications, the "AUTO 0-20A" mode is recommended, which automatically adjusts the current.
- Press the "Start/Stop" button to begin charging. The display will show charging progress and battery status.
3. Charging Process
The charger features a multi-stage charging process:
- Desulfation: If a deeply discharged or sulfated battery is detected, the charger may enter a desulfation phase (indicated by "Reparatur" on the display, lasting 30min-2h).
- Soft Start: Gradually increases current to protect the battery.
- Bulk Charge: Charges the battery at the maximum selected current until it reaches approximately 80% capacity.
- Absorption Charge: Charges at a decreasing current until the battery is fully charged.
- Float/Maintenance Charge: Once fully charged ("Voll" indicated), the charger switches to a maintenance mode, providing a small current to keep the battery at optimal charge.
4. Jump Start Function (100A)
The charger can provide a temporary boost for starting a vehicle with a discharged battery.
- Ensure the charger is connected to the battery and power as described above.
- Select the "Starthilfe 100A" (Jump Start 100A) mode.
- Attempt to start the vehicle. Do not crank for more than 5 seconds. Wait at least 1 minute between attempts.
- Once the vehicle starts, disconnect the charger from the AC outlet first, then disconnect the clamps from the battery/chassis.
5. Disconnecting the Charger
- Press the "Start/Stop" button to stop charging.
- Unplug the charger from the AC power outlet.
- Disconnect the BLACK (-) negative clamp from the battery/chassis.
- Disconnect the RED (+) positive clamp from the battery terminal.
Maintenance
- Cleaning: Clean the charger's exterior with a soft, dry cloth. Do not use abrasive cleaners or solvents.
- Cable Inspection: Regularly inspect the charging cables and clamps for any signs of damage, fraying, or corrosion. Replace if necessary.
- Storage: Store the charger in a cool, dry place when not in use. Utilize the integrated cable storage to keep cables tidy.
- Ventilation: Ensure the ventilation openings are clear of dust and debris to prevent overheating.
Troubleshooting
| Problem | Possible Cause | Solution |
|---|---|---|
| Charger does not turn on. | No power supply; faulty outlet; damaged power cord. | Check power connection; try a different outlet; inspect power cord for damage. |
| "Fehler" (Error) indicator lights up. | Reverse polarity connection; short circuit; battery fault. | Check clamp connections (red to +ve, black to -ve); inspect cables for shorts; test battery condition. |
| Battery not charging. | Incorrect mode selected; poor connection; deeply discharged battery. | Verify battery type and voltage selection; ensure clamps are securely connected; allow time for desulfation mode if applicable. |
| Charger overheats. | Poor ventilation; excessive load. | Ensure adequate ventilation around the charger; reduce charging current if possible. |
Specifications
| Feature | Specification |
|---|---|
| Brand | APA |
| Model | 16623 |
| Input Voltage | 240V AC |
| Output Voltage | 6V / 12V DC |
| Charging Current | 2A, 10A, 20A (Automatic 0-20A) |
| Jump Start Current | 100A |
| Battery Types | AGM, Gel, Wet, Maintenance-Free Lead-Acid Batteries |
| Charging Time | Approx. 2 hours (depending on battery size and discharge level) |
| Material | Plastic housing |
| Dimensions (L x W x H) | 26 cm x 26 cm x 15 cm (approx.) |
| Weight | 5783 Grams (approx. 5.78 kg) |
| Safety Compliance | UL (as per specification) |
Warranty and Support
For warranty information and technical support, please refer to the documentation provided with your purchase or contact APA customer service. Keep your proof of purchase for any warranty claims.
Manufacturer: EAL GmbH


